How to create a Website with Drupal
If you want to create your own website, you have three basic options: If you have the necessary know-how, you can program the website completely on your own and work with your choice of tools to complete this task. If your knowledge of HTML, CSS, and JavaScript is rather modest, a second option is website construction kits, which are much less flexible, but very beginner-friendly. The third option is to use a content management system such as Drupal, which is a kind of workaround solution: With ready-to-use modules, it offers you numerous functions that are easy to implement, but still leaves you plenty of scope for designing your web project.
In this Drupal guide, you will learn, among other things, what makes the CMS so special, what the prerequisites are for using the open source software, and how to create your first simple Drupal website.
- 99.9% uptime
- PHP 8.3 with JIT compiler
- SSL, DDoS protection, and backups
What is Drupal?
Behind the name Drupal is a freely licensed (under GNU General Public License) content management system, the first official version of which was released in 2001. Like many comparable systems, it is written in the PHP scripting language and has a modular structure: There are seven core modules and thousands of add-on modules. The former provide the basic functions and therefore the basis for every website you create with Drupal. The add-on modules, most of which were developed by members of the very active community, can be added as needed to extend the functionality of the CMS. Drupal supports relational database systems like MySQL, MariaDB, Percona Server, and PostgreSQL.
Drupal is characterized by high flexibility and dynamics, which makes it interesting for interactive web projects of different sizes. Thanks to a variety of social publishing features, the content management system is particularly suitable for web applications where social exchange and the joint creation of content are of prime importance. So if you’re planning to develop a community platform, a weblog, or a multi-editor publishing website, Drupal is an excellent choice.
Drupal: How to set up and install the CMS
To be able to use Drupal to create your website, you must first create the necessary software and hardware basis for installing and operating the web software. The first step on the way to your own Drupal website is therefore to find a server where you can install and host the CMS and all other necessary applications – such as the web server, the database, or an FTP client. If you run this server on your own, you also have to take care of its functionality yourself. It is therefore advisable to enlist the services of a hosting provider, especially if it’s your first time. These providers also usually offer various installation packages that make installing Drupal, the web server, etc. child's play.
With Drupal hosting, IONOS offers an exclusive hosting package which is completely tailored to the installation and use of the open source CMS. With this package, you not only get access to the necessary hardware resources, but you can also install Drupal including all other components in a few minutes directly from the App Center.
Since you need a suitable web address for your future web project, it’s important that you choose an address that is both meaningful and memorable. This is sometimes not so easy, since many popular domain addresses are already assigned. Tools like the IONOS Domain Check will help you to find your desired domain and check its availability.
What software is needed to use Drupal and how is it installed?
Drupal runs on any web server that supports PHP – although the developer recommends installing more current versions of PHP7 for newer versions of the CMS. The default choice is then the Apache web server, which is compatible with these versions of PHP7. As a database management system, the Drupal team recommends MySQL, MariaDB, or Percona Server. Of course, an operating system must also be installed on your server, whereby the mentioned components run under Linux as well as under Windows. If you want to use a proven software package that meets all the above requirements, simply install the so-called LAMP stack (for Linux) or the XAMPP stack (for Windows, Linux, macOS).
Installing Drupal
If you want to install Drupal manually because you have your own server or because the provider does not offer ready-made installation packages, then you first need the program files. The latest releases are available for download at any time on drupal.org. Transfer the downloaded files to the root directory in your web space using an FTP client such as FileZilla. Afterwards you can access your Drupal project by entering the domain address in your browser, whereupon you are automatically redirected to the “/core/install.php” installation page. Then follow the interactive installer’s instructions to set up Drupal.
A summary of the installation steps can be found in the official Drupal documentation.
Creating a Drupal website: Step-by-step tutorial
After successful installation, you can start creating your own Drupal website. Even though you don’t need any programming knowledge, working with a CMS like Drupal isn't that easy at first. Unlike website construction kits, you don’t have an assistant to guide you through the design process, which is why you are largely on your own when it comes to exploring the Drupal backend. To make it easier for you to get started, the following is a brief summary of the most important steps in terms of administration, page design, and content creation.
Logging into the Drupal backend
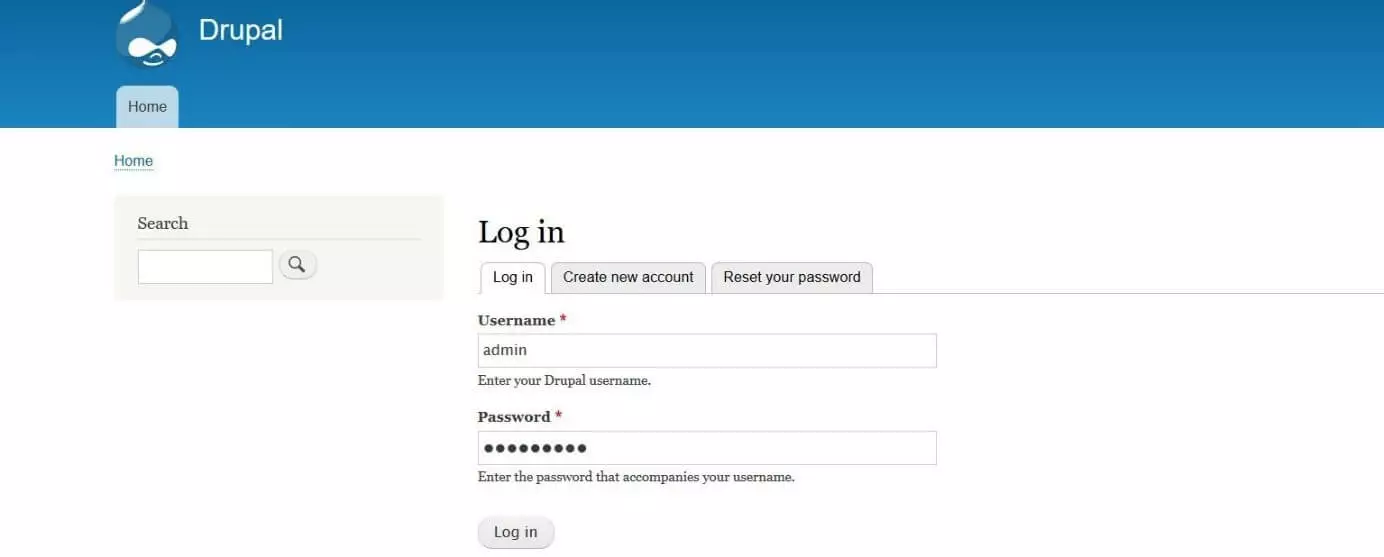
During the installation, you created an administrator account for Drupal, which you now need for logging into the backend for the first time. The login window is displayed by accessing the following address with the web browser of your choice – the example domain address “example.org” used here is, of course, used in the place of your project’s web address:
https://example.org/user/loginChange backend user language if desired
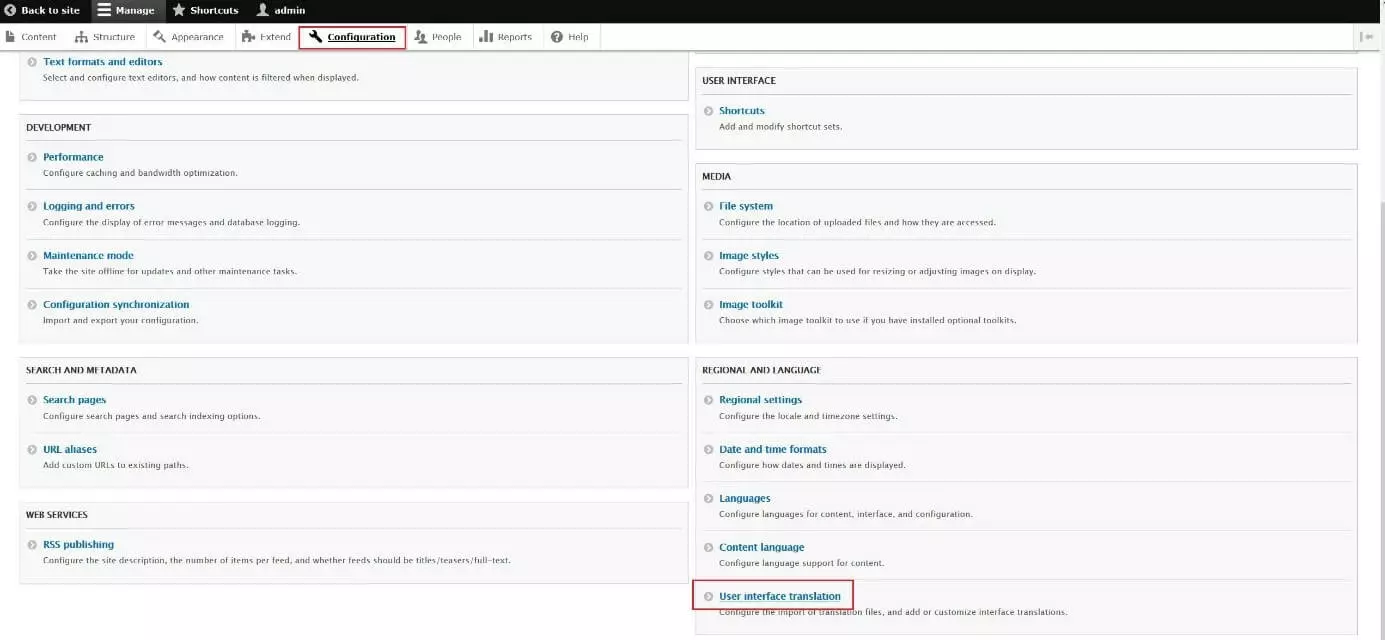
After installation, English is the default display language for the Drupal user interface. However, by installing language packages, it is also possible to select other languages. However, the packages are not part of the basic installation, so you might want to check out the language packages and download the corresponding Drupal edition from the Drupal translation server. Once you have done this, simply open the “Configuration” settings menu in the backend and click on “User interface translation” under “REGIONAL AND LANGUAGE”:
Navigate back to the main menu and this time click on “Languages.” In the language list, select whichever language you want as the default interface language (“DEFAULT”) and confirm the changes with “Save configuration”:
Management of users and user roles
Before you start designing and creating your Drupal pages, you should consider the permissions of future users. The content management system allows you to create individual user groups for which you can define a complete set of authorizations. You can then assign newly registered users to one or more of these groups, whereby they automatically receive the associated access and editing options. Three user groups are predefined in Drupal from the get-go:
- Guest: Website visitor without log in in frontend or backend
- Logged in user: Users who have created a user account
- Administrator: Logged-in users with maximum rights
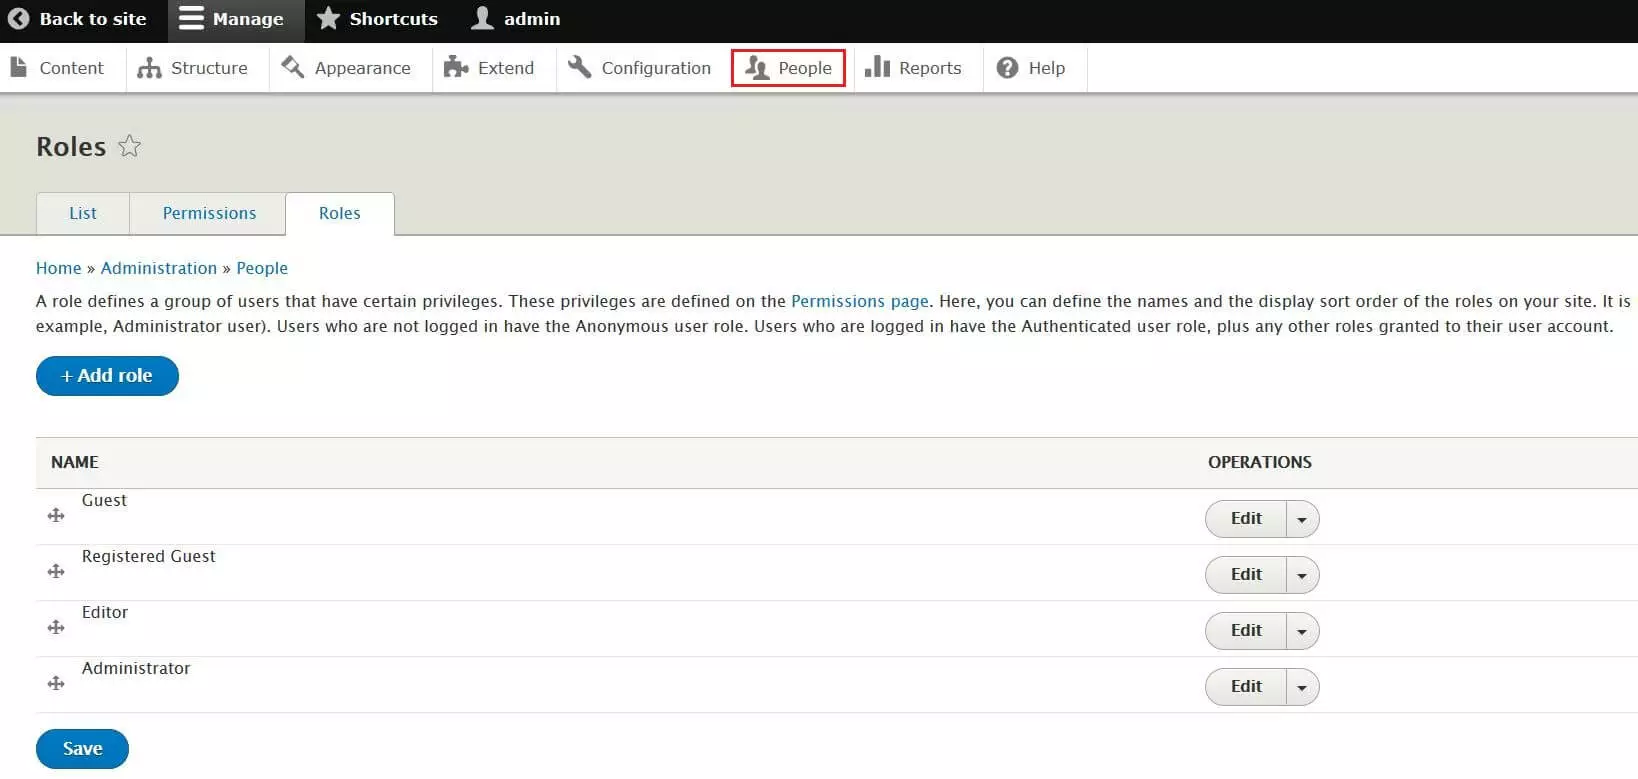
If you want to edit or delete these groups or create additional groups, open the user menu and switch to the “Roles” tab:
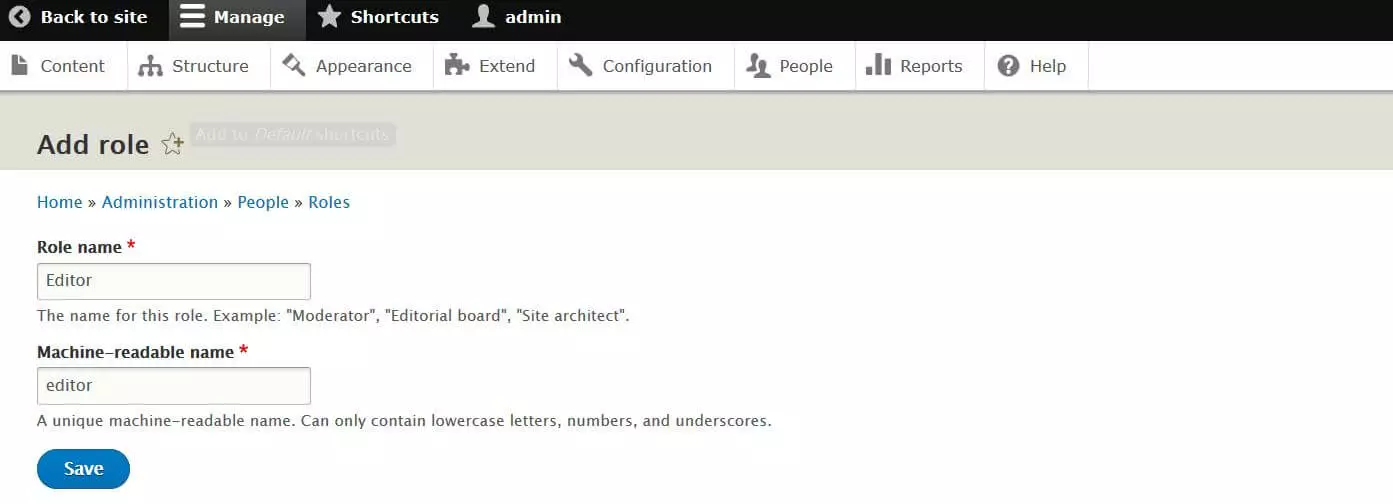
To add another group to the existing groups, click on the “Add role” button. Then enter a meaningful name (e.g. editor, moderator etc.) including a machine-readable name (lower case letters, numbers, underscores) and press “Save”:
You then set the permissions for the new user group under the tab of the same name by checking all categories and actions that the group should have and then clicking “Save permissions”:
You can also create a new user account in the user menu. To do this, open the start tab of the menu (“List”) and press “Add user.” Fill in the required information such as e-mail address, username, and password, and select the user group to which you want to assign the new account under “Roles.” In the last step, you add the new user via “Create new user account”:
Import theme and set as default theme
Creating a Drupal website is also possible for users with little IT experience, thanks to the simple structure of the content management system. The fact that the scope of functions is initially limited to the bare essentials does not mean that the software cannot also be used for the development of more complex projects. If the functions of the core components are not sufficient for you, you can simply add additional features via add-on modules if required.
When incorporating additional modules and themes, always make sure that they are compatible with the Drupal version you are using and come from a trusted source, such as the official repository. Otherwise, it may happen that your website no longer functions as intended or that security gaps result that make your web project vulnerable.
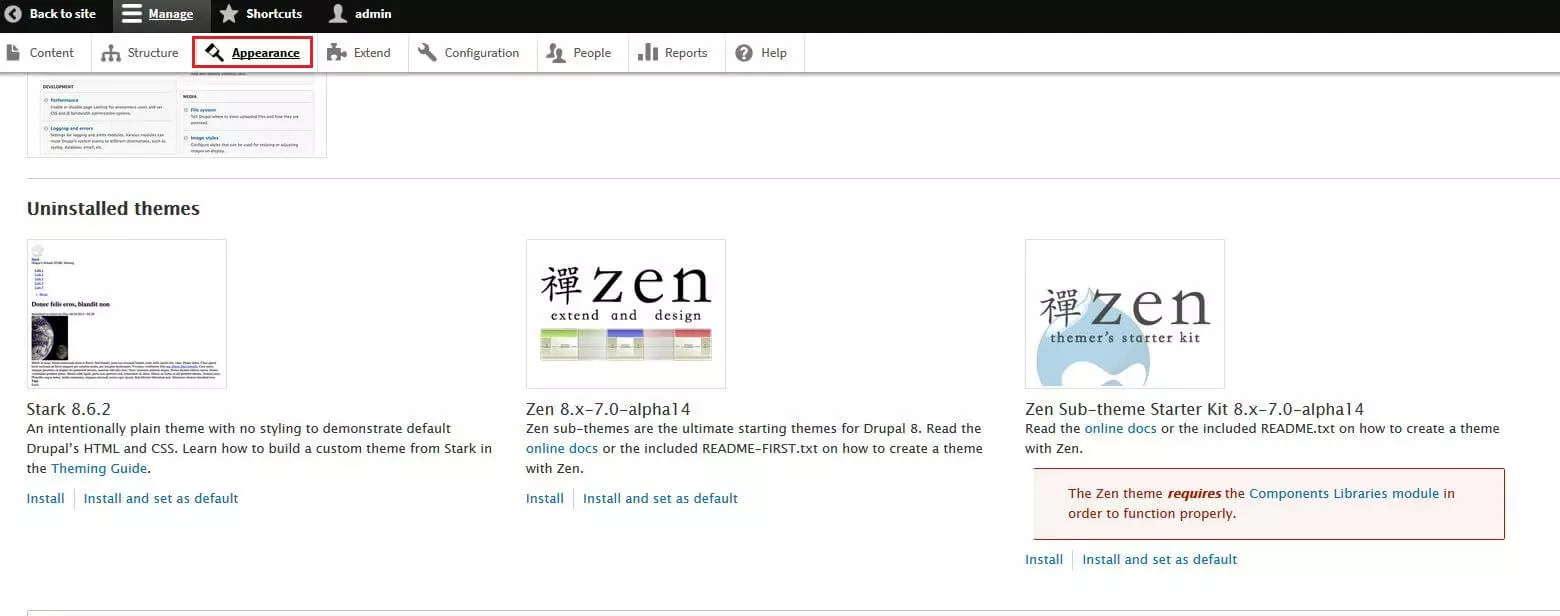
The principle of modular design also applies to the layout and design of your Drupal website: Drupal provides two pre-installed themes for this purpose. The standard theme Bartik and the administration theme Seven provide beginners with everything needed for the administration of a project and for creating first Drupal pages. Alternatively, you can select one of the hundreds of free Drupal themes from the download repository, download it, and add it to your Drupal installation. Unlike other CMS, however, Drupal does not offer an integrated installation manager, so you have to manually move the theme to your web space. The target directory is as follows:
/drupal/name-of-website/themesOnce you have moved the theme into the web memory, it can be installed via the backend of the content management system. Open the “Appearance” menu and scroll down to the category “Uninstalled themes”:
Click “Install and set as default” for the theme you want to install and select as default for your Drupal pages. Finally, press “Save configuration” to confirm the template change.
Creating Drupal pages
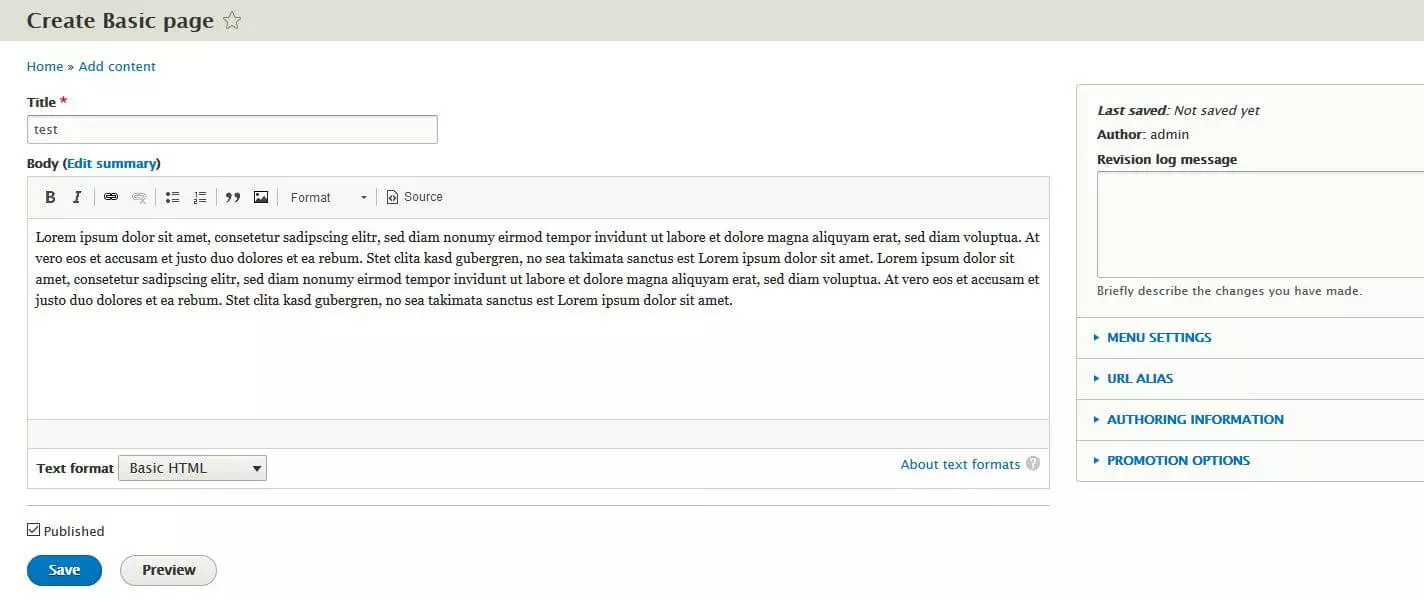
After completing the steps of backend configuration, user management, and layout selection, you now have the perfect foundation to begin building your Drupal website. First and foremost, you have to create new pages that can be filled with texts, images, and videos. To create a new Drupal page, first go to the “Content” menu and click on “Add content”:
Drupal has two different types of pages by default: Choose the type “Simple pages” for all websites with static content such as the imprint, an “About us” page, or the privacy policy. You can use “Articles” for all pages with dynamic, time-critical content such as blog posts, news pages, or press releases. Simply click on the button to start creating a page of the desired type.
Even if your project is a blog or a similar web application, it is recommended that you first create static pages such as the imprint or privacy policy (both for legal reasons) and the homepage (for practical reasons).
For both page types, you can select a page title, insert text, and change the initial menu and URL settings. Drupal only requires a page title as mandatory information for both basic pages and articles. By clicking on “Save” the new Drupal page can finally be created.
If you want to publish content on the start page, check the corresponding page in the page listing in the “Content” menu and select the entry “Promote content to front page” under “Action.” Then click on “Apply to selected elements”:
Inserting images into website texts
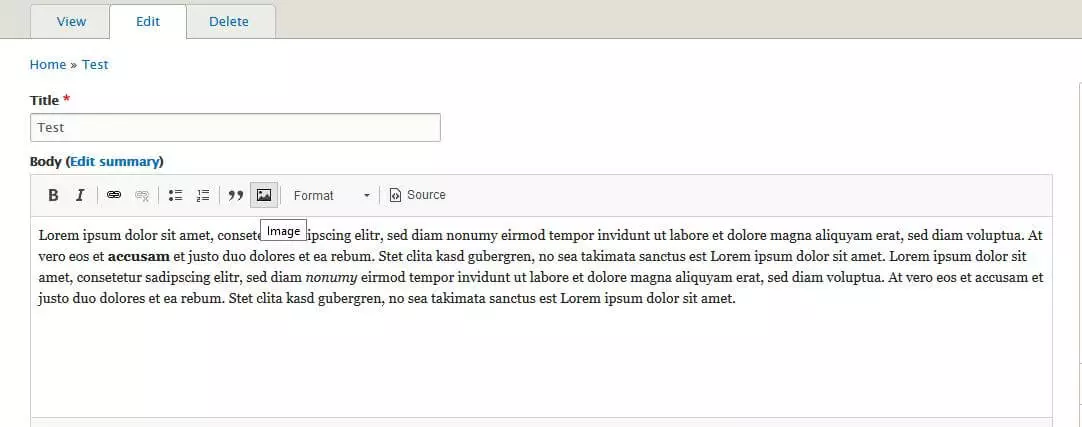
If you want to add images to a text on your newly created Drupal website, open the editor for that page. Simply search for this page in the “Content” menu and press “Edit.” You now have the same setting options as when creating the page and therefore also access to the WYSIWYG editor. With this editor, you can not only design the text of the page just like with an ordinary text editor by setting bold, italics, headings, or enumerations using the menu bar, but also embed photos and images. To do this, first click on the image symbol:
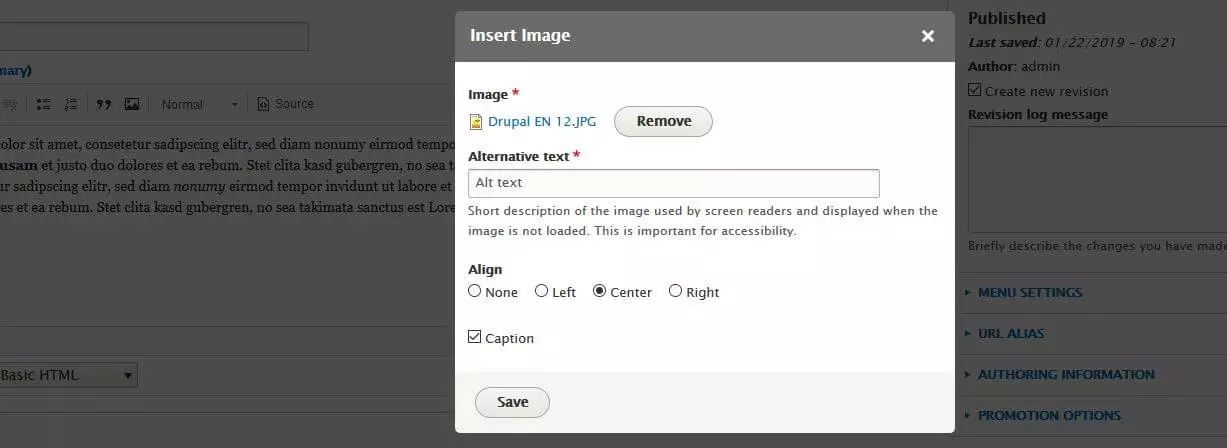
Select “Browse” and specify the location of the image you want to include on your Drupal page. Then formulate an alternative text to be displayed to website visitors if they cannot see the image. Finally, under “Align,” you determine how you want the photo or graphic to be positioned. In addition, set a checkmark next to “Caption” to add a suitable caption below the image:
Optimizing images pays off for two reasons: On the one hand, you increase your chances of ranking in the Google image search. On the other hand, well-integrated and described images have a positive effect on where your website is positioned in the search engine. Further information can be found in articles on the subject of “Image SEO”.
Creating internal and external links
The Drupal editor also enables you to place links by first clicking the chain icon and then entering the target URL. For internal links, however, this option is extremely cumbersome, which is why there are various additional modules that simplify the procedure considerably. At this point, we recommend Linkit, which is also compatible with current Drupal versions. Download the appropriate Linkit file and transfer the module to the web space (as you did during the theme installation). In this case, the target directory is:
/drupal/name-of-website/modulesAfter you have installed the module, switch to the configuration menu and create a Linkit profile under “Content” “Linkit.” In the same section, select “Text formats and editors.” For the editor format you use to create your content (typically basic HTML), press “Configure.” Then make three changes in this menu:
- Under “CKEditor Plugin Settings,” select the menu item “Drupal link” and confirm that Linkit is activated. You also specify the Linkit profile that you created previously.
- Under “Activated Filters,” check the “Linkit URL Converter” box.
- In the filter settings, go to “Linkit URL Converter” and check the box so that Drupal automatically sets a title attribute that links to the linked content.
If you link a text on a created Drupal page, you can enter keywords into the URL window, so you will automatically receive link target suggestions for other pages of your web project:
- 99.9% uptime
- PHP 8.3 with JIT compiler
- SSL, DDoS protection, and backups


