How to use the ping command in Windows
Windows has a series of network commands available for its command prompt (CMD for short) that enable you to view relevant information and configure network settings.
One of these commands is ping. We’ll explain ping and how you can use the ping command in network diagnostics.
What is ping?
Ping is a network diagnostics tool for the Windows command prompt. In network diagnostics, the command line program enables you to verify if another computer is available in a connected local or public network.
Ping is accessed using the command line prompt of the same name, either in combination with the IP address or the target computer’s host name. If the target computer is not located in the same local network as the source computer, it is necessary to specify the domain.
The name ping is an analogy to sonar technology – a technique to locate objects by emitting pulses of sound that was employed during World War II to locate submarines. The emitted pulses of sound were perceived within the submarine as a light knocking, which was onomatopoetically referred to as a “ping.”
How does ping work?
In order to verify a computer’s availability, ping sends in its default setting four ICMP echo request packets of 32 bytes each to the address assigned as a parameter.
ICMP (Internet Control Message Protocol) is a protocol that enables the exchange of information and error notifications within IPv4 networks. For computer networks using IPv6, ICMPv6 has a successor protocol that can be used for this purpose.
In theory and in accordance with the protocol specification, computers that support ICMP and/or ICMPv6 must automatically respond to incoming echo requests with an ICMP echo reply. In practice, this doesn’t always work, as many administrators, for security reasons, configure the computers they manage in such a way that ICMP packets are rejected without a response. As a result, the unavailability of the target computer cannot be inferred from an unanswered ICMP request.
If the addressed target computer doesn’t respond, ICMP provides a notification from the appropriate gateway. Normally in this case a router responds that either the network or the appropriate host is not available.
If there is no response from the router, it can be assumed that the computer is in fact available but is not automatically responding to the echo request due to its configuration.
The ping command delivers the following information as output:
- Response time in milliseconds (ms)
- Validity period for ICMP packets (time to live, TTL) (only with IPv4)
The response time specifies how long a data packet requires to be sent to the target computer and back. The validity period specified as the TTL corresponds to a data packet’s elapsed time. The initial value amounts to a maximum of 255. Usually, implementations have an initial TTL of either 31, 63 or 127. The TTL is reduced by 1 by every network node that the data packet passes. This is referred to as hops. Should the TTL drop to 0, the data packet is rejected.
The TTL that you receive as output normally corresponds to the responding computer’s initial value minus the number of hops on the route.
With a TTL of 58, for example, you can assume that the response packet was dispatched with an initial value of 63 and passed five network nodes on the way back.
The TTL is only moderately informative. For the ping command user, the TTL’s initial value and which network nodes changed it is hardly traceable in practice.
Testing network connections with the ping test
In network diagnostics, the command line program provides ping information about the quality of the network connection between two computers.
Follow these instructions for using a ping test to determine if the routing between your system and that of the target computer is functioning and what sort of delay you can expect when transferring data.
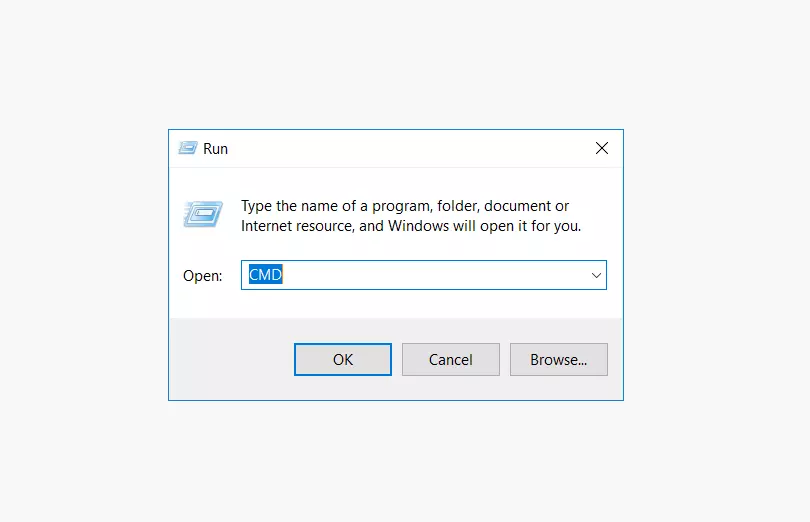
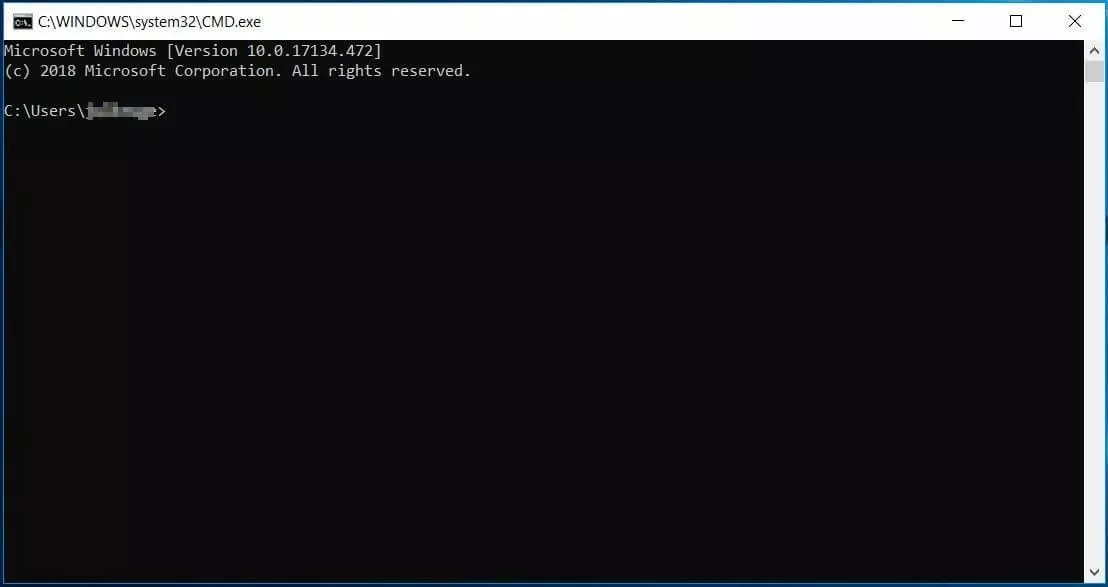
1. Open the Windows command prompt: Use the key combination Windows + R to view the “Run” dialog box. Enter the command “CMD” in the “open” field and confirm by hitting the enter key.
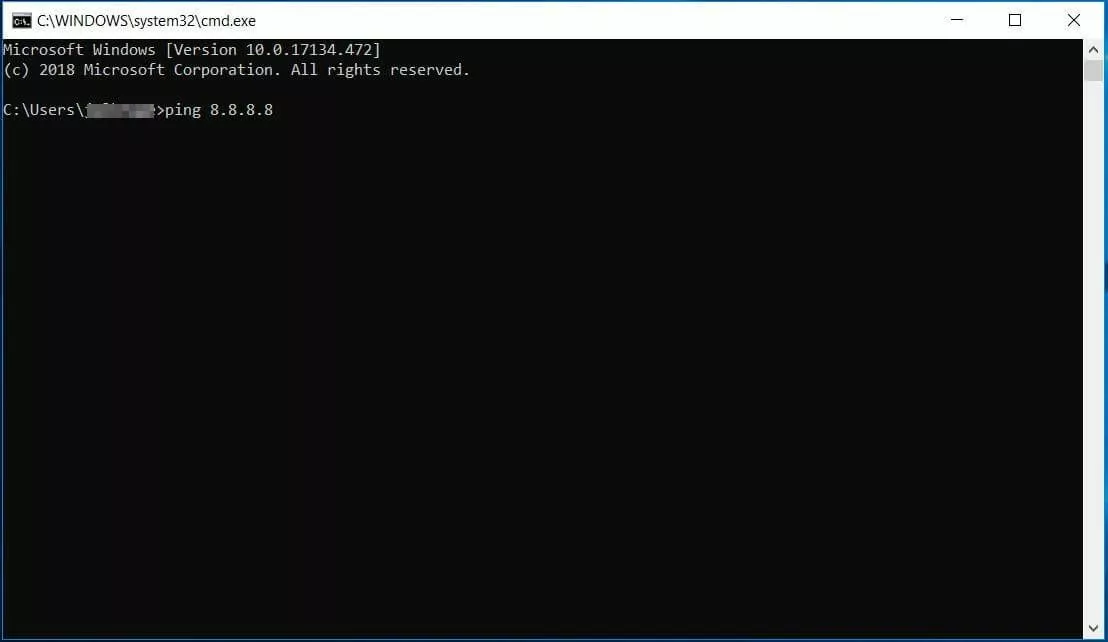
2. Run the ping command with parameters: Enter the ping command in the command line and assign the latter either the IP address or host name of the target computer as a parameter by adding the corresponding information to the command separated by a space.
Ping command with the target computer’s IP address:
ping 8.8.8.8Ping command with the target computer’s host name and domain:
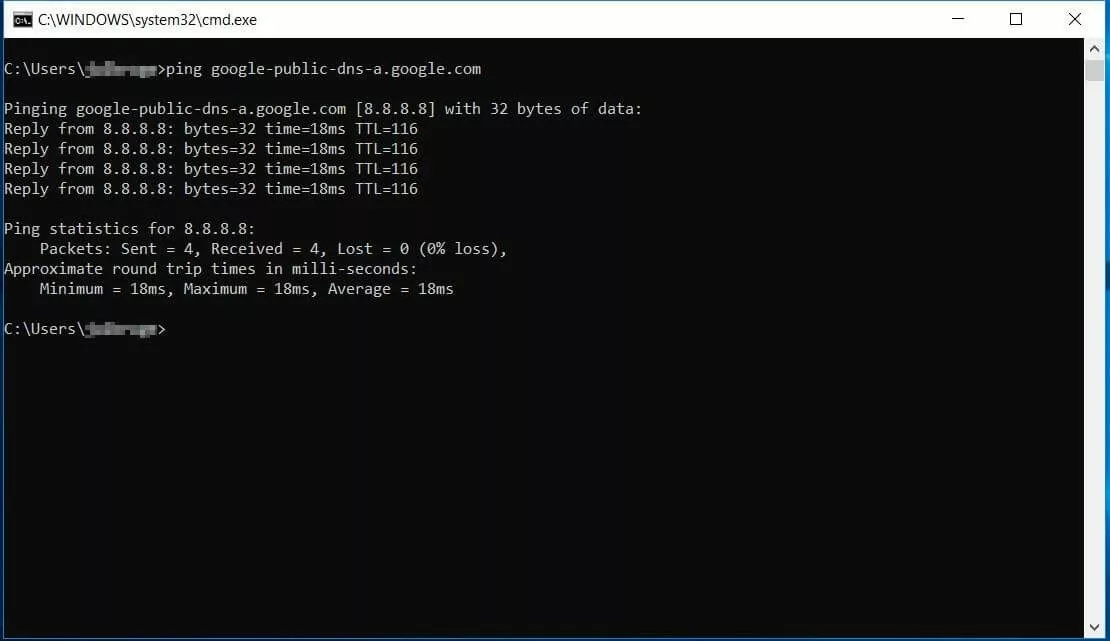
ping google-public-dns-a.google.comClick Enter to confirm your entry and run the CMD program with the selected parameter.
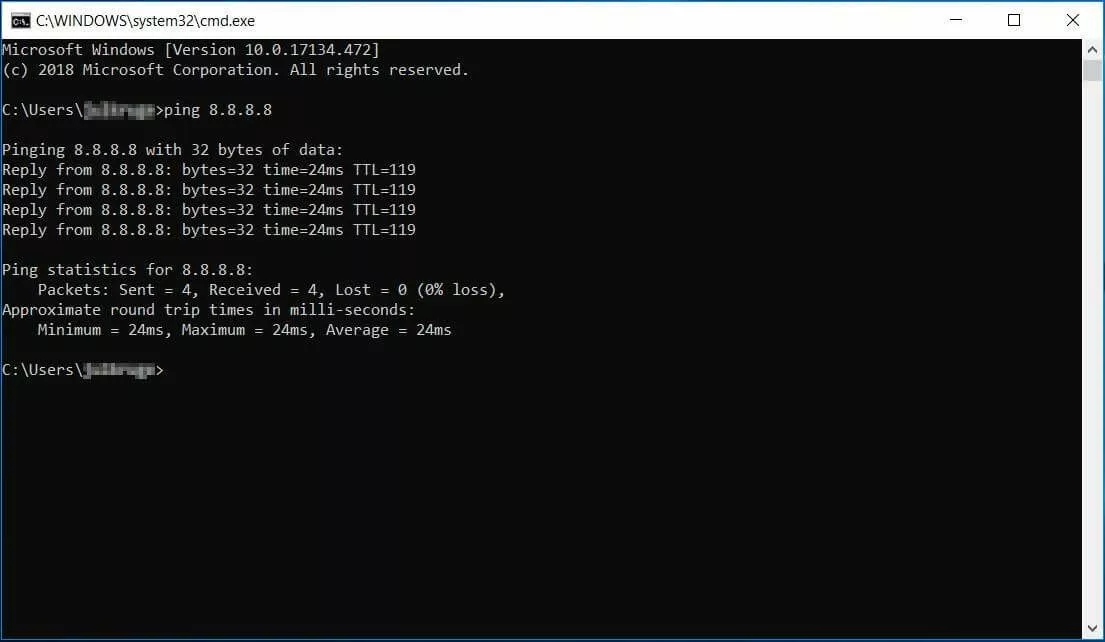
3. Ping command output: If the ping is run without additional options, the program sends four data packets to the specified target computer and gives you statistical information on the queries in the terminal.
The terminal output includes a summary table that lists the corresponding response time, the packet size as well as the TTL per response packet. In addition, you receive statistical information on sent, received and lost packets, including packet loss in percentage terms as well as an analysis of the minimum, maximum and average response times.
You’ll receive a similar output if you perform the ping test via the target computer’s host name.
In this case, the computer name is resolved from the IP address by the underlying DNS settings for your operating system. The IP address, along with the ping statistics, is displayed to you in the program output.
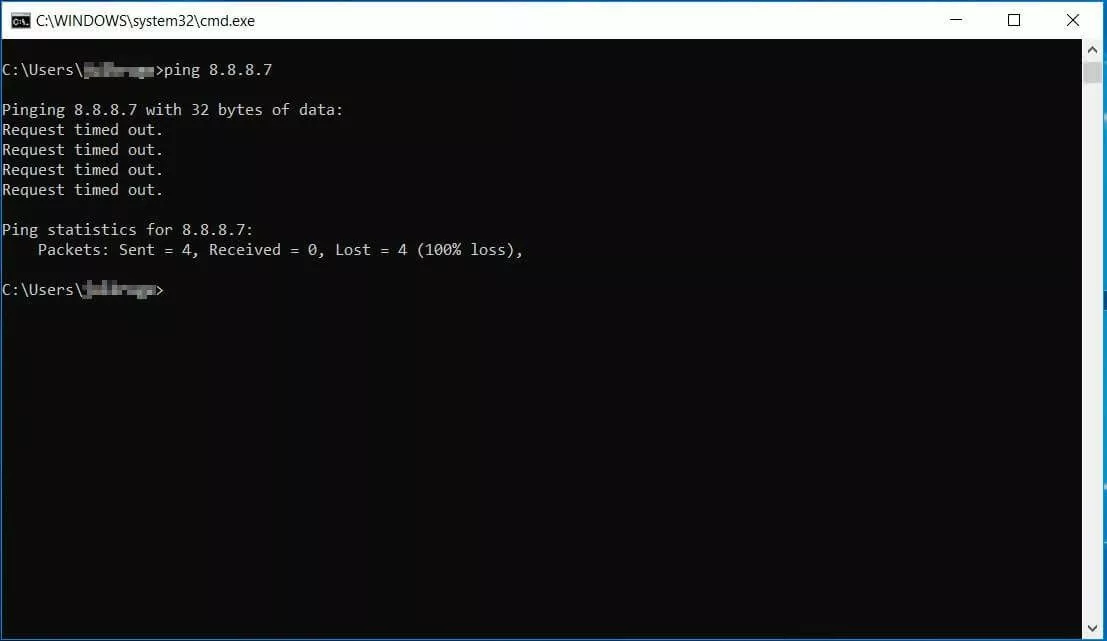
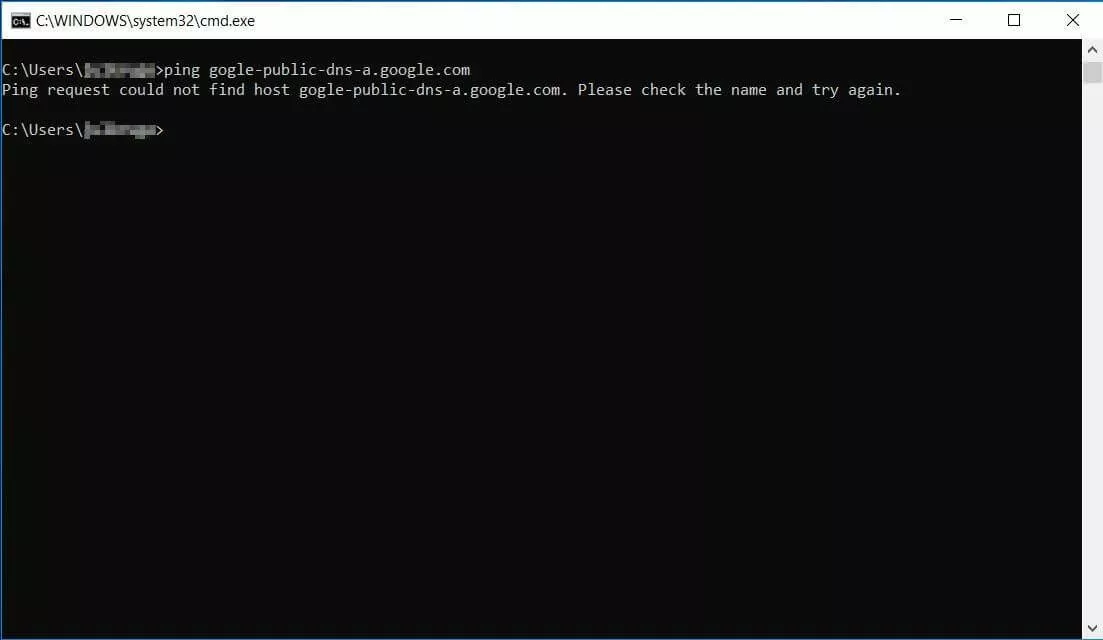
If, on the other hand, the addressed target computer isn’t available, the terminal output will differ depending on whether you are addressing the target via its IP address or hostname.
If the IP address you’ve specified isn’t available, the expected response packet will not arrive within the specified time limit. In this case, you’ll receive the terminal output: “Request has timed out”.
Ping command options
When needed, you can run the ping command with a series of options in order to adjust the ICMP echo request’s default value. The following table gives you an overview of the command line’s most important options.
| Option (Choice) | Description |
|---|---|
| -t | With option -t, the addressed target computer is pinged until you end the procedure with Ctrl + C to display the ping statistics. This is called a continuous ping (see tip below). |
| -a <ip> | Use the ping command with option -a and the target computer’s IP address in order to determine the target’s host name. The computer name will be displayed to you along with the ping statistics in the terminal. |
| -n <number> | With the -n option, you define the desired number of ICMP echo requests. It sends four ping requests in the default setting. |
| -l <size> | With option -l, you define the size of the ICMP echo request in bytes. The default value is 32. Ping can be used to send data packets with a maximum size of 65,527 bytes. |
| -f | If the ping command is run with option -f, the program sets the “Do not Fragment” flag in the ICMP echo request packet’s IP header to 1. Such a request cannot be broken up into smaller units by network nodes en route to the target. This option is only available in IPv4 networks. |
| -i <TTL> | Use the -i option if you want a user-defined TTL for your ICMP echo request. The maximum is 255. |
| -4 | The -4 option forces the use of IPv4 and is only employed if the recipient is addressed via the hostname. |
| -6 | Option -6 forces the use of IPv6 and is only employed when the recipient is addressed via the hostname. |
Our article on the basics of the Windows command prompt gives you an overview of the most important CMD commands. In our in-depth article on the subject of continuous ping, you’ll learn how to use the ping command for continuous ping tests.


