How to create a Multiboot USB
Installing something anew, or repairing operating systems like Linux, Ubuntu or Windows can be done in various ways. The choices you’ll be familiar with are the cloud reinstallation of Windows 10, CDs with ISO files, or a USB with the corresponding system files or rescue tools. However, if you want everything on one, creating a multiboot USB is the way to go.
Quick guide: Setting up a Multiboot USB
- Download a multiboot tool (YUMI in this manual).
- Start YUMI with a double click.
- Select the relevant USB drive under “Step 1”.
- Select the desired ISO file or system tool under “Step 2”.
- Locate the selected file via “Browse” if it is on the computer.
- Download the file under if it is not already on the computer.
- For Windows ISO files, use the MediaCreationTool for downloading.
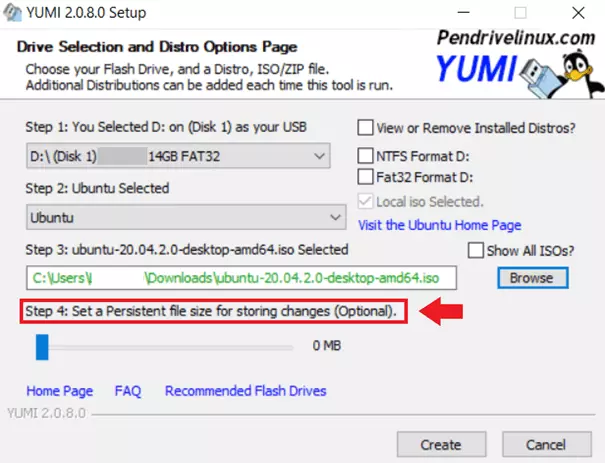
- Optionally, you can specify how much USB memory the file should use in “Step 4”.
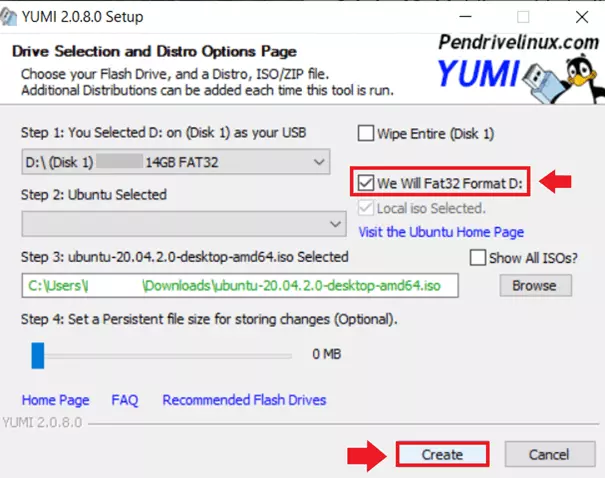
- For an initial setup: Select a file system (FAT32 or NTSF) to format the stick and click “Create”.
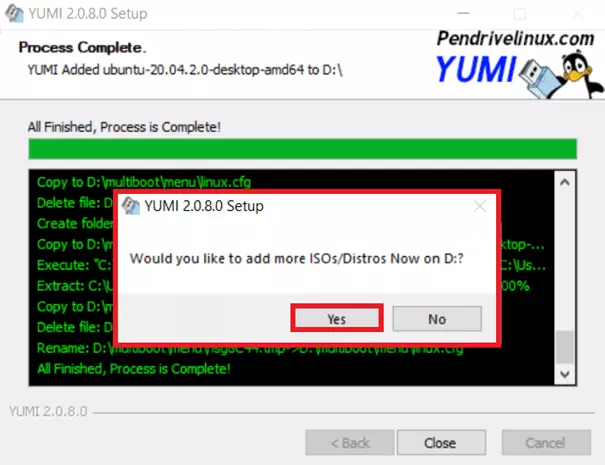
- Once the process is complete, more ISO files and tools can be copied to the Multiboot USB.
What is a Multiboot USB?
A multiboot USB is the universal tool for anyone who wants to reboot or repair their system or boot a live system from a USB. The advantage of a multi bootable USB is that it accommodates a lot, from various Windows and Linux distributions, to repair and rescue tools such as antivirus services or complete live systems or backups. This is made possible by free software tools which, unlike tools such as Rufus, do not create one bootable USB per system, but rather a multiboot USB for various files.
The best-known tools include Yumi, WinSetupFromUSB, and Ventoy. They make a USB multi bootable in a few steps, so that you simply copy desired system files to the stick.
Why is a multibootable USB useful?
Whether for backups or an emergency solution - every computer user would ideally create data backups in the cloud and on external hard drives and, if possible, have rescue tools, live systems, system backups, and ISO files. These are used when systems need to be reset, or viruses removed. However, this usually requires a collection of live CDs and USBs, which can contain various distributions, additional programs and even BIOS updates. With a multiboot USB, you save yourself a great deal of trouble, because all necessary files end up on a single bootable stick. This gives you the choice between several live distributions and fixes system problems effortlessly.
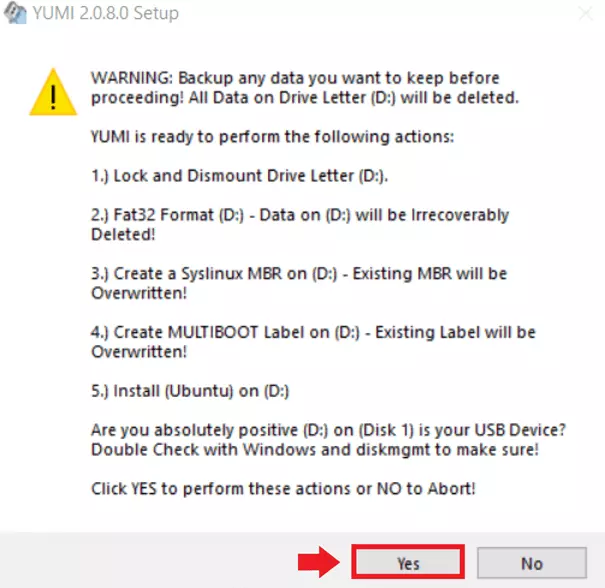
Creating a multiboot USB is simpler than you’d think. Free tools are available for download online. The prerequisite for a multiboot USB is sufficient storage space - at least 8 GB are recommended here. To make a USB bootable, you must format it first. So make sure that there is no important data on the USB stick. Another advantage: With enough memory, you can continue to store files and documents on your USB stick in addition to the multiboot area.
Multiboot system backups are only one of many backup solutions. Additionally use MyDefender from IONOS and rely on automated backups in ISO certified, secure data centers.
Using YUMI as a multiboot USB tool
If you want to create a multiboot USB, you’re in luck. Software that creates a multi bootable USB is plentiful and each offers its own advantages. Especially for inexperienced users, setting up multiboot USBs manually is complicated. Since the method behind each of the tools is similar, the example of the tool YUMI (“Your Universal Multiboot Installer”) will be used here to explain how to set up multiple live systems, installations, or repair/diagnostic tools on a USB.
Yumi formats the USB and provides a comprehensive selection of distributions, including Linux variations such as Ubuntu, Debian Live, Linux Mint, and Fedora for download. In addition, YUMI writes maintenance and diagnostic tools from antivirus manufacturers as well as ISO files from Windows to the stick as required. Prerequisites for YUMI are Windows systems from VISTA and higher or Wine under Mac and Linux. The BIOS should additionally allow booting from USB media. When formatting the USB, note that FAT32 offers optimal compatibility, while NTFS is suitable for systems with more than 4 GB.
Back up important system data and documents to the HiDrive cloud storage from IONOS and conveniently access your files from any device.
Creating a multiboot USB with YUMI
Step 1: Download YUMI for free from a trusted platform or the associated website pendrivelinux.com. The tool is ready for use immediately after the download and doesn’t require installation.
Step 2: Insert the USB you’re going to use and start YUMI.
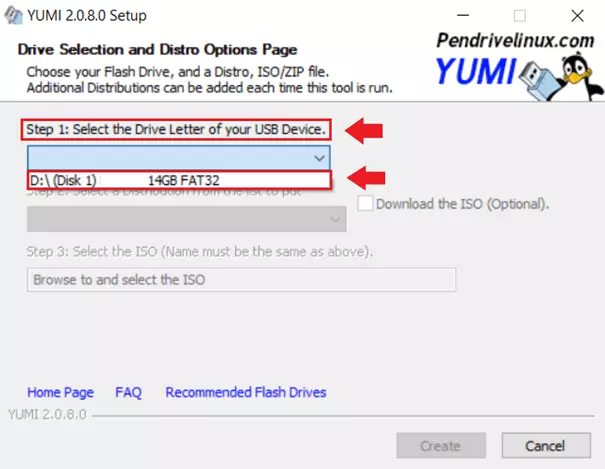
Step 3: Now select the USB drive under “Step 1: Select the Drive Letter of your USB Device”. Make sure it is the correct USB drive, as formatting will erase all existing data.
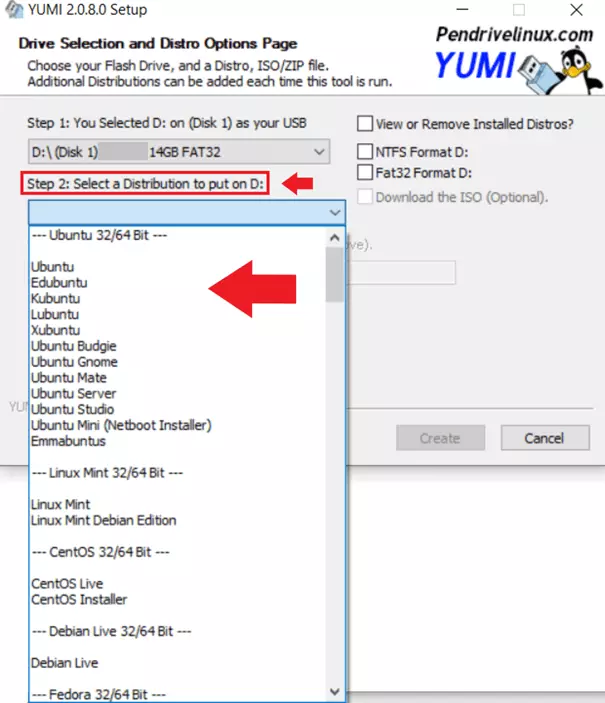
Step 4: Under “Step 2: Select a Distribution to put on (drive)”, select the operating system you want to store on the USB stick. YUMI already offers the most important Linux variants like Ubuntu, Linux Mint, Debian Live, openSUSE, Fedora and many more. The software also offers many other system and maintenance tools that you can save on the stick.
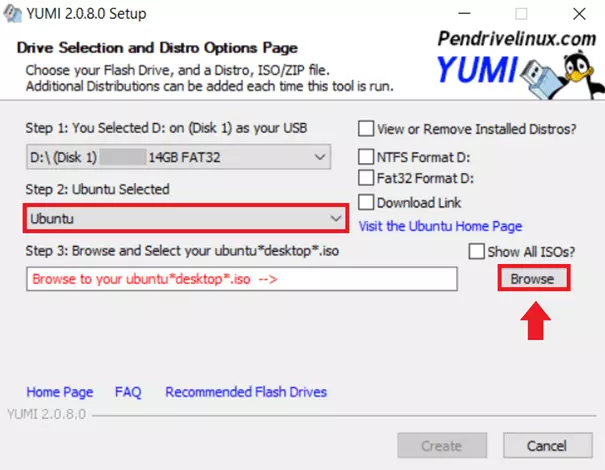
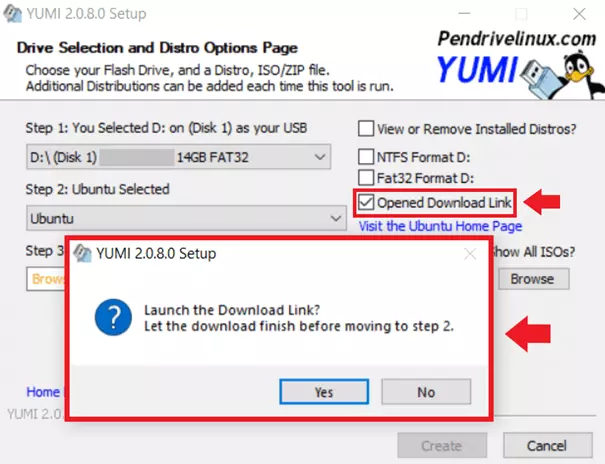
Step 6: If the file is not yet on the computer, check “Download Link” to go to the download page of Ubuntu or the selected distribution. After the download, select the downloaded file under “Step 3” with “Browse”. If YUMI does not offer an automatic download, download the files manually from the manufacturer.
Step 8: Before you write the selected system or system tool to the stick, you must format the USB stick. To do this, select the appropriate file system - NTFS or Fat32 - and make sure that there are no important files on the stick. Then click on “Create” to create the multiboot USB stick.
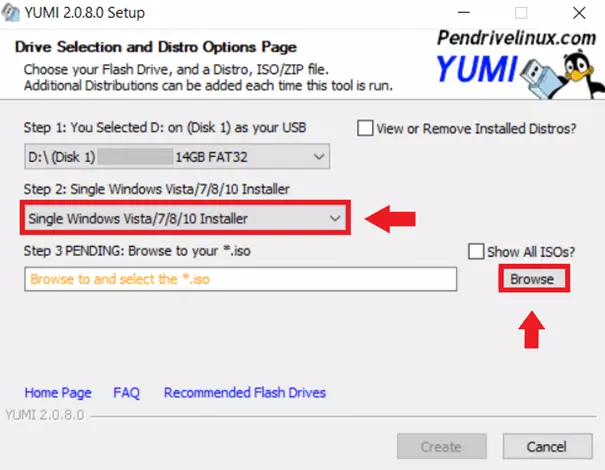
Step 12: Now select the installer for Windows 10, for example, by selecting “Single Windows Vista/7/8/10 Installer” and, if the ISO is already on the computer, click “Browse”. Since Windows ISO files can now only be downloaded via the Windows Media Creation Tool, YUMI for Windows does not offer automatic redirection. Therefore, you must first install the MediaCreationTool and download desired Windows ISO files. After that, select the file in YUMI via “Browse”. Be careful not to format the stick after setup, otherwise you will delete existing data.
Booting via a Multiboot USB
If you now want to boot your system, you must already connect the USB stick before the computer starts. While the computer then starts, you will see (usually very briefly) an information which key you have to press to enter the boot menu. In most cases this is one of the 12 function keys or the escape key. In the menu you can then select the USB drive and start the boot process. Since you are working with a multiboot USB stick, you then still select the desired operating system and can load the system.


