How to set up a V Rising dedicated server
The vampire survival game V Rising has been so popular that it reached 500,000 sales within the first three days after its release. As of May 17, 2022, brave heroes and heroines turn into awakened bloodsuckers to fight their way through a world of developed by Stunlock Studies. Sounds fun? It is even more fun when played with friends on your own V Rising server. We’ll show you how to set one up in no time.
Try out your VPS for 30 days. If you're not satisfied, you get your money back.
V Rising server: what are my hosting options?
Once you’ve purchased V Rising, you can get started in a multiplayer session straightaway by running it on your own device. However, hardware and internet connection are the decisive factors for the stability and performance of a V Rising server – especially when you want to participate in the game. Note that the server only runs when you’re online.
For the best possible gaming experience, hosting with a professional provider is recommended. With IONOS, for example, you can choose from three server models:
- vServer (VPS): Virtual resources at a fixed rate
- Cloud Server: Virtual resources billed by the minute
- Dedicated Server: Dedicated hardware reserved exclusively for you
With a dedicated server you opt for maximum performance by accessing enterprise hardware with strong single-core power that’s exclusively reserved for you. At the same time, you only get charged for what you use.
In contrast, the vServer (VPS) and Cloud Server from IONOS use virtual resources. These are shared between customers, but that doesn’t affect their performance. With a vServer, you pay a fixed monthly price. With a cloud server, performance can be flexibly adjusted and what you use is billed by the minute.
V Rising: 3 server scenarios and matching IONOS plans
All three IONOS servers are suitable for implementing a V Rising server. For beginners, the vServer and Cloud Server options are recommended since V Rising does not actually require strong single-core performance. When making your selection consider the computing power for the underlying operating system – Windows or Linux server.
Here are three possible scenarios for your V Rising server with the most suitable vServer and cloud server plans:
| Recommended vServer | ||
| V Rising: server for 2 gamers (PvE) | IONOS VPS XL | |
| V Rising: server for 3–8 gamers (PvE or PvP) | IONOS VPS L RAM | |
| V Rising: server for 8+ gamers (PvE or PvP) | IONOS VPS XL RAM |
Tutorial: Design your V Rising server
Once the appropriate hardware for your V Rising server is in place, all you need to do is choose the server operating system you wish to use. You can host the vampire game on either a Windows or Linux server – this is entirely up to you.
In the following tutorial, we show the installation and setup of a V Rising server for IONOS customers (vServer, Cloud Server, Dedicated Server). We use Windows Server 2019 as the operating system.
Step 1: Connect to the host server
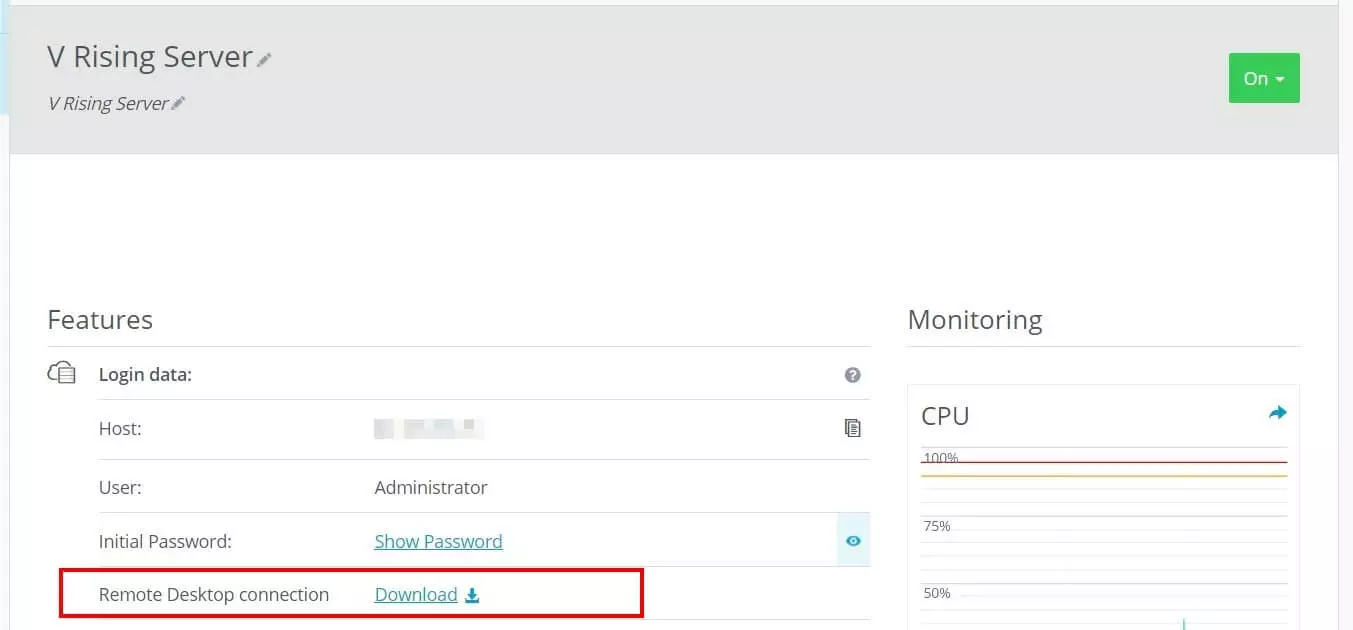
To install the V Rising server application, you must connect remotely to your server. IONOS customers can set this up conveniently via the web-based Cloud Panel. The procedure is as follows:
- Log into IONOS using your account details
- Click on “Server & Cloud”
- Click the rented hardware on which you intend to host your V Rising server
- Scroll down to “Access data”
- Click the download button next to “Remote Desktop connection”
Execute the downloaded file and select “Connect”. Now log in to the server with your server login data. If this is your first login, you’ll find the username and password via Access Data in the Cloud Panel.
As part of the initial connection setup, you need to trust the server certificate. Select the “Do not ask again for connections to this computer” checkbox to avoid the query being shown in the future.
Step 2: Install SteamCMD
After establishing a connection with your server hardware, installing SteamCMD is the first step. The command-line variant of the Steam client provides access to the dedicated server application from V Rising.
You can download the installation files for the tool from this download link. Detailed instructions on how to proceed are provided in our guide on SteamCMD installation.
Step 3: Install a dedicated V Rising server
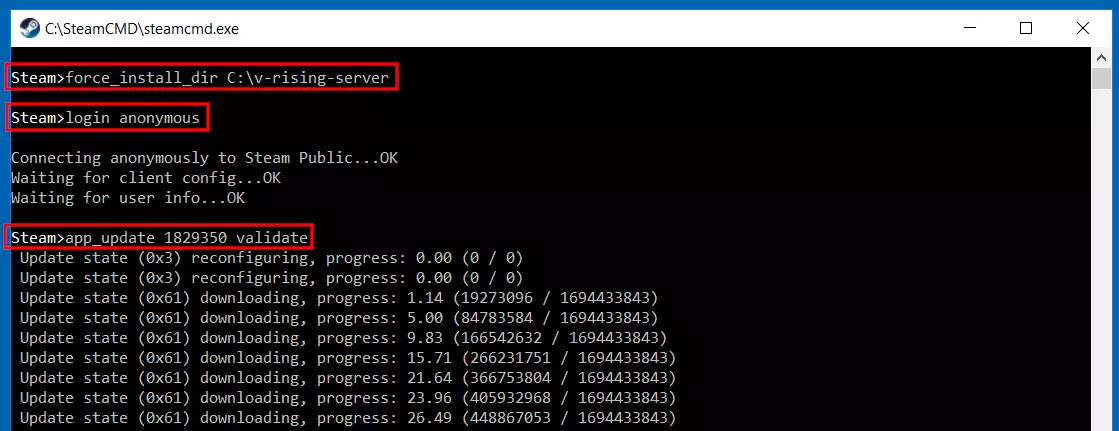
Run SteamCMD and create an installation directory for your V Rising server. For example, the following command sets the path C:\v-rising-server as the directory for the dedicated server application:
force_install_dir C:\v-rising-serverConnect to the public Steam servers (Steam Public) via the command line client:
login anonymousFinally, install the dedicated server application using the ID of the corresponding Steam app. In the case of V Rising the app ID is “1829350”. Run the following command:
app_update 1829350 validateStep 4: Release ports
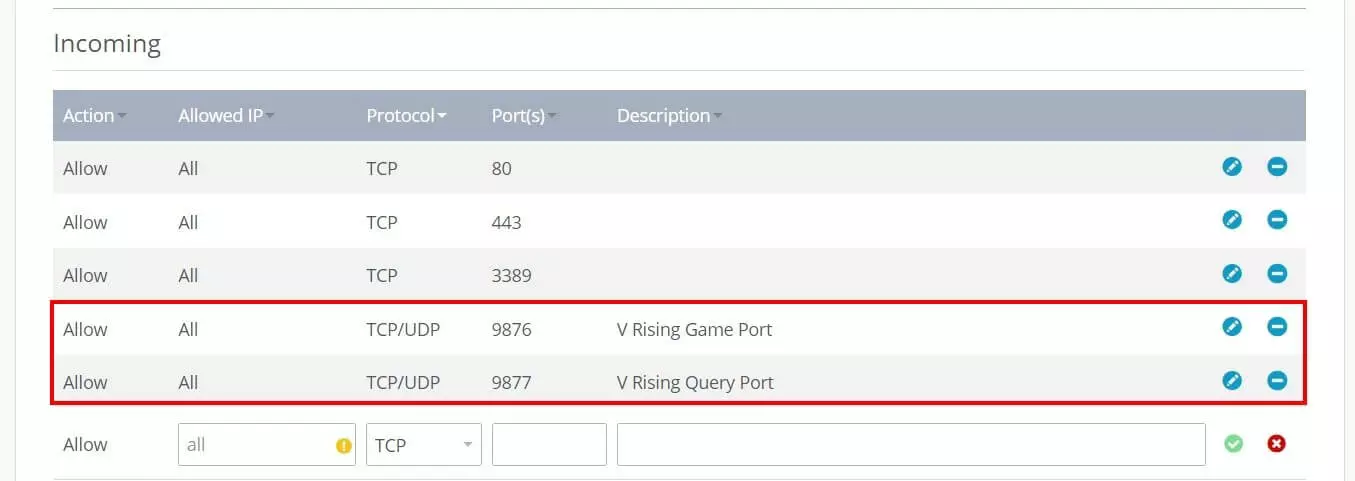
For your server to be accessible online, release the TCP/UDP ports 9876 (game port) and 9877 (query port) to communicate with clients. IONOS customers can initiate this step via the Cloud Panel:
- Log into IONOS
- Click on “Server & Cloud”
- Select the hosted gaming server
- Click “Network” and “Firewall Policies” in the left menu one after the other
- Create the two rules for TCP/UDP port 9876 and 9877 under “Incoming”
Step 5: Configure V Rising server
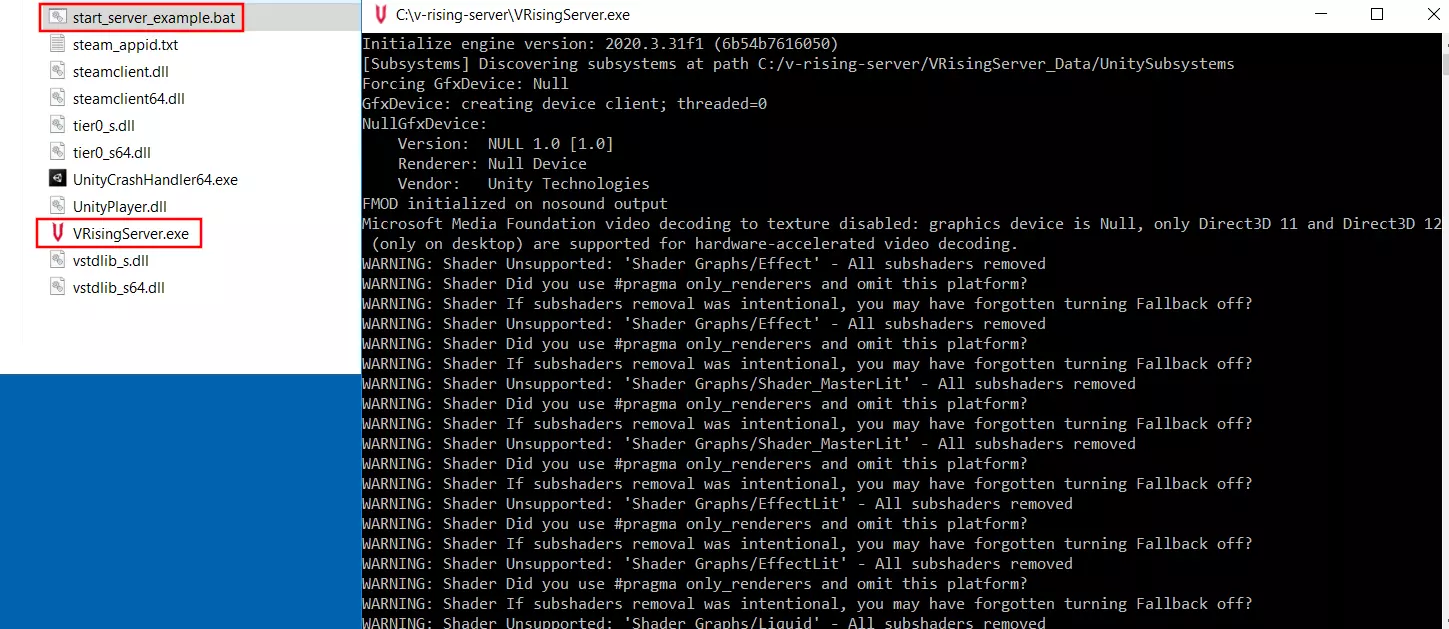
Now, create the appropriate setup for your V Rising server. To configure it, you’ll find three important files in the installation directory:
- start_server_example.bat: The batch file named start_server_example can be found in the root directory. This is a basic startup script for your V Rising server. Specify a server name, the name of the memory state, and the file for the server logs, among other things.
- ServerHostSettings.json: In the subfolder VRisingServer_Data\StreamingAssets\Settings you’ll find the JSON file ServerHostSettings to define the server name, adjust the ports, assign a password and set the maximum number of players.
- ServerGameSettings.json: You can also find the ServerGameSettings file in the VRisingServer_Data\StreamingAssets\Settings subfolder to customize the game world – from the size of clans, health modifiers or game mode (PvE/PvP).
For an overview of available options in ServerGameSettings.json (including explanations) check out the V Rising Server Configuration Guide.
Step 6: Start up server
Step 7: Joining a V Rising server
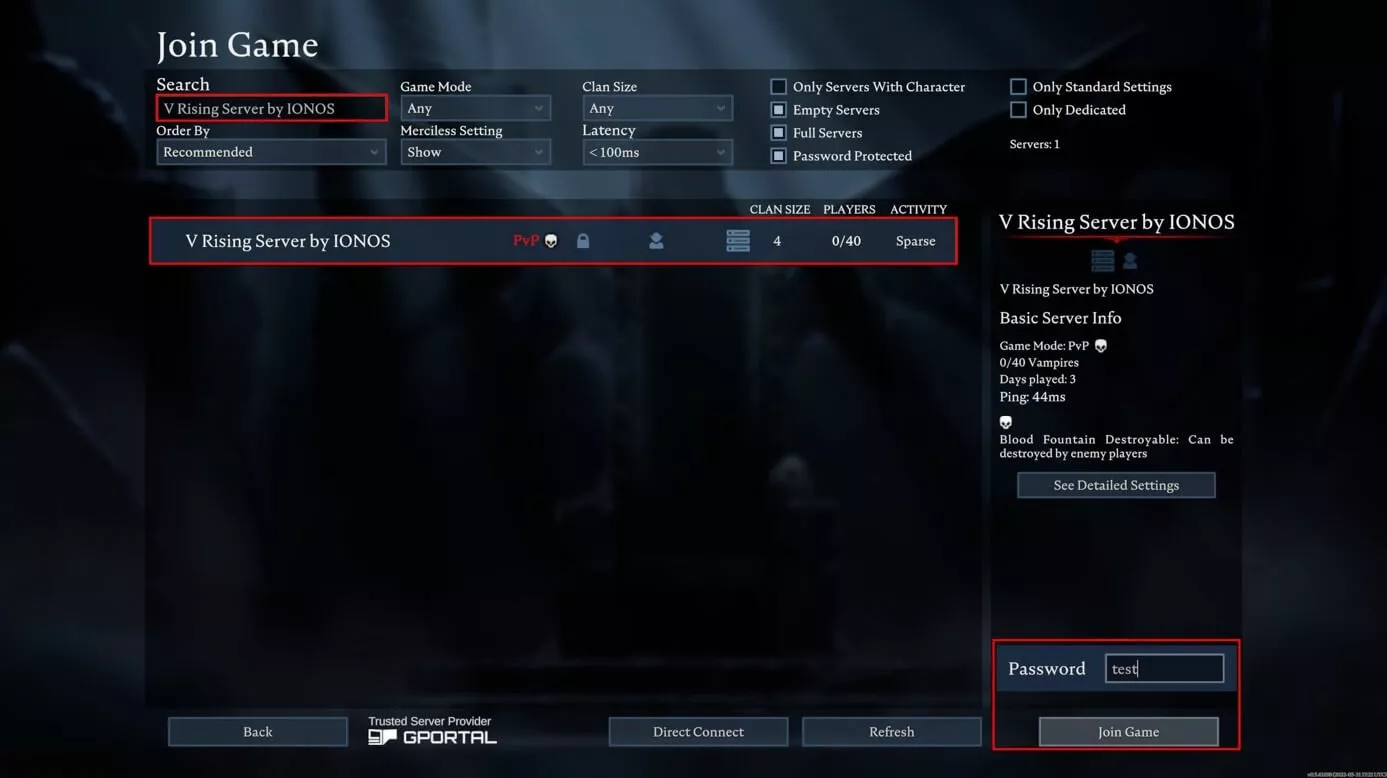
The server loading process usually takes a few minutes. Once loaded, you can connect to the new gaming world. Simply start up the game and continue as follows:
- Press “Play”
- Select “Online game”
- Select “Find Servers”
- Show all servers by pressing “Show all servers and settings”
- Type the previously assigned server name into the search area
- Enter the password (if assigned) and click “Join Game” to connect to the V Rising server
If your server is not shown in the overview, click on “Direct connection” and manually enter the IP address (using appended port “:9876”) to establish the connection to your V Rising server.
Make a statement with your own .gg domain and let the games begin. Register your own .gg domain now with IONOS.


