How to set up a The Isle server in just a few quick steps
The open-world game The Isle, which lets you view the world through the perspective of a dinosaur, is very popular, especially in multiplayer mode. Having your own server is very advantageous when playing with friends, and it can be set up in just a few steps with Ubuntu.
What are the system and server requirements?
In order to have a smooth gaming experience while playing The Isle, the server you choose needs to meet certain minimum requirements. A sufficient amount of RAM is essential since the open-word PvP is a relatively memory-heavy game. There are also other system requirements that your server should meet.
- Operating system: In this tutorial, Ubuntu is used as the server operating system. Other Linux distributions or Windows servers are also suitable.
- RAM: Your server should have at least 8 GB RAM.
- Processor: A quad-core processor is adequate for The Isle.
- Internet connection: In order to avoid lag, it’s necessary to have sufficient bandwidth. The bandwidth should be around 10 Mbps especially if you want to be able to support multiplayer mode. This upload speed is no problem when you a use a professional provider for hosting.
- Hard disk space: Depending on the operating system, you’ll need at least around 70 GB (Windows Server) or 30 GB (Ubuntu) of free disk space on your server.
Which server is suitable for The Isle?
When hosting your own server, you have various options to choose from. This can be quite overwhelming at the beginning. In particular, the different server typescan be confusing. With providers like IONOS, you can choose between three server types:
- Dedicated server: With the dedicated server, the hardware is only used by you. Resources are not shared.
- Cloud server: Access to virtualized resources allows you to adapt your server to changing needs at any time.
- vServer: With this option, you also benefit from virtualized resources.
Which of these server types you ultimately choose depends on your individual preferences as well as factors such as the number of players.
Try out your VPS for 30 days. If you're not satisfied, you get your money back.
How to get the most out of your The Isle server when starting out
Thanks to its scalability, a cloud server is perfect for hosting The Isle. If you want to have more players on your server than initially expected, you can flexibly adjust the server plan at any time. It’s also possible to downgrade the hardware, to ensure the resources you are paying for are being optimally utilized.
Thanks to free starting credit, you can test the IONOS cloud server for 1 month free of charge (or until the credit is used up) and experience the perfect combination of performance and security!
Isle scenarios and suitable servers
To help you understand the different server types a bit better, we’ve come up with some typical scenarios for playing The Isle and matched them with suitable server plans. If your server still has some resources to spare, you can also consider hosting a Teamspeak server so you can easily communicate with other players.
| The Isle server scenarios | Suitable IONOS server plan |
|---|---|
| Server permanently online, up to 50 players | VPS Linux L |
| Server permanently online, up to 100 players | VPS Linux XL |
| Server permanently online, more than 100 players | VPS Linux XXL |
A step-by-step guide to hosting your own The Isle server
After you have decided on a suitable server, you can start setting it up. This is done in just a few steps on Linux using the command line. Alternatively, you can also host your own The Isle Evrima server.
Step 1: Connect to your server
The first step is to connect to the server. The SSH protocol is usually used for this.
If you are using a IONOS server solution, you can also use the integrated KVM console instead of SSH. To do this, follow these quick steps:
- Log in to IONOS with your login data.
- Navigate to the server menu by clicking on Server & Cloud.
- Select the correct server product from the list. You will be redirected to the IONOS Cloud Panel.
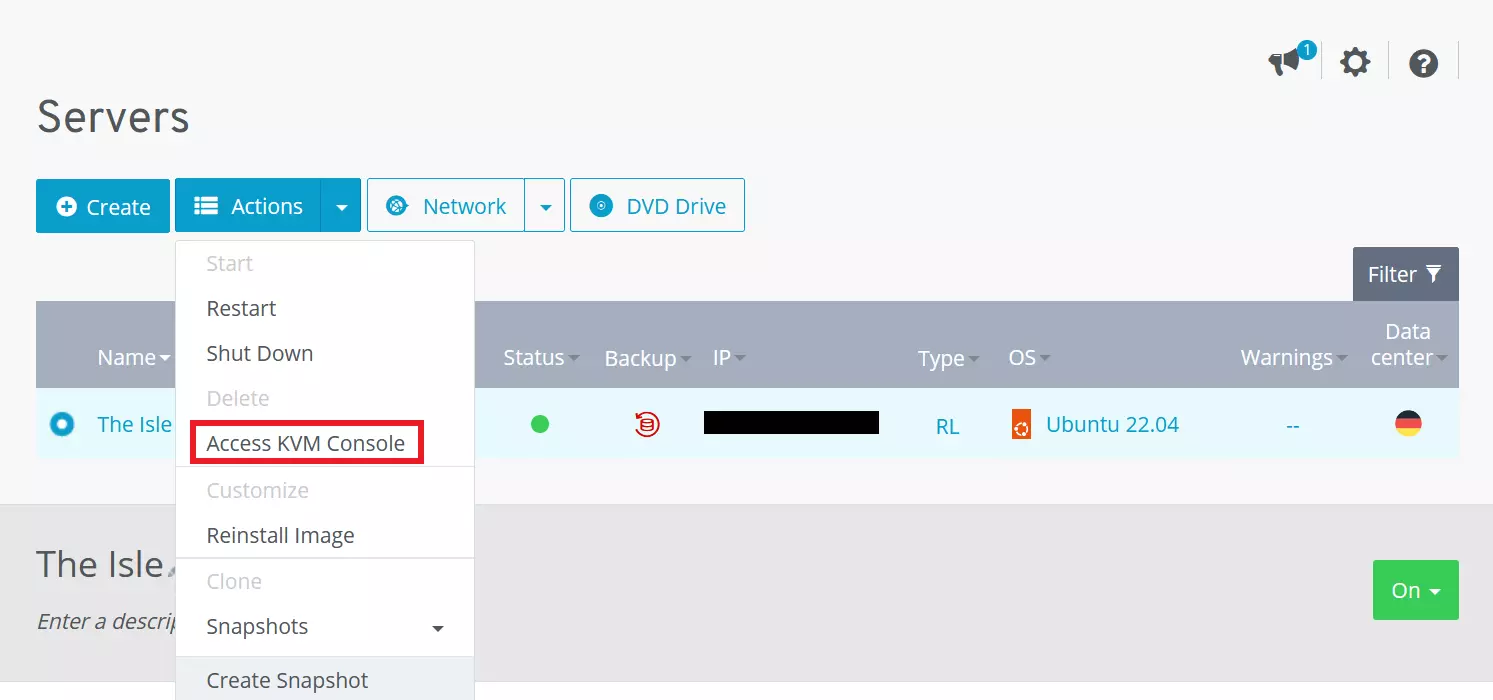
- Click on the server entry and then on the Actions drop-down menu. Then select Access KVM Console.
- Log in with your login credentials. You can find your login details in the section about access data in Cloud Panel.

Step 2: Create user
After you have connected to your server, you can create a user for the server. We have used isle as the name for this user; however, the name you use is completely up to you.
sudo adduser isle
sudo usermod -aG sudo isle
su – isleStep 3: Install SteamCMD
The next step is to install SteamCMD. To do this, we first need to perform any necessary system updates:
sudo apt update
sudo apt upgradeNext, we’re going to execute the necessary commands for downloading the SteamCMD libraries:
sudo apt install steamcmd
cd ~
mkdir isleSteamCMD is now installed on your server and ready to use.
Step 4: Start SteamCMD
SteamCMD now needs to be started so that the The Isle server can be installed afterward. The following command can be used to start SteamCMD:
steamcmdNow you can proceed with installing the The Isle server. This is also done in the terminal with the help of SteamCMD, which you just started:
Steam>force_install_dir /home/isle/isle
Steam>login anonymous
Steam>app_update 412680 -beta evrima +quit
Steam>exitStep 5: Move Steam client to the correct folder
The server looks for the Steam client that has just been installed in a certain directory. In order for the setup of the The Isle server to work, the client needs to be moved to this directory. The directory and its contents are created automatically when you install the Steam app. If you do not want to install the Steam app on your system, you can create the directory manually and move the client from your SteamCMD folder:
mkdir /home/isle/.steam/sdk64
mv /home/isle/.local/share/Steam/steamcmd/linux64/steamclient.so /home/isle/.steam/sdk64/steamclient.soIf there is no .steam directory, it’s still necessary to install the Steam client on your system. The installation is done via a package manager with the command sudo apt install steam.
Step 6: Download configuration files
To configure the server, you need the configuration files. These can be easily downloaded from GitHub. Folders should be created first so that the configuration files can be placed there later:
mkdir /home/isle/isle/TheIsle/Saved
mkdir /home/isle/isle/TheIsle/Saved/Config
mkdir /home/isle/isle/TheIsle/Saved/Config/LinuxServerAfter the folders have been created, go to the folder named LinuxServer and download the required configuration files from there. You will need the following commands for this:
cd /home/isle/isle/TheIsle/Saved/Config/LinuxServer
wget https://raw.githubusercontent.com/modernham/The-Isle-Evrima-Server-Tools/main/Engine.ini
wget https://raw.githubusercontent.com/modernham/The-Isle-Evrima-Server-Tools/main/Game.iniStep 7: Edit configuration files
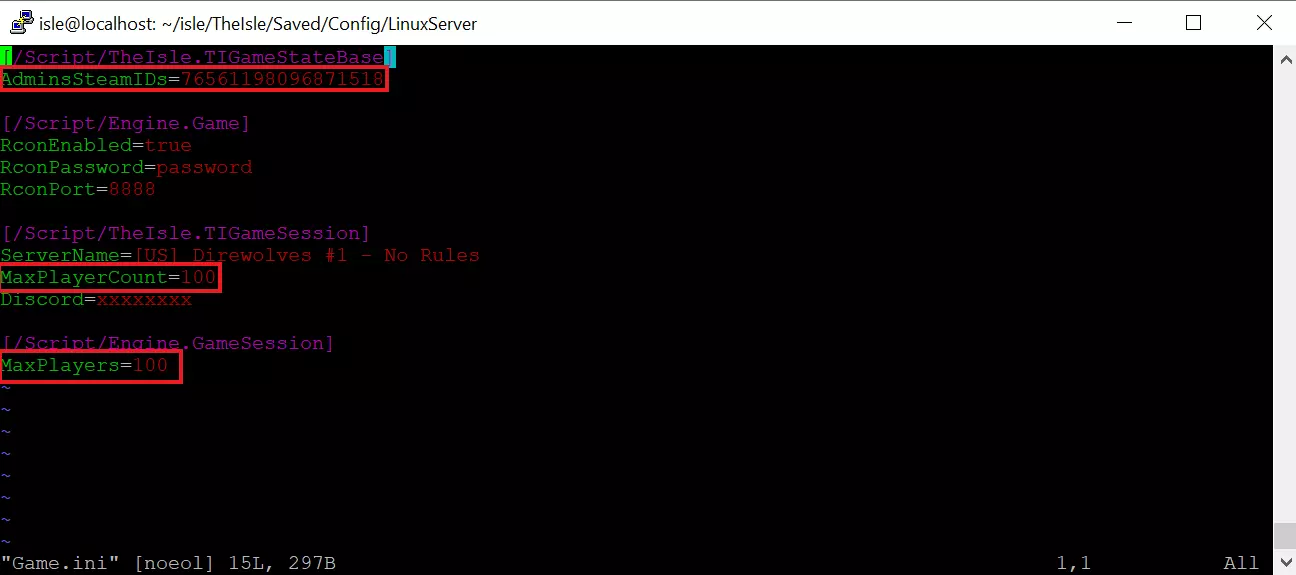
For the final step, the configuration files must be edited. For this you can use the text editor of your choice. We have decided to use vim, which is easy to use via the command line. The file that you need to edit is called Game.ini and can be opened with vim like this:
vim Game.iniHere you should first enter your Steam ID. You can find this in your Steam account by clicking on your profile name in the top right corner and then clicking Account details. The ID is directly under your account name.
You can specify the number of players for your The Isle server in the Game.ini file. You can also find ways to specify the RCON password in the configuration file. Additionally, you can choose not to use a password by entering RconEnabled:false.

Step 8: Start the server
After your server setup is complete, you can start your server. To do this, you must first go to the correct folder:
cd /home/isle/isleThen you can use the following command to start the server. Here you have to replace [ip-address] with your own IP address.
./TheIsleServer.sh MultiHome=[ip-adresse]?Port=7777?QueryPort=7778 -logStep 9: Connect to The Isle server
You’ve now successfully set up your server. In order for the fun to begin, all you have to do is connect to your server. To do this, open your game and enter the server information (that you just created) in the search. You will then be connected to the server.


