How to set up a dedicated server for “The Forest”
Want to play “The Forest” together with friends, and enjoy maximum freedom for configuration and mods in game? A hosted server is the best solution for this. If you have the necessary hardware, you can easily install the server application of this open-world survival game via SteamCMD.
Try out your VPS for 30 days. If you're not satisfied, you get your money back.
What are the requirements of “The Forest” dedicated server?
A community server for joint online adventures in “The Forest” can basically also be hosted on your own PC at home. However, if you want to join the game yourself later, this is not recommended from a performance point of view. In addition, the internet connection in households is rarely sufficient to guarantee a smooth gaming experience. Another reason for hosting the game at a provider: As soon as you shut down your device, the “The Forest” server is offline as well.
The requirements of hosting “The Forest” on a dedicated server can be summarized as follows:
- Computing power (CPU): 2 players: min. 2.4 GHz (2 cores); 3+ players: min. 3.0 GHz (4 cores)
- RAM: 2 players: min. 3 gigabytes; 3+ players: min. 4 gigabytes
- Hard disk space: min. 10 gigabytes
If you want to use additional modifications, you have to plan for more resources, especially if you increase the default maximum player count of 8 in this way.
Additionally, consider the computing power you need for the operating system. You can choose between the server operating systems from Microsoft and the typical Linux server systems like Ubuntu.
You want to set up a solution for shared communication in addition to your “The Forest” dedicated server? Plan a little more disk space and computing power and install the voice tool of your choice using our articles:
- Create a TeamSpeak server
- Create a Discord server
- Create a Mumble server
Hosting a “The Forest” dedicated server with IONOS offers
Hosting options for gaming servers can be found at a wide variety of providers. At IONOS, for example, you can choose between three models with different packages (scope and costs), which differ in their architecture, but all guarantee a broadband connection of up to 400 Mbit/s.
Three IONOS server models compared
The server categories that IONOS offers for hosting a “The Forest” server are as follows.:
- Cloud server: Virtualized server resources billed by the minute
- vServer: Virtualized server resources at a fixed monthly price
- Dedicated server: Dedicated enterprise hardware; per-minute billing
Here, you’re given the choice between virtualized server resources, which you share with other customers, and dedicated hardware, which IONOS reserves only for you. In both cases, however, you can be sure that you will always have the booked performance capacities at your disposal.
The decisive difference between cloud servers and vServers lies in the billing. With a cloud server, you only pay at the end of the month for the service that you have actually used. Customers who opt for a vServer always pay a fixed monthly price.
The price for dedicated servers, which are also billed on a per-minute basis, is generally higher than the prices for vServers and cloud servers, as the focus here is on high-performance enterprise hardware.
Want to run more than one “The Forest” dedicated server or use your server for other purposes as well? In this case, a dedicated server from IONOS is likely the best option.
Three cases for a “The Forest” dedicated server and matching IONOS plans
Exactly how much computing power and storage space you need, and which server type or plan is best suited to you depends mainly on how you want to use your “The Forest” server. Are you planning to have many users and mods? And do you need the hardware exclusively to run “The Forest” dedicated server? The table below shows three possible scenarios and the corresponding IONOS plans.
| “The Forest” dedicated server scenario | Matching IONOS server plans |
| 2-4 persons; server permanently online | VPS M RAM |
| 5-8 persons; server permanently online | VPS XL |
| 8+ persons; many mods or other use of the server planned | AR6-32 SSD |
A Cloud server from IONOS is the perfect choice for getting started in the world of server rental. The hardware provides you with a secure and flexible basis for hosting a “The Forest” dedicated server or other applications, where you only pay for claimed performance.
Create a “The Forest” dedicated server: step-by-step tutorial
You can start with the installation and setup of your own “The Forest” server as soon as you have the appropriate server hardware ready. In the following, we will show you the individual steps. The instructions are exemplary from the perspective of IONOS customers (vServer, Cloud Server, Dedicated Server). Windows Server is used as the operating system.
Try out your VPS for 30 days. If you're not satisfied, you get your money back.
Step 1: Establish remote connection to the server
To install and set up “The Forest” server application on the rented hardware, you must first establish a remote connection to the server. Set up this remote connection on the device you want to use to work with the server resources. Customers and clients of IONOS conveniently perform the configuration via the Cloud Panel. The required steps are as follows:
- Log in via the IONOS Login with your individual login data.
- Click on the “Server & Cloud” section.
- Select the rented server solution on which you want to set up “The Forest” dedicated server
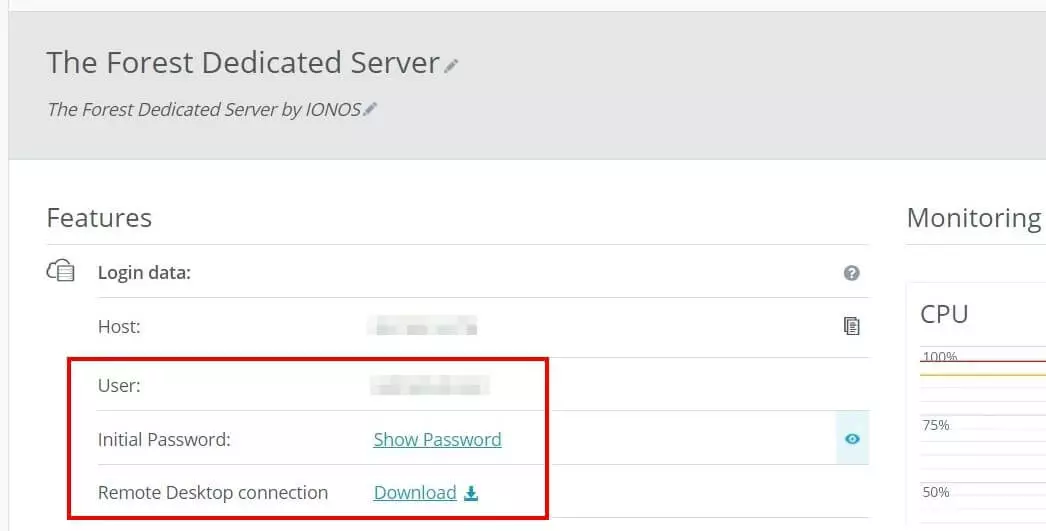
- Scroll to the credentials and click the download link at the “Remote Desktop Connection” entry.
- Double-click the downloaded file and press “Connect”.
- Enter the credentials for your server (“More options” -> “Use another account”), which you can find in the credentials in the Cloud Panel in the “Username” and “Initial password” lines.
The first time you connect, you must also confirm the certificate by pressing “Yes”.
Step 2: Install SteamCMD
The quick and easy solution to download and install the server software is via SteamCMD. This tool is the official command line client of the Steam gaming platform. Simply download the following SteamCMD installation package and unzip it into any directory. Then double-click SteamCMD.exe to install the program.
For detailed information on how to install the Steam command line client on Windows and Linux, see our article “Install SteamCMD”.
Step 3: Install “The Forest” dedicated server via SteamCMD
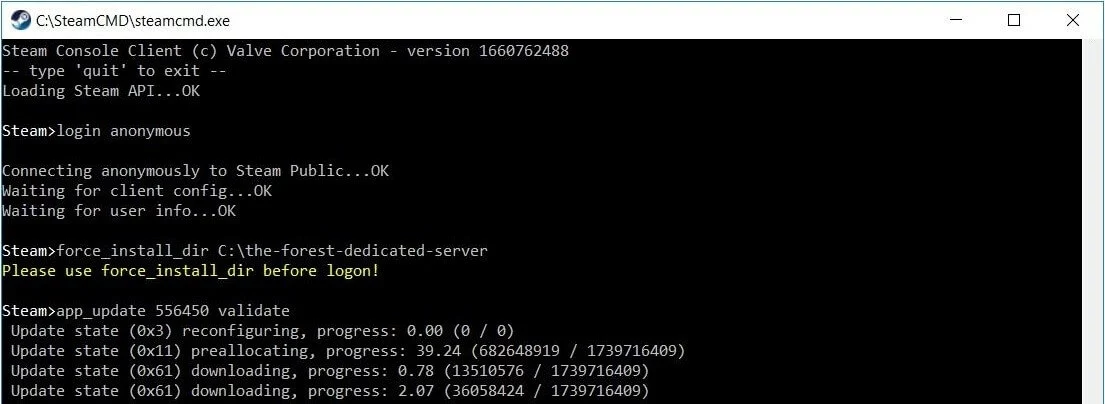
Using the command line client, you can now connect to the public Steam servers and obtain the dedicated server software of “The Forest”. To do this, start the program by right-clicking and first type the following command for an anonymous login to the public Steam servers:
login anonymousIn the second step, you create a directory where the server application will be installed, for example C:\the-forest-dedicated-server:
force_install_dir C:\the-forest-dedicated-serverFinally, download the software by combining the “app_update” command with the app ID of “The Forest” dedicated server (556450):
app_update 556450 validateIf you want to check if there are updates for the server application later, the SteamCMD command “app_update 223350” will work.
Step 4: Release server ports
Your “The Forest” server is now installed. However, it is not yet prepared ready to communicate with the Steam servers and connection-seeking clients. For this purpose, it is necessary to release the corresponding ports in the server’s firewall. These are the following:
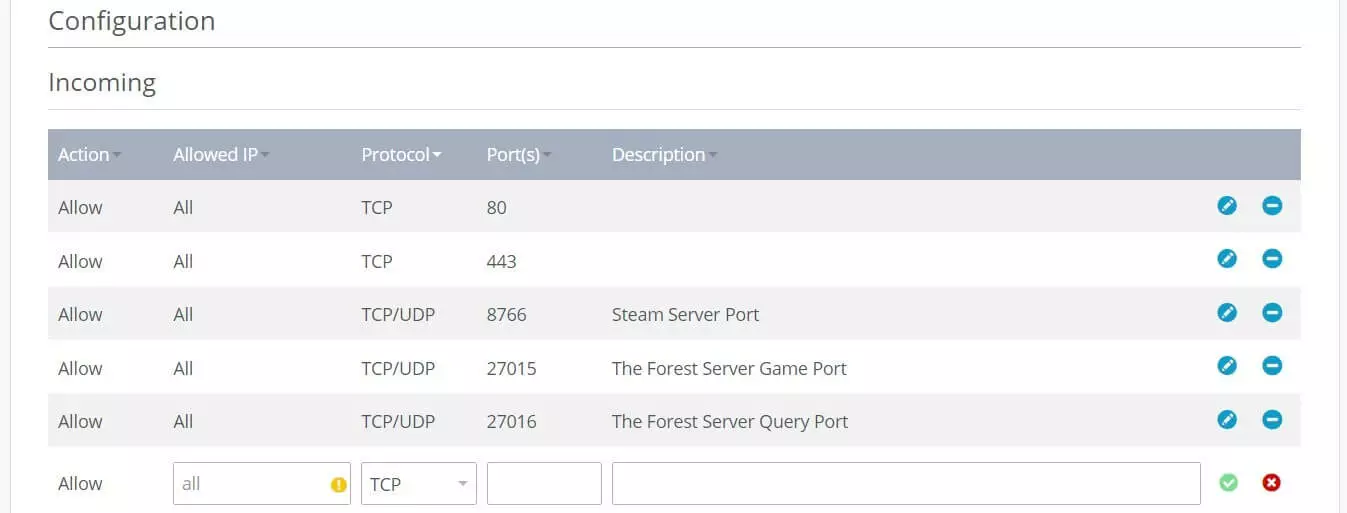
- TCP/UDP-Port 8766: Steam Server Port
- TCP/UDP-Port 27015: Game Port
- TCP/UDP-Port 27016: Query Port
It’s only after you have released these three ports that your hosted game world can be registered by Steam and visited by other players. As an IONOS customer, you can also activate the ports in the Cloud Panel:
- Log in to the IONOS login page with your data.
- Go to the “Server & Cloud” section and select the server where you have installed the dedicated server software.
- Click “Network” and “Firewall Policies” in the left side menu one by one.
- Under “Incoming”, create the rules for the three listed port numbers “8766”, “27015” and “27016”. Make sure to select the “TCP/UDP” option in the “Ports” field.
Port release usually takes a few minutes. In the top section of the firewall policies, the IONOS Cloud Panel can show you the progress under “Status”.
Step 5: Configure server
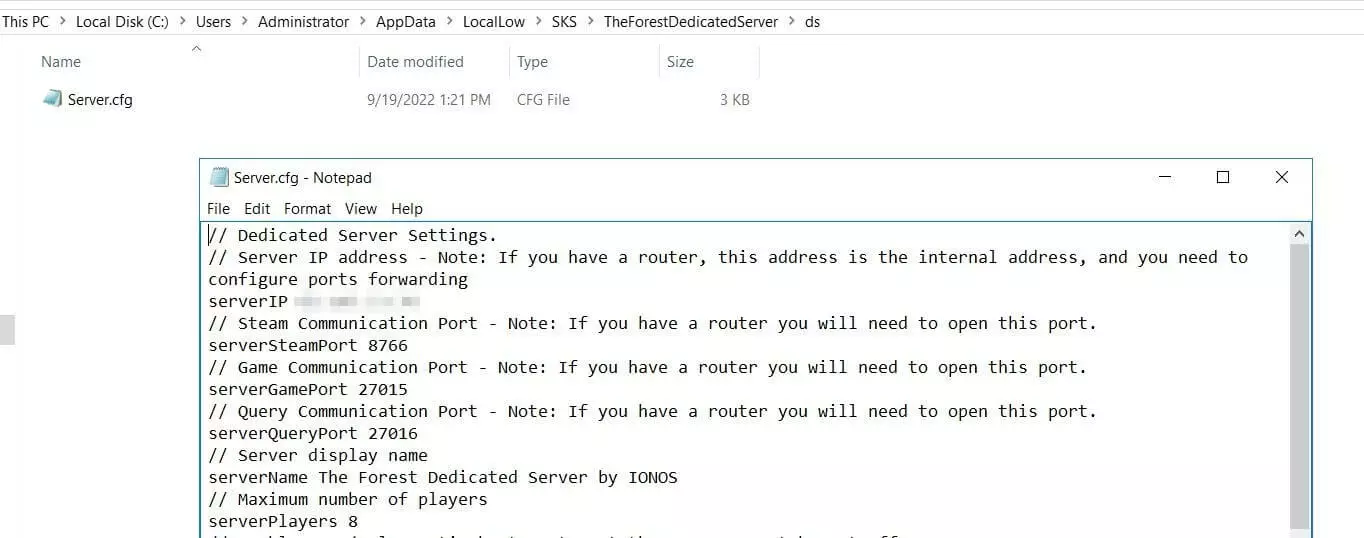
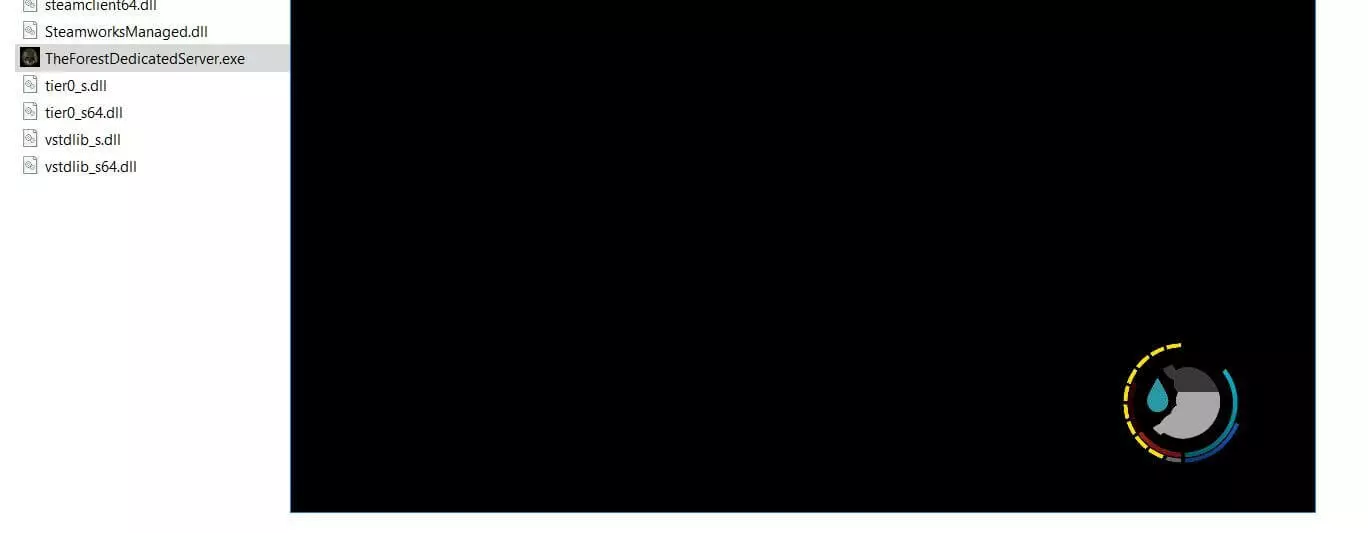
Now you can take care of the configuration of the server. “The Forest” uses the Server.cfg file for this, which is automatically generated the first time you start TheForestDedicatedServer.exe. So first call up the directory where you installed the server and start the .exe-file by double-clicking it.
Wait a moment and then close the window again (it’ll open automatically). You will find the configuration file in the following directory:
C:\Users\USERNAME\AppData\LocalLow\SKS\TheForestDedicatedServer\dsOpen Server.cfg with any editor and configure “The Forest” dedicated server to your liking. Among other things, you can assign a server name and password, adjust the maximum number of players and the difficulty level, or activate Vegan Mode to create a game world without the annoying cannibals (!).
If you define an admin password in the Server.cfg, you can use it later to log in to the server as an administrator. You can then use the command console to execute various commands in the game, for example to manually save the game or restart the server. An overview of the available commands can be found on the “The Forest”-Wiki on Fandom.
Step 6: Start “The Forest” server
Step 7: Connect to your “The Forest” dedicated server
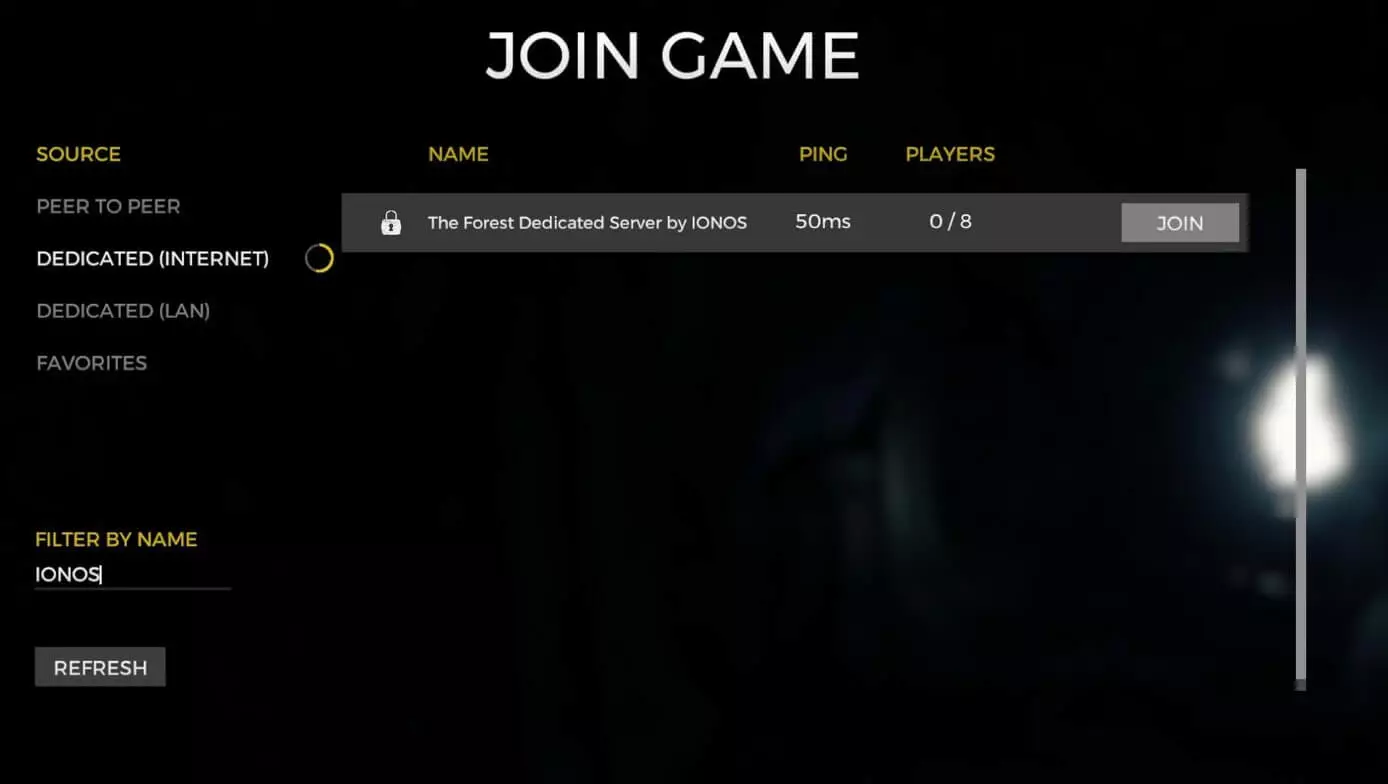
Once your own server is up and running, you and other players can connect to it at any time. Simply start the game and then follow these steps:
- Click on “Multiplayer”.
- Select “Join Game”.
- Switch to the “Assigned (Internet)” section under “Source”.
- Search for your server in the listing. For assistance, you can type in a keyword or the entire server name under “Filter by Name”.
- Click “Join” on the matching search result.
- Enter the server password and (if assigned and desired) the admin password.
- Press the “Join” button again to establish the connection to the server.
Make a statement with your own .gg domain and let the games begin. Register your own .gg domain now with IONOS.


