How to host a TeamSpeak Server
In August 2021, the VoIP application TeamSpeak celebrated its 20th anniversary. Over two decades later, despite modern alternatives like Discord, the program is still used for group chats and calls, especially in gamer circles. In addition, high security standards and unsurpassed sound quality encourage many users to host or rent their own TeamSpeak server. But how does it actually work? And what are the hardware requirements for TeamSpeak?
Thanks to free starting credit, you can test the IONOS cloud server for 1 month free of charge (or until the credit is used up) and experience the perfect combination of performance and security!
TeamSpeak: Host a server yourself or just rent it?
Anyone who has looked into renting a gaming server such as a Minecraft server knows that many providers often offer the option of additionally renting a TeamSpeak server. However, in order to enjoy maximum freedom in the administration of the VoIP software, it is recommended that you host the TeamSpeak server yourself. For this you basically have two options:
- You host the TeamSpeak server on your own PC.
- You host the TeamSpeak server software in a provider’s data center.
If you run the TeamSpeak server on your own PC, you enjoy the advantage of not having to pay additional costs for renting external server resources. In this case, however, TeamSpeak is only available to all users when you have your device turned on. So if you want the server to be available around the clock, you cannot shut down your PC.
Then there is the fact that a stable Internet connection is absolutely essential for smooth conversations and chats, with broadband requirements increasing with the number of active users. This is where external providers, whose servers have excellent connections to the Internet, are especially impressive. Especially if you want to join the TS server and play on your PC at the same time, it is recommended to use external provider resources.
What are the requirements for a TeamSpeak server?
A big plus of TeamSpeak is their performance-oriented approach: Unnecessary extras beyond the basic needs of a voice and text tool do not play a major role, which means the hardware requirements of a TeamSpeak server therefore turn out to be very manageable:
- Processor: CPU with SSE2 support; CPU with SSE4.x support (POPCNT enabled, Windows: 64-bit only).
- RAM: at least 1 gigabyte (total memory requirements depend on the number and size of hosted virtual servers)
- ROM: at least 15 megabytes (total space requirements depend heavily on actual usage, size, and number of hosted virtual servers; additional space is needed for file transfer and icon/avatar storage)
In terms of operating system, you have a free choice. TeamSpeak software runs on all major Windows, macOS, and Linux devices or servers - both 32-bit and 64-bit architecture.
Depending on the size and type of TeamSpeak server, it may also be necessary to purchase a license: For up to 32 users (one virtual server) using the server for private purposes, the software is free to use. For more slots (64 to 1,024 are possible), you have to purchase the Gamer license, which is payable annually. With the commercial license companies can use TeamSpeak as a solution for internal voice communication.
Your own TeamSpeak server from IONOS: These are the options
The minimalist requirements of the software make it easy in principle to rent the appropriate resources for a TeamSpeak server. Nevertheless, with the large selection of providers and pricing plans, it is often difficult to keep track of everything. At IONOS, you have the choice between the following three server models:
- vServer (Virtual Private Server, VPS)
- Cloud Server
- Dedicated Server
How do the IONOS server models differ from each other?
With both the vServer and cloud server, you get access to virtualized resources, all of which reside in IONOS data centers but are not tied to fixed hardware. The difference between the two models is the way they are billed: While vServers are charged by a fixed monthly amount, with cloud servers you only pay for the resources you actually use (per-minute billing).
Start today with your own Cloud Server from IONOS - scalable at any time, billed by the minute, and including your own SSL/TLS certificate!
With a Dedicated Server, you have access to hardware that is reserved solely for you. However, the high computing power you get with a plan like this far exceeds the needs for a simple TeamSpeak server. If you combine the TS3 server with, for example, a CS:GO server or a LS22 server, you have the perfect basis for your own administered online adventures.
Whichever server model you choose, IONOS guarantees an external broadband connection of the server with up to 400 Mbit/s.
TeamSpeak server at IONOS: Which pricing plan for which model?
Choosing the server model is only half the battle - you also have to decide on one of the available pricing plans. However, these differ only in terms of the scope of services. Keep in mind that you also need to plan for resources for the operating system, e.g. a 1.4 GHz processor (64-bit), 512 MB or 2 GB of RAM (without or with graphical user interface), and 32 GB of hard disk space for Windows Server 2016.
The following plans are ideal for a TeamSpeak server:
| vServer | VPS L |
| Dedicated Server | Dedicated Server AR6-32 HDD |
Try out your VPS for 30 days. If you're not satisfied, you get your money back.
TeamSpeak Tutorial: How to create your own TeamSpeak server
In the following tutorial we will show you how to host your own TeamSpeak server step by step and make it available for other users. We will describe the individual steps for IONOS customers (vServer, Cloud Server, Dedicated Server) as an example - Windows Server 2016 is used as the operating system.
Step 1: Establish a connection with the server
The first step is to establish a connection to the rented server. This can be established directly from your device. As an IONOS customer, you can easily set this up via the Cloud Panel.
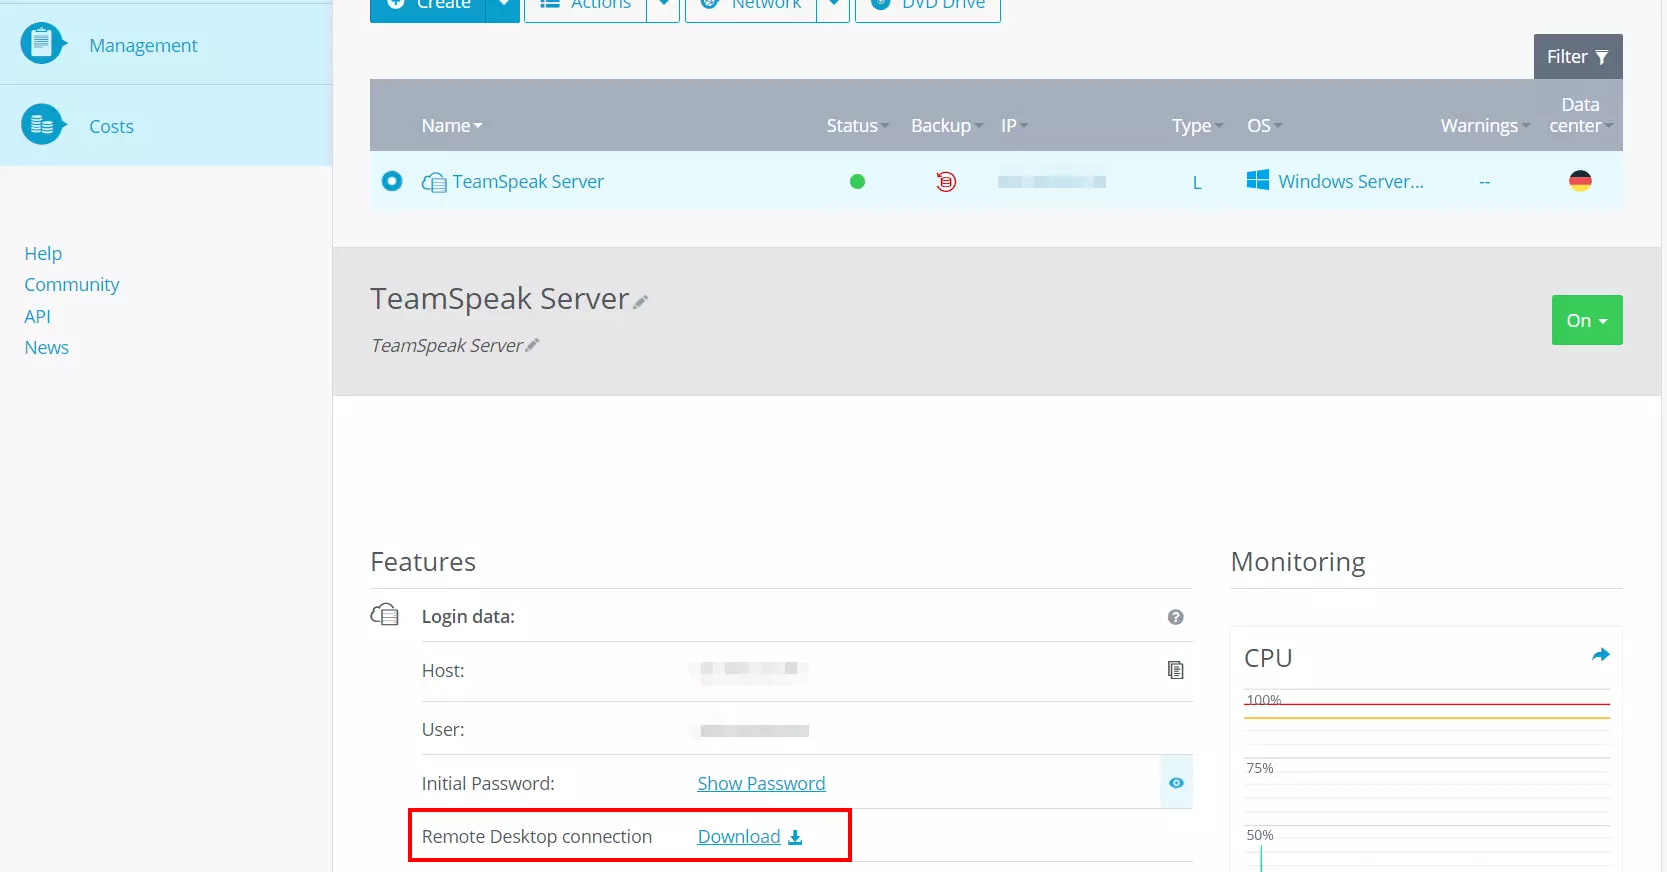
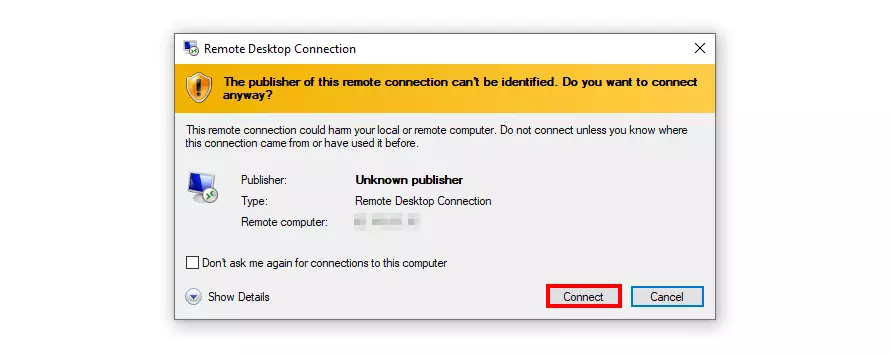
For this purpose, first log in with your personal login details in the Cloud Panel. Select the “Server & Cloud” section and then the server plan you have rented. Scroll down to the “Login data” entry and click on the download link in the “Remote Desktop Connection” line. Run the .rdp file directly or place the file locally first and then double-click to launch it.
If this is the first time you are logging into your server, you will need to enter your individual user credentials. You can also find these in the Cloud Panel under “Server & Cloud” -> “Select Server” -> “Login data” -> “User” or “Initial Password”.
Step 2: Download and unzip the TeamSpeak software.
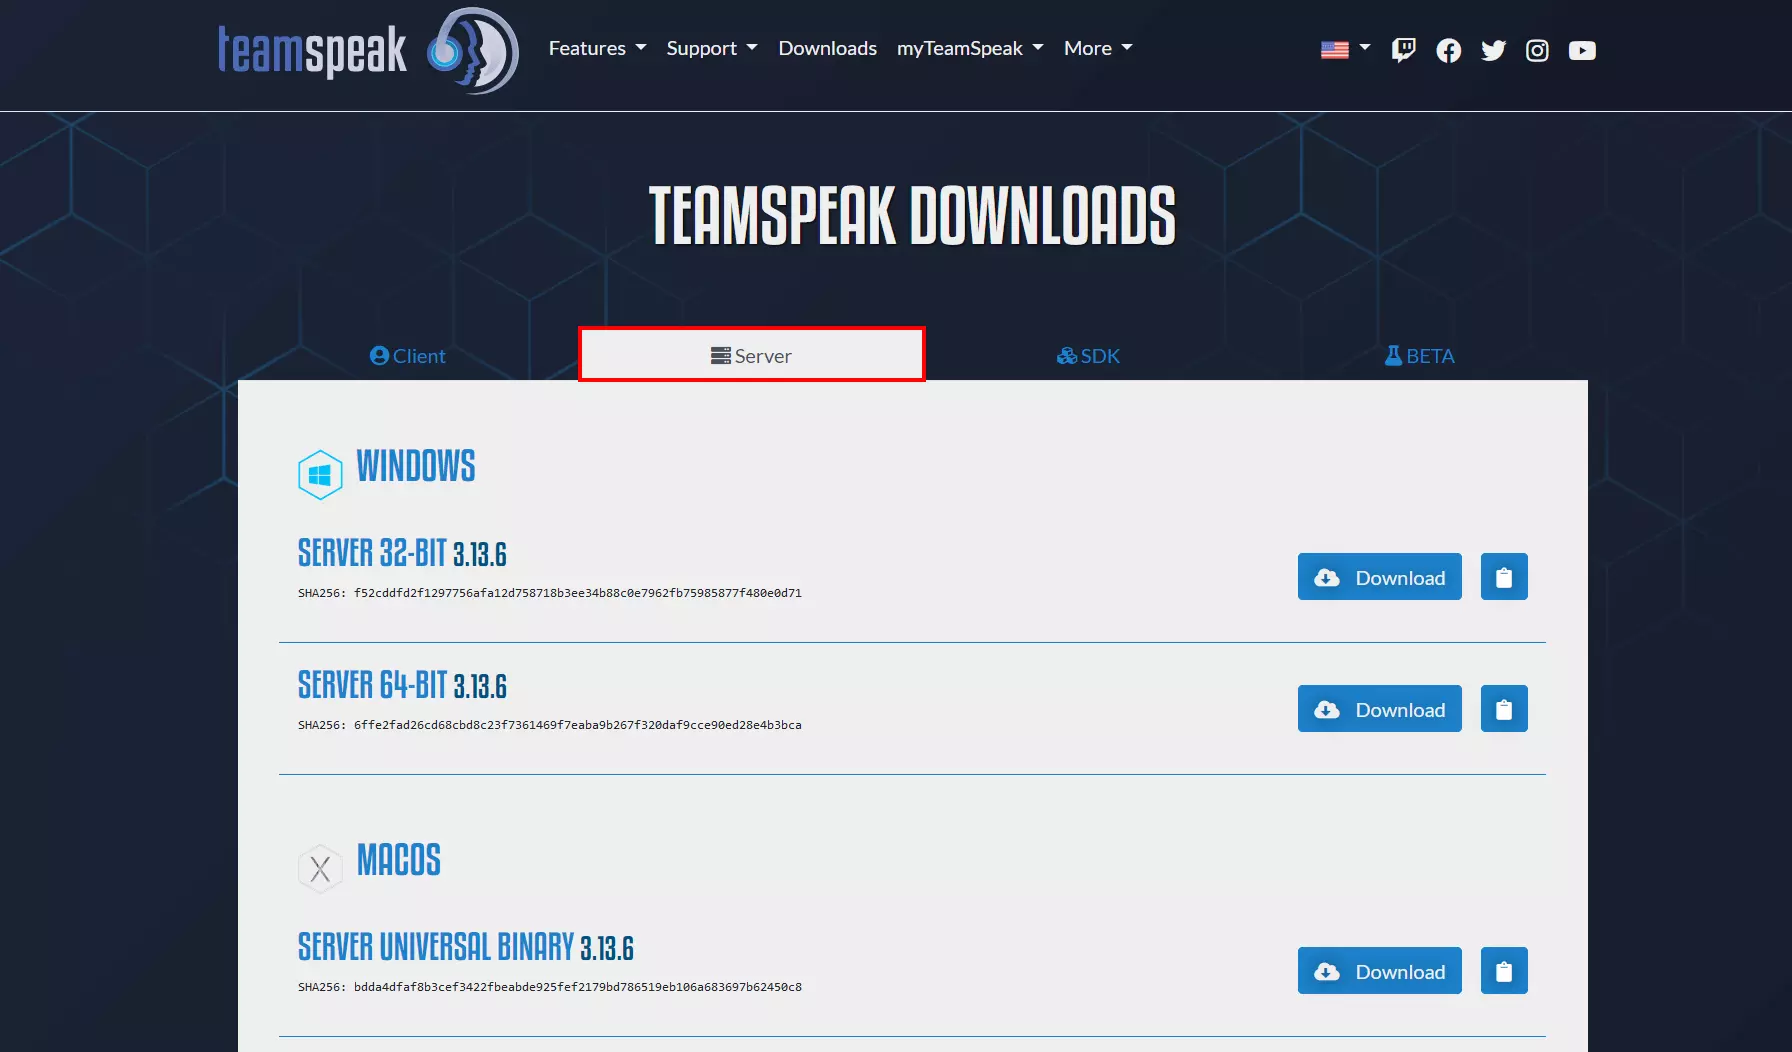
In the second step, download the TeamSpeak server software and install it on the rented server resources. To do this, go to the official website of the VoIP application and download the appropriate edition (32- or 64-bit; Windows, Linux, macOS, FreeBSD) from the Download Center.
After downloading, unzip the downloaded ZIP file into the directory of your choice.
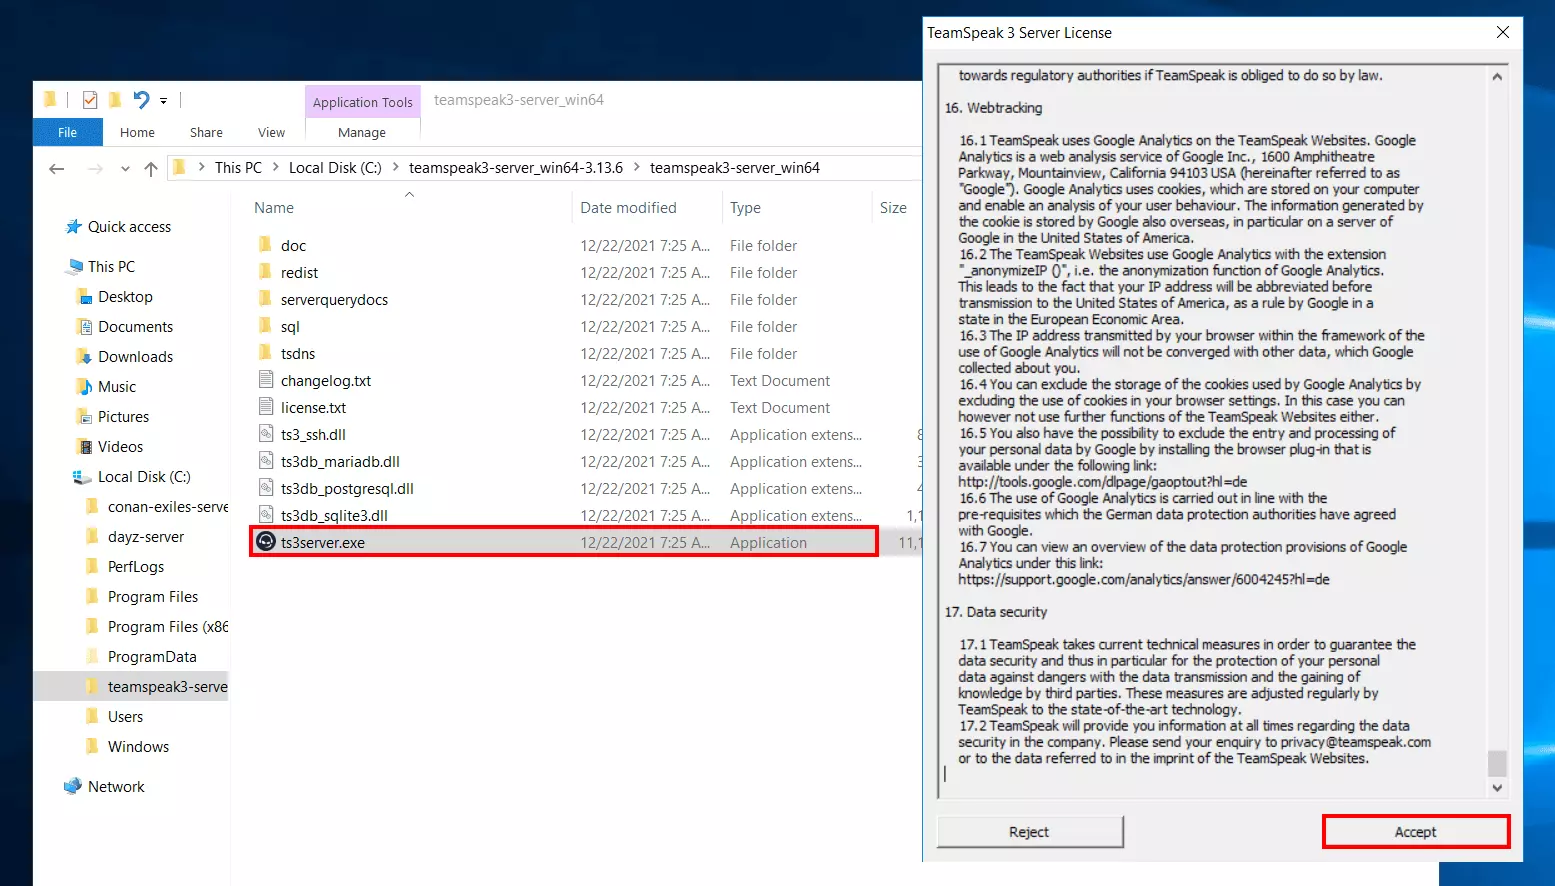
Step 3: Run TeamSpeak server and confirm license agreement
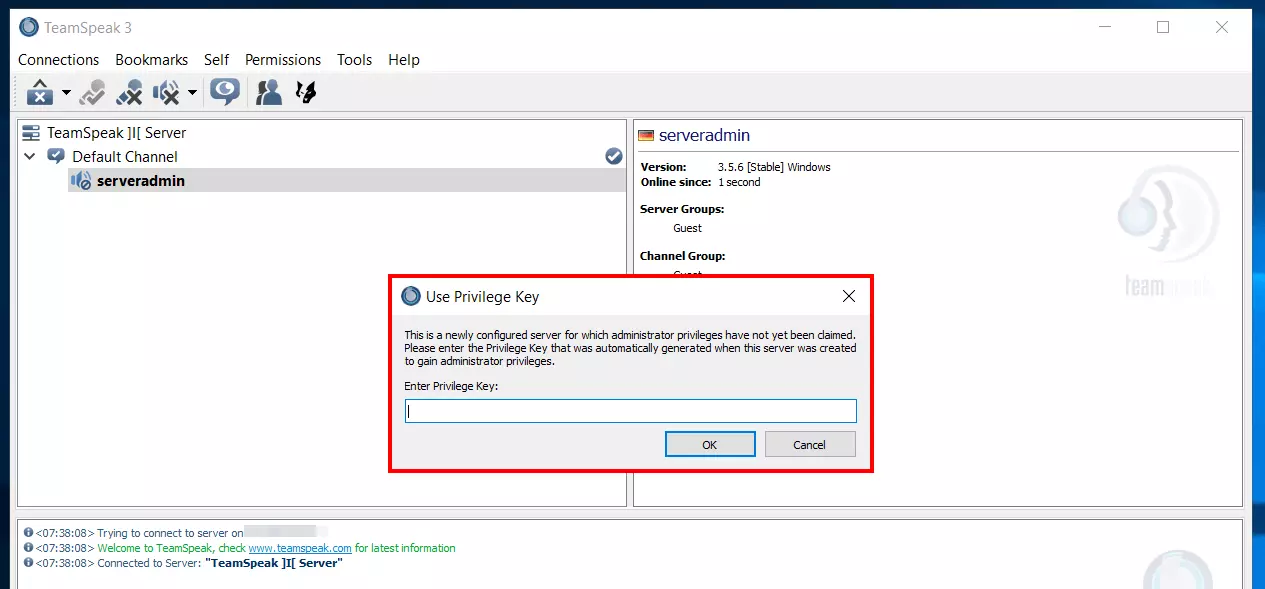
Step 4: Start TeamSpeak client and enter authorization key
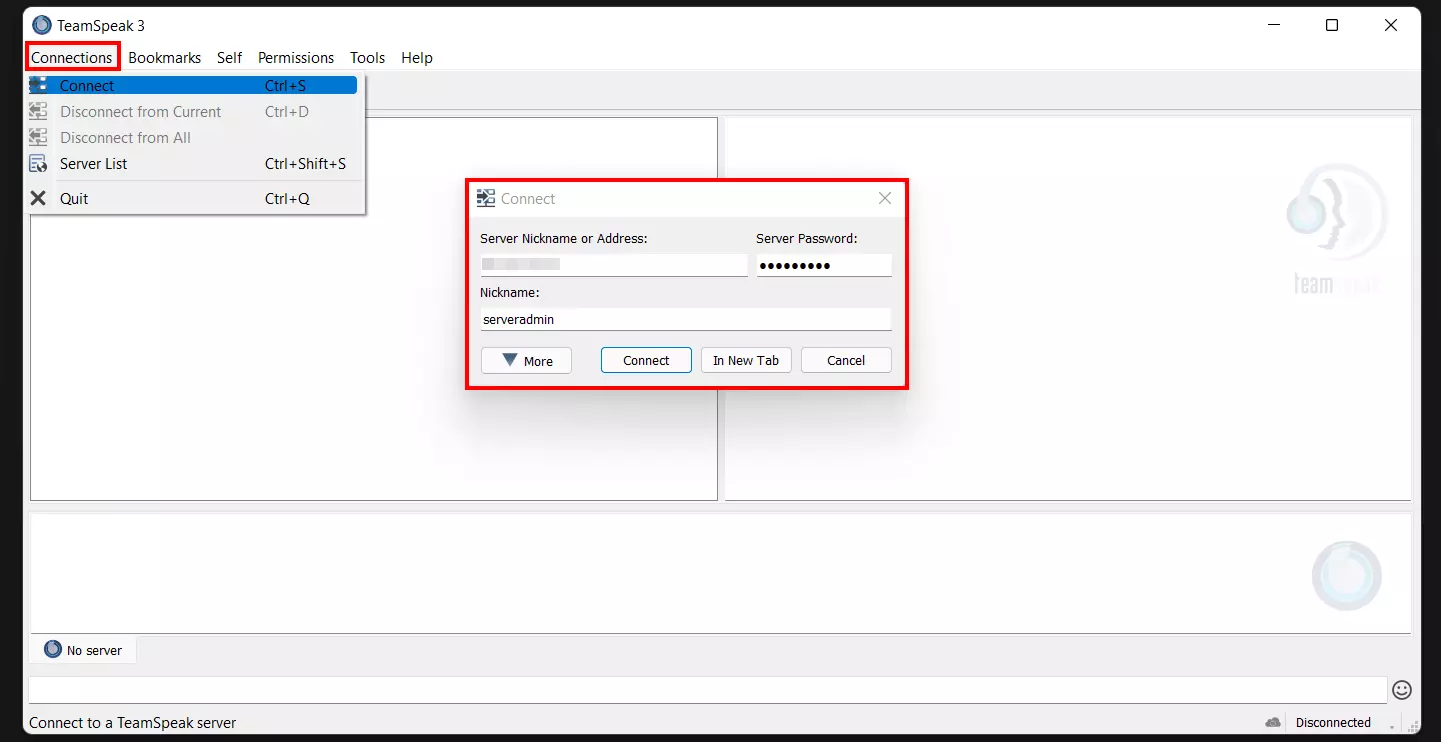
In the next step, start the TeamSpeak client on your server and select “Continue without login”. Assign an individual nickname and click on “Connections” and “Connect”.
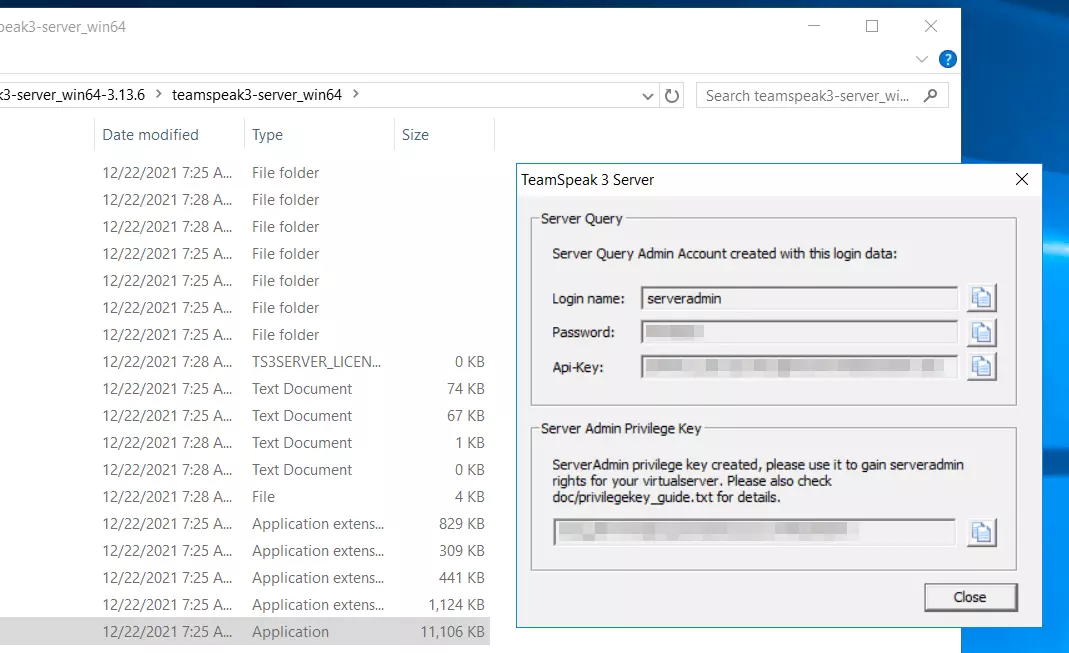
After that you will need the individual IP address of your server as well as the password and username (by default: “serveradmin”) previously generated when running the TeamSpeak server. Enter the three required values and finally press “Connect”.
Step 5: TS3 server setup
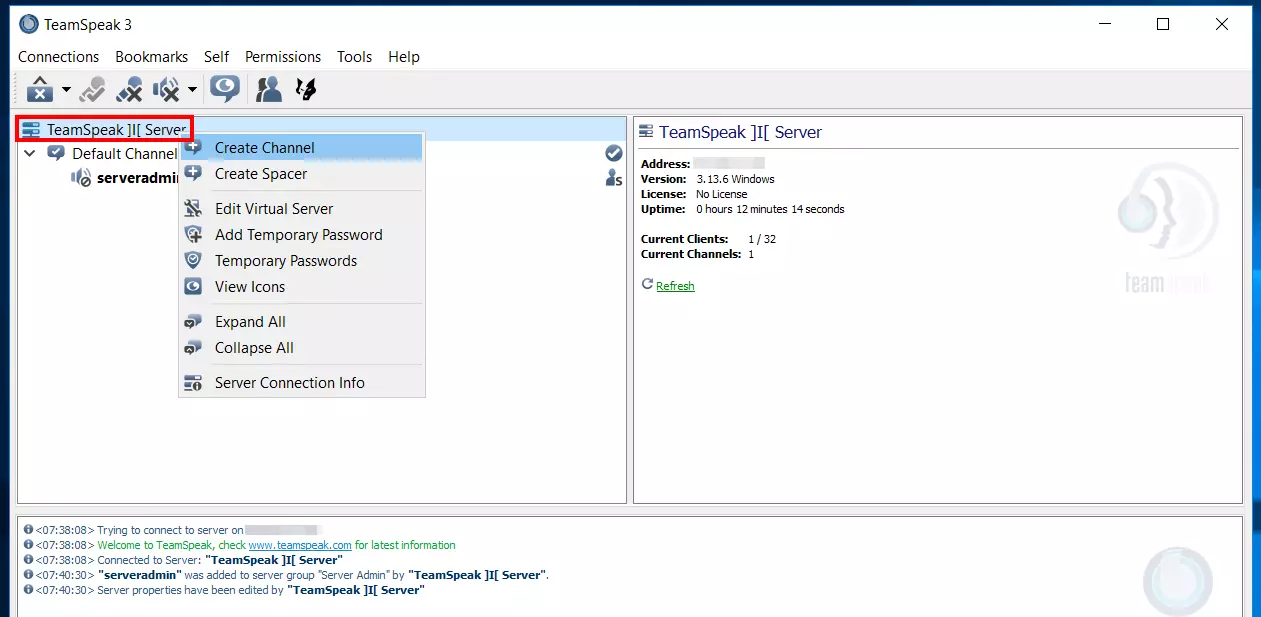
With the help of the administrator rights you can now freely set up the TeamSpeak server according to your wishes. To create a new channel, for example, right-click on the entry of the server in the left window, which by default is called “TeamSpeak]|[Server” and then select the menu item “Create Channel”. You can then assign an individual name and an optional password to the channel. In addition, you can define whether it is
- a temporary channel (exists until the last client leaves it),
- a semi-permanent channel (exists until the next server restart)
- or a permanent channel (exists until it is deleted manually).
If you want to change the name of the server or the welcome message, right-click and select “Edit virtual server”. Here you can also adjust the number of allowed clients or the server icon, among other things.
Step 6: Open ports
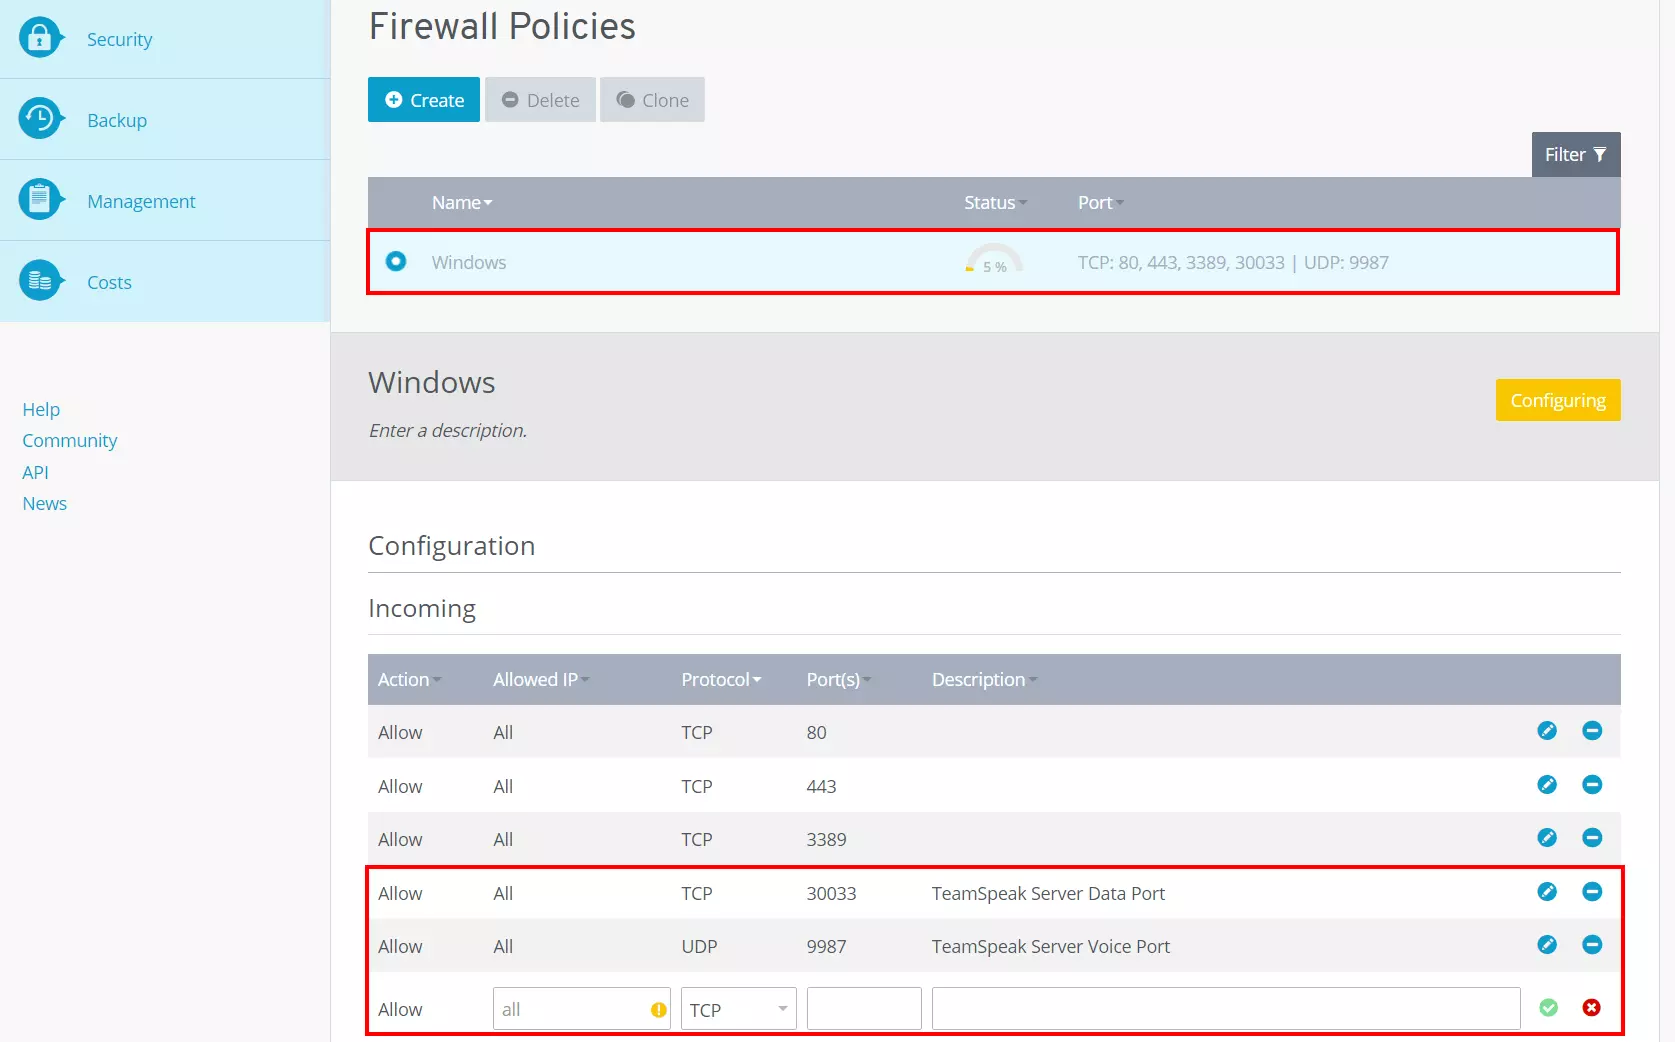
To communicate with the TeamSpeak server, you now need to open a few ports. These are the following:
- UDP port 9987 (incoming): This port is used to send all TeamSpeak voice data. Opening the ports is mandatory. To establish a connection, this port must be appended to the IP address unless you are using a domain or TSDNS.
- TCP port 30033 (incoming): File uploads and downloads are only possible if you have opened this port.
- UDP port 2010 (outgoing): If you want your server to be found in the official server listing, UDP port 2010 must be open.
- TCP port 443 (outgoing): If you are using a license for your TeamSpeak server, you need to open TCP port 443 so that the license data can be checked.
To open the desired ports, you need to create appropriate rules in the firewall. IONOS customers can configure firewall rules for incoming connections directly from the Cloud Panel:
- Log in to the Cloud Panel.
- Call up the “Server & Cloud” section.
- Select the server which the TeamSpeak server is running on.
- In the left side menu, press “Network” and then “Firewall Policies”.
- Select the operating system and add the rule(s) under “Incoming”.
Opening Ports takes some time to complete. Under “Status” you can see the progress of the configuration. In some cases, you may need to restart the server after setup to apply the shared ports as desired.
Step 7: Establish client connection to your TeamSpeak server
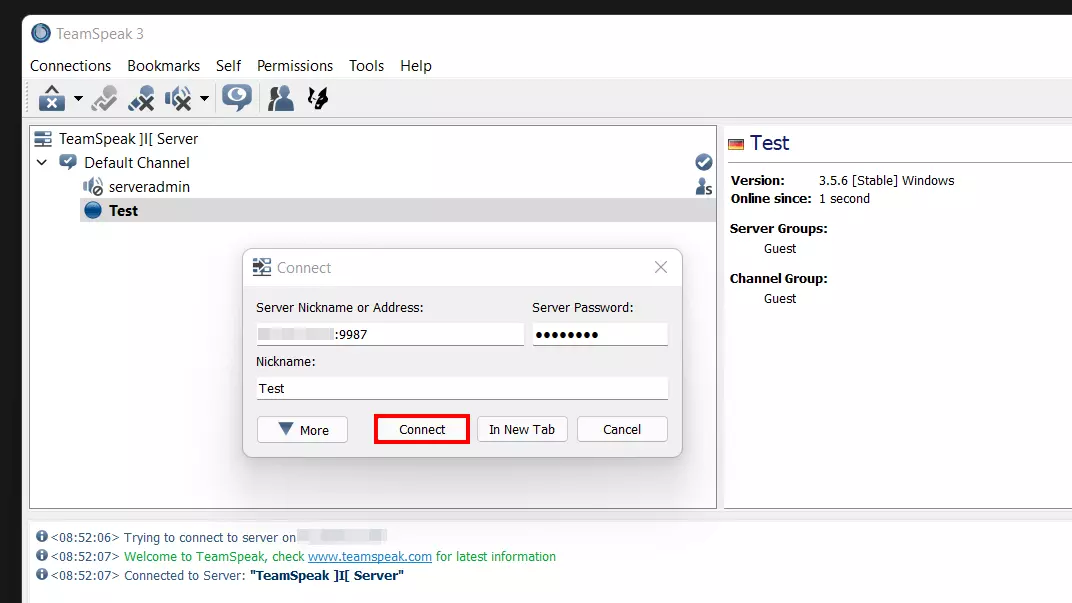
You can now join your TeamSpeak server anytime and from anywhere. To do so, simply open the client software of the VoIP program on the device of your choice and press “Connect” under the menu item “Connections”. Type in the server address and add the voice port preceded by a colon:
IP address of your server:9987

