Set up a Valheim server: Here’s how
The single-player mode has a lot of exciting adventures - however, the multiplayer variant is much more popular, in which up to ten players try their hand at bringing order to the shaken Valheim. In the following, we’ll therefore summarize all the important requirements that need to be met in order to host your own Valheim server. With our step-by-step guide, you’ll learn how to create a Valheim server and make it available for other players to join the fun.
Thanks to free starting credit, you can test the IONOS cloud server for 1 month free of charge (or until the credit is used up) and experience the perfect combination of performance and security!
Valheim server: Host on your own PC or rent a server?
If you want to play Valheim together with friends and acquaintances in multiplayer mode, you have three different options:
- You can start a private or a public server (community server) directly in the game.
- You can join a community server together with friends (without password, or password is known to all players).
- You create and host (or rent) your own Valheim dedicated server.
Starting up your own default server in Valheim (option: Create server) is the easiest and most straightforward way to play together with friends: In this case, you simply specify an individual name and the desired Seed for the new game world, start the Valheim server and then invite your fellow players via the Steam friends list.
A “server” is not only the hardware used to host server applications, but also the software itself. In our article on the topic “What is a server?” we go into more detail about the ambiguous use of the term in computer science.
If you choose a community server for your shared survival adventure, neither you nor your friends will have to host the server. However, in this case you won’t have any influence on which seed is used to generate the map. In addition, expect that other players will also join or that the server will be shut down and no longer available.
If you host your own Valheim dedicated server, you’ll have more freedom for your own hardware and still have complete control over the seed and the players that are on the server. In addition, this option lets you run the server permanently, so that your fellow players can leave for Valheim without you in case you’re busy.
What are the system requirements for a Valheim server?
If you start a Valheim server directly in the game, keep in mind that you run not only this server, but also the game itself (as well as the operating system) on your PC. Your computer must be able to not only handle the server, but also meet the requirements of the game. In addition, your Internet connection is critical in the stability of the server set up. Even very powerful connections will reach their limits if there are more than three players on the server.
For the hosting of Valheim’s dedicated server software, there is no official information from the manufacturer’s side so far. Since the graphical design of the survival game - at least in the Early Access status - was deliberately kept simple, Valheim is by no means particularly resource demanding. However, technical information from players suggests that less powerful setups are less suitable for hosting the game world in the long run. The more intensively players interact with the world, for example by constructing buildings or entering dungeons, the more volatile Valheim servers with little RAM and CPU have been. The same is true when the number of simultaneously active players increases.
Below we have summarized the most important system requirements of a Valheim server for you.
Due to the lack of official information about the performance requirements of a Valheim server as well as the still early development stage of the game, the suggested values are recommendations only.
CPU
Valheim isn’t too demanding on the processor performance, which is why most server setups hardly reach their performance limits at this point. Two cores with 2.8 GHz should be a good basis for a joint online adventure for almost all scenarios - both with Windows and Linux as the server system. If the provider works with virtualized cores that have less GHz, a four-core processor (or a suitable number of virtualized cores) is recommended. For a Valheim server for more than five people, it is also a good idea to have more CPU in view of upcoming developments to the game.
For hosting a Valheim server, the Microsoft operating systems Windows Server 2016 and 2019 as well as the typical Linux distributions such as Ubuntu, CentOS, Debian, or openSUSE will work.
RAM
RAM seems to be the most important performance component in many current Valheim servers. Minimal setups with two gigabytes of RAM or four gigabytes of RAM (for operating systems with a graphical user interface) are said to be enough, but these RAM figures lead to problems during longer sessions. Even for the server size of three to five players recommended by Iron Gate, eight gigabytes of RAM seem to be the safer long-term option. If your budget allows, an increase to 16 gigabytes is recommended if between six and ten players will regularly join your adventure at the same time.
Hard disk space
The need for hard disk space is hardly worth mentioning with the current Valheim version. You only need to plan one to two gigabytes of memory for the program files. For the standard installation of a dedicated server via Steam, an additional space of about three gigabytes is needed. So, with five gigabytes of hard drive space, you’ll be well equipped for the current Valheim version. In addition, there are the memory requirements of the operating system - for a Windows Server 2016, for example, 32 GB, for an Ubuntu server (20.04) 25 GB memory.
If you’re planning regular backups of your Valheim server, this should also be taken into account when planning your storage.
It is to be expected that future Valheim editions will take up more memory, as the survival game is far from reaching the final stage of development. Add-ons and modifications, which currently do not play a role, are also possible elements for server upgrades in the future.
Broadband requirements
The broadband requirements for hosting a Valheim server should, in theory, be easily met by all professional providers. If you take the upload guideline of 53.4 Kbit/s per player for Steam source games provided by Steam developer Valve as a guide, a broadband connection that offers one to two Mbit/s upload speed should be more than enough. In practice, many gamers experience serious lags as the number of players increases, since these providers may limit the maximum upload speed by default. In this case, consult your provider to remove the restriction - if possible.
Renting Valheim server hardware from IONOS: Three options
In principle, you have the option of hosting a Valheim server on your own home computer or a separate second PC. In this case, however, you have disadvantages compared to a rented server, e.g., high acquisition and operating costs or a lack of flexibility when it comes to increasing or decreasing the server capacities.
If you want to rent the hardware for a Valheim server, however, you’ll need to choose between providers and server models, which is easier said than done. With IONOS, for example, you can choose one of the following three variants:
- Dedicated Server (dedicated server, either self-managed or managed by IONOS)
- vServer (also referred to as Virtual Private Server, or VPS for short).
- Cloud Server
Do you keep coming across the term “dedicated” server resources when comparing providers and are wondering what exactly this is all about? In the article “Shared Hosting vs. Dedicated Hosting”, we’ll explain how this specially allocated hardware differs from the alternative shared solutions.
What are the differences between the three IONOS server options?
The three available server options from IONOS differ regarding their pricing. In addition, the way in which the resources are made available to customers plays an important role. To make it easier for you to choose the right model for your Valheim server, we present the three options below:
A cloud server rental from IONOS means that you rent virtualized server resources that are billed by the minute. If you want to ramp up the performance, you can do so at any time via your account. The same applies if you want to reduce the service package or switch off the server completely.
vServers grant you access to virtualized server environments. However, there is always a fixed monthly charge for the VPS solutions, regardless of how the resources are used.
IONOS guarantees an external broadband connection of the server with up to 400 Mbit/s regardless of the chosen server model.
If you choose a dedicated server, IONOS assigns hardware that is reserved just for you. Only this option allows customers to have processors with strong single-core power of up to 3.8 GHz, but that also affects the price.
IONOS’ options are not only aimed at Valheim gaming communities: You can also use the powerful rental hardware to host a Minecraft server, a CS:GO server or create a LS19 server. Of course, if you’re looking for variety in the survival genre, you can also set up an ARK: Survival Evolved server or a Rust server.
Three Valheim server set-ups and IONOS packages for them
For the three server options presented, IONOS has a few packages to choose from, which differ in terms of scope of services and costs. To make it easier for you to find the right package, we have compiled three possible set-ups for your own Valheim server in the following table, including the appropriate rates for vServers at IONOS.
| Recommended vServer | ||
| Valheim-Server for 2-3 players | IONOS Virtual Server Cloud XL (VPS XL) | |
| Valheim-Server for 4-5 players | IONOS Virtual Server Cloud XL (VPS XL) | |
| Valheim-Server for 6-10 players | IONOS Virtual Server Cloud XXL (VPS XXL) |
Try out your VPS for 30 days. If you're not satisfied, you get your money back.
Creating a Valheim server – step by step instructions for Windows
Once the server setup is complete, it is important to choose your operating system. In the case of a dedicated server for Valheim, you can choose between Microsoft and Linux server systems such as Windows Server or Ubuntu.
In the following, we will show you how to create a Valheim server as an IONOS customer and then how to make it accessible for playing together with friends via the game client. Windows Server 2016 is used as the server system.
Step 1: Connect to server
To access rented server resources, you’ll first need to establish a remote connection to the server. If you have not configured this yet, you’ll have to do this next. As an IONOS customer, you can conveniently set up the connection via the Cloud Panel, which is why the first step is to log in to the Login page with your personal account data.
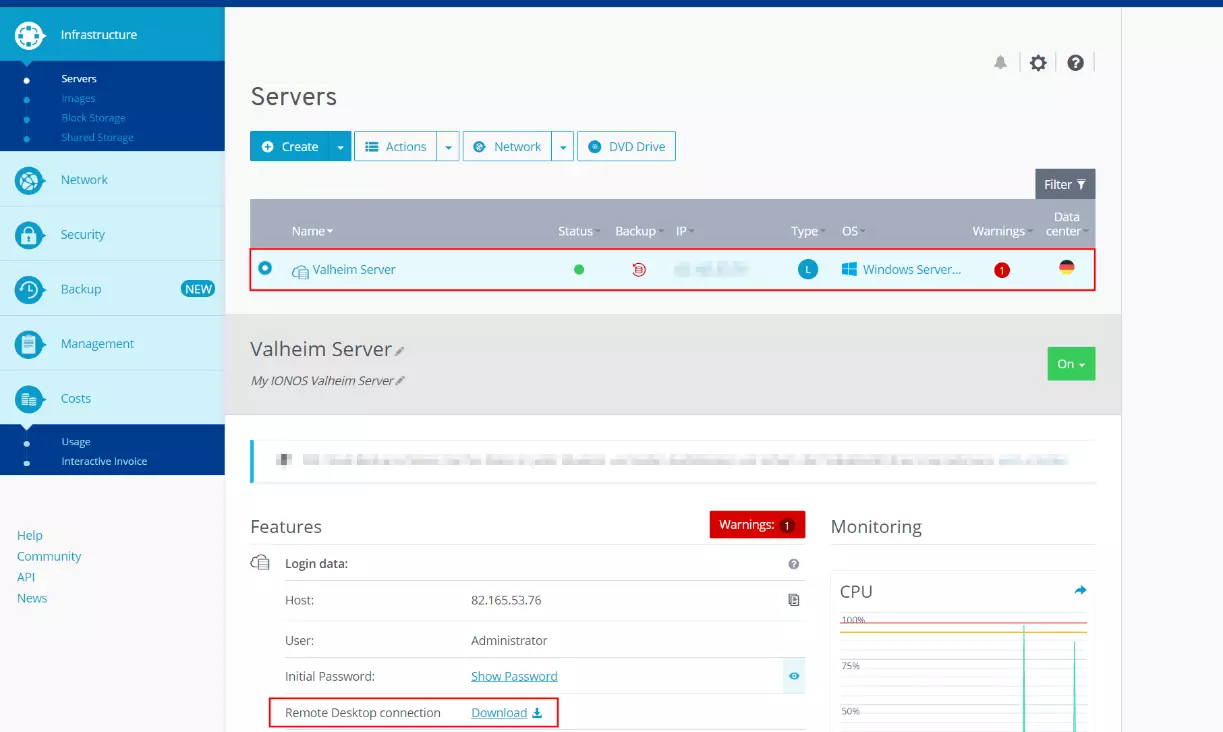
After logging in, select the “Servers” section and then your server package that you have booked for hosting the Valheim server. On the information page that is then presented, you will find the entry “Remote Desktop connection” including the download button under “Login data”.
Once you click the link, you can either keep the selected “Open with” option or save the file locally and then double-click to run it. Continue with the setup by selecting “Connect” in the next dialog box.
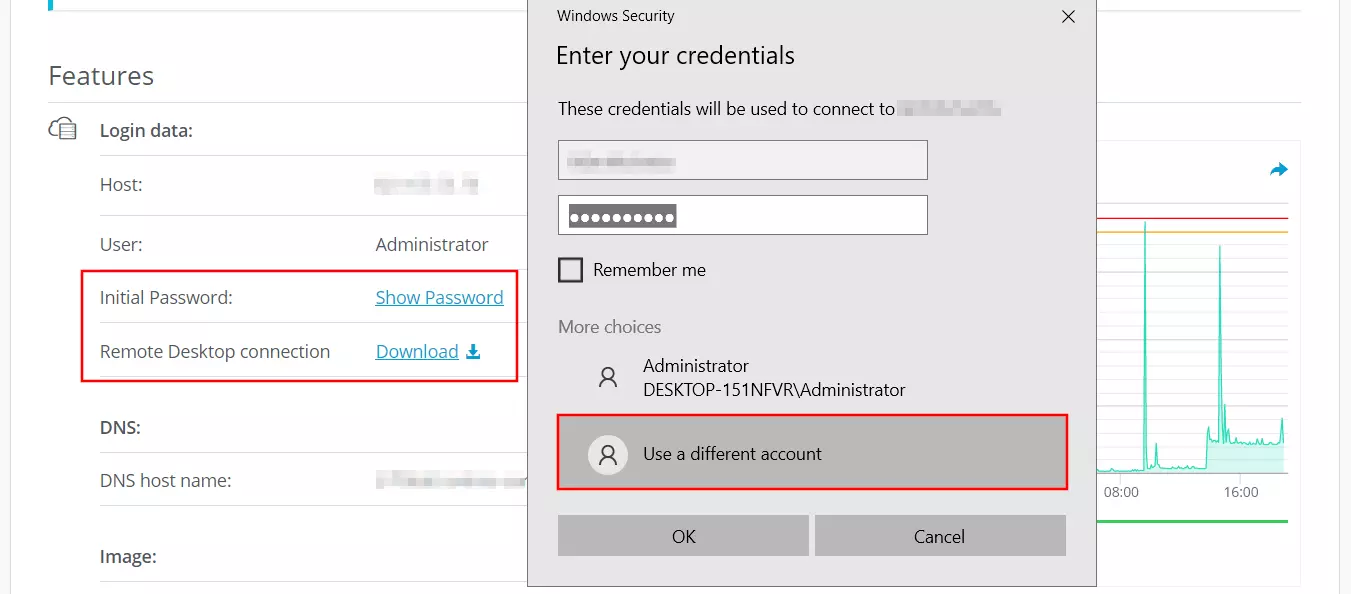
Enter the credentials for the server by clicking on “More options” and “Use another account” one after the other and then enter the credentials for your Valheim server. If you have not yet configured individual data for this, you will find these credentials in the Cloud Panel under “Users” and “Initial password”.
The first time you establish a connection, you will receive a security warning because the Valheim server certificate isn’t classified as trustworthy yet. Confirm this message with “OK” to establish the connection. If you also check the checkbox saying not to ask again, you will not receive the message on later connections.
Step 2: Install Valheim server via Steam
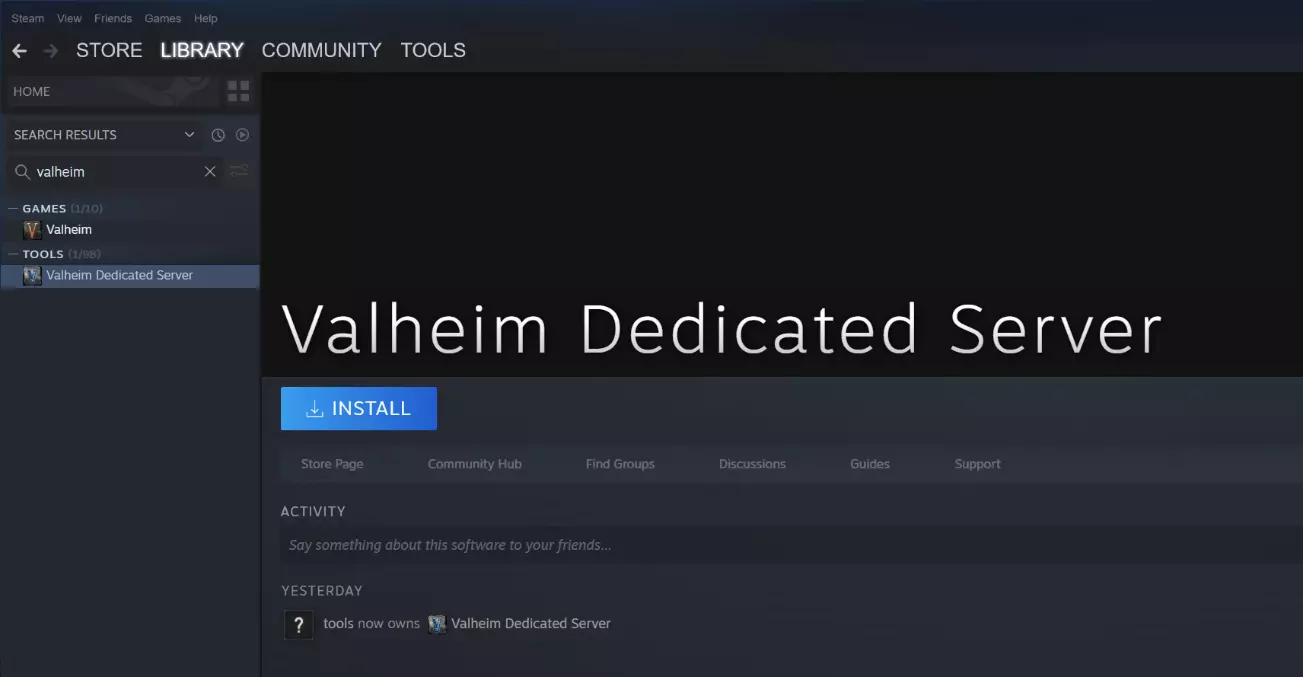
The most convenient way to download the software for hosting your own Valheim dedicated server is via Steam. Install Steam then log in with the Steam account you purchased Valheim on. Navigate to your game library and use the search function to look for the dedicated server software. To do so, simply type in “Valheim” in the “Tools” section and you will immediately see the matching hit “Valheim Dedicated Server”. Select the search entry by left-clicking on it and finally press “Install” to start the installation.
Step 3: Server configuration
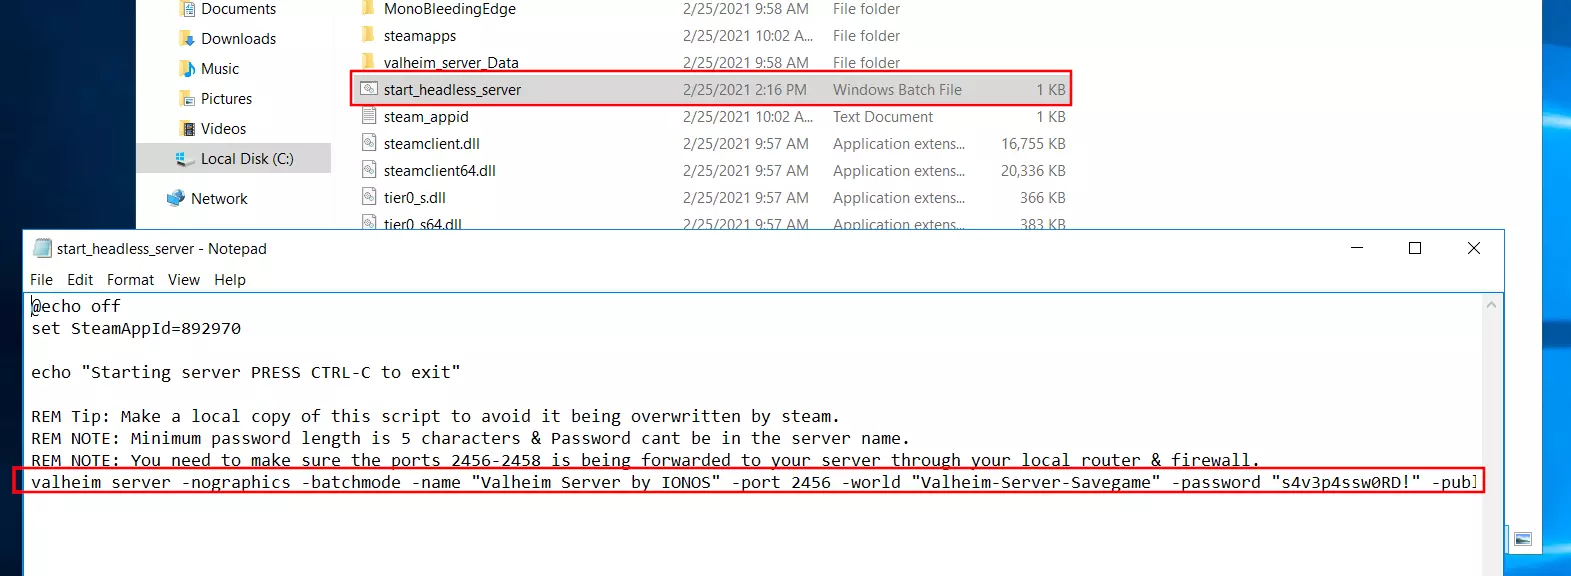
Theoretically, you can now start and stop your Valheim server at any time via the Steam client. However, the interface does not offer any options to revise the properties of the server, which is why we recommend starting it via the start_headless_server file, which can be found in the following directory by default:
C:\Program Files (x86)\Steam\steamapps\common\Valheim dedicated serverHighlight the batch file by right-clicking and select the “Edit” option to open the configuration file in the standard editor. The information for the server can be found in the bottom line of the file:
valheim_server -nographics -batchmode -name "My server" -port 2456 -world "Dedicated" -password "secret"The three parameters in quotation marks are relevant and required in this case:
- Name: the name of your Valheim server, which is displayed in the server listing in the client if you make the server publicly available.
- World: the name of the storage file of the Valheim server
- Password: the password for accessing your server
Server name, name of the save file and password must be different from each other!
The start_headless_server file does not (currently) provide a way to specify an individual seed for the nature of the game world. With the following trick you can still set an individual game world for your Valheim server: Start a single-player game with the desired seed and save the save game to the server in the folder C:\User\USERNAME\AppData\LocalLow\IronGate\Valheim\worlds. Then specify the name of the save in the start_headless_server file, and your server will load the appropriate seed at startup.
Step 4: Forward TCP/UDP-Ports 2456 to 2458
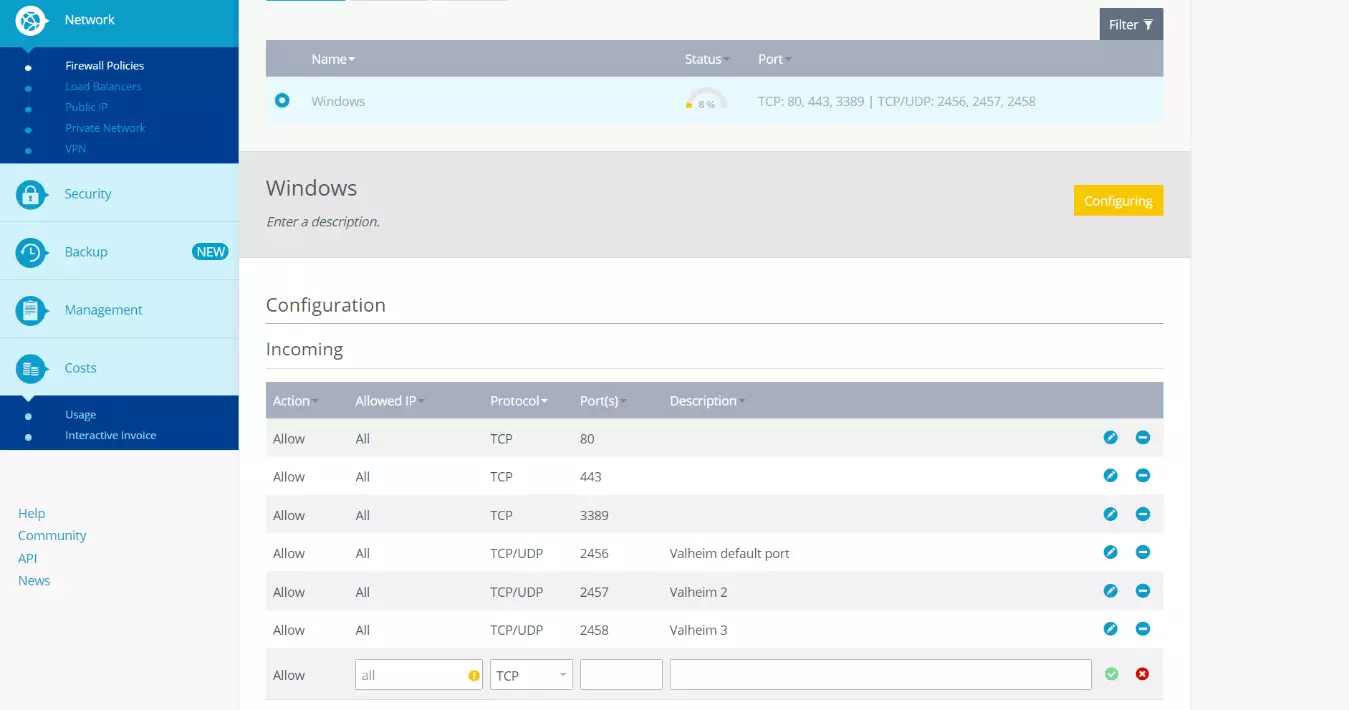
For users to connect to your Valheim server, you must allow connections via TCP and UDP port 2456. In addition, the developer also recommends forwarding ports 2457 and 2458, so first define appropriate rules for the server firewall before you start your server - as an IONOS customer, this step can also be done conveniently and easily in the Cloud Panel:
Open the “Server” section and click on “Network” and “Firewall Policies” in the left-hand side menu, one after the other. Highlight your Valheim server and add the rules for the three ports - 2456, 2457 and 2358 - under “Incoming”. In all three cases, select “All” for “Allowed IP” and “TCP/UDP” for the protocol.
Forwarding ports in the IONOS Cloud Panel may take a few minutes. You can view the progress of the configuration under “Status”.
Step 5: Start Valheim server
Once you have saved your configuration and forwarded the ports, you can start your Valheim server. To do this, simply double-click on the start_headless_server batch file and the game world will be automatically generated or loaded via the command prompt, provided it is an already advanced game state. After a successful start, the command line displays the entry “Game server connected”:
Step 6: Join the Valheim server
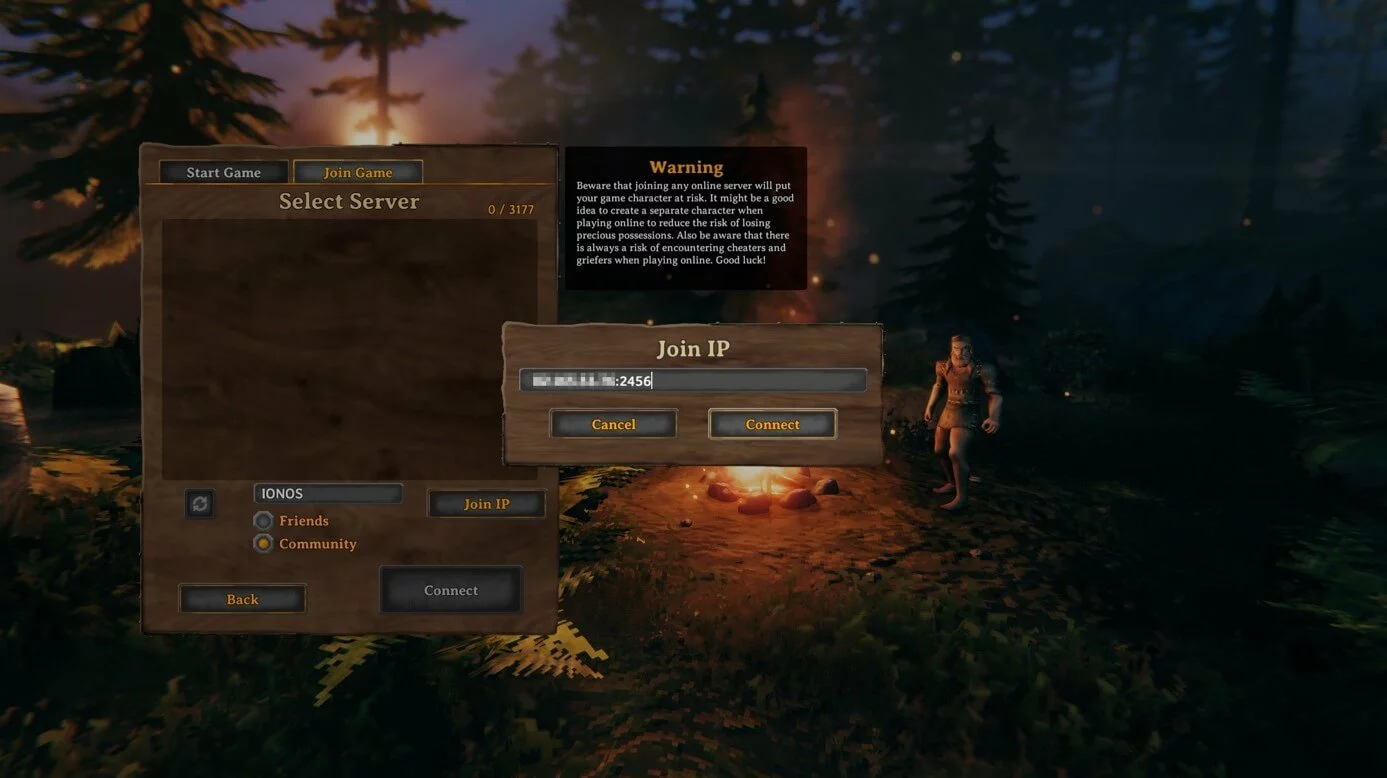
If you and your friends want to join the Valheim server, start the game in the usual way, press “Start game” and select or create your desired character. Instead of creating a new world, switch to the “Join game” tab. You now have two options for establishing a connection:
- Search for your server in the listing of community or friends’ servers and click “Connect”.
- Press the “Join IP” button, enter the IP address of your Valheim server and then click “Connect”.
If you host your Valheim server as a community server, it may take some time for it to show up in the listing. However, with IP joining, you have an alternative that should work from the start.
Make a statement with your own .gg domain and let the games begin. Register your own .gg domain now with IONOS.


