FS 22 server: Play Farming Simulator 22 together
Since 2008, the Farming Simulator series from the Swiss developer team GIANTS Software has delighted gamers all over the world. For example, the FS 19 edition released in 2019 cracked the million mark after just 10 days. With FS 22, the official successor is now on the market, which, among other things, enables cross-platform adventures (PC, PlayStation, and Xbox) with up to 16 players.
We’ll show you how to create your own FS 22 server to take care of livestock, timber, and field work online, together with your friends.
Hosting FS 22: on your own PC or in a data center?
Your own FS 22 server has a decisive advantage over freely accessible community servers of other users. You get to determine all important key data for the server yourself, such as the maximum number of players, the cross-play status (on or off) or permitted modifications. You have two options for hosting your own FS 22 world:
- Create and host the game directly on your own PC.
- Create and host the game on external server hardware from a provider of your choice.
If you select the first option, you won’t need to use an external solution. You’ll create and host the Farming Simulator 2022 server on your private PC via the game client. Server and storage data are located locally on your hard disk. However, hosting puts additional load on your device – consequently, for a server with 16 people you’ll need a high-end PC. In addition, all users can only play on the server when you are online. If you don’t want to run your device permanently and drive up the electricity bill, you have to agree to fixed playing times.
The most decisive argument for hosting with a provider is your Internet connection, because bad pings and lags are almost a given with many private connections. For maximum flexibility in terms of online time and an optimal gaming experience, a dedicated server on external hardware resources is preferable.
Farming Simulator 22: what are the demands for a FS 22 server?
To run a dedicated server for FS 22, you don’t have to meet increased system requirements of the game itself. The server software uses a lot less power. GIANTS Software officially recommends the following minimum hardware setup:
- 2.4 GHZ processor (Intel or AMD)
- 2 GB RAM
- 35 GB free hardware storage
Compared to the predecessor edition FS 19, the only thing to note in terms of dedicated servers is the higher requirement for free hard disk space. However, keep in mind that the presented values are only the basic requirements for running the FS 22 server. More power, especially RAM and hard drive space, is essential for active operation should multiple players connect to the game simultaneously. The same applies if you want to use DLC content for the server.
Getting a server with SSD storage has the advantage that loading times are greatly reduced. Backups can also be created faster with an SSD hard drive.
All common Windows systems from Windows 7 or Windows Server 2008 are suitable operating systems. Ensure that you’re using a 64-bit architecture. Native support for Linux is not provided which is why you can only run a server for Farming Sim 22 under Ubuntu, Debian, etc. in a roundabout way – for example, by using the runtime environment WINE – to get running. Note that you also need to plan for hardware resources for the operating system. For example, for Windows Server 2016, these are a 1.4 GHz processor, 512 MB or 2 GB of memory (without or with graphical interface, respectively), and 32 GB of hard disk space.
Similar to a FS 19 server you have to purchase a license for a FS 22 server. Even if you already own the game, you’ll need to buy it again for the server, because otherwise you won’t be able to play it yourself. The same goes for DLCs, which you also have to buy for both the server and the client.
Rent a FS 22 server: your options with IONOS
With a basic server setup in mind, you can start the search for a suitable provider to turn the dream of your own FS 22 server into reality. However, given the huge number of providers and server models, choosing the right solution is not that easy. At IONOS, for example, you can choose from three models:
- Dedicated server (self-administered or managed by IONOS)
- vServer (also called Virtual Private Server, short VPS)
- Cloud server
How IONOS server models differ
The differences between the three IONOS server options can be broken down as follows. With a dedicated server, the underlying hardware is reserved exclusively for you. You get setups with powerful single-core power, but this incurs a higher cost.
Cloud Server and a Virtual Private Server grant you access to virtualized resources. The underlying hardware is used by other customers, although this does not affect security or performance of the server. The difference between these two models lies in the billing: minute-by-minute billing in the cloud server variant contrasts with the fixed monthly amount in the VPS option.
Regardless of the server model used, IONOS guarantees an external broadband connection of the server with up to 400 Mbit/s.
Three cases of FS 22 and suitable IONOS plans
However, the choice of server model is half the battle. In fact, there are different plans for each option that match the performance level of the hardware and associated costs. To simplify the choice, we have considered three possible variants for the design of an FS 22 server and assigned the matching solutions from IONOS:
| Recommended vServer | Recommended Dedicated Server | ||
| 2-4 players (without DLCs) | Virtual Server Cloud XL | Dedicated Server AR6-32 HDD | |
| 5-10 players (with DLCs) | Virtual Server Cloud XL | Dedicated Server AR6-32 HDD | |
| Up to 16 players (with all DLCs) | Virtual Server Cloud RAM L | Dedicated Server AR6-32 HDD |
Thanks to free starting credit, you can test the IONOS cloud server for 1 month free of charge (or until the credit is used up) and experience the perfect combination of performance and security!
Create a FS 22 server: step-by-step tutorial (Windows server)
The following instructions are a summary of the individual steps for setting up a dedicated server for Farming Simulator 22. As an example, we will use a server from IONOS with Microsoft operating system Windows Server 2016, which is supported by the simulator by default.
Step 1: Establish remote connection to server
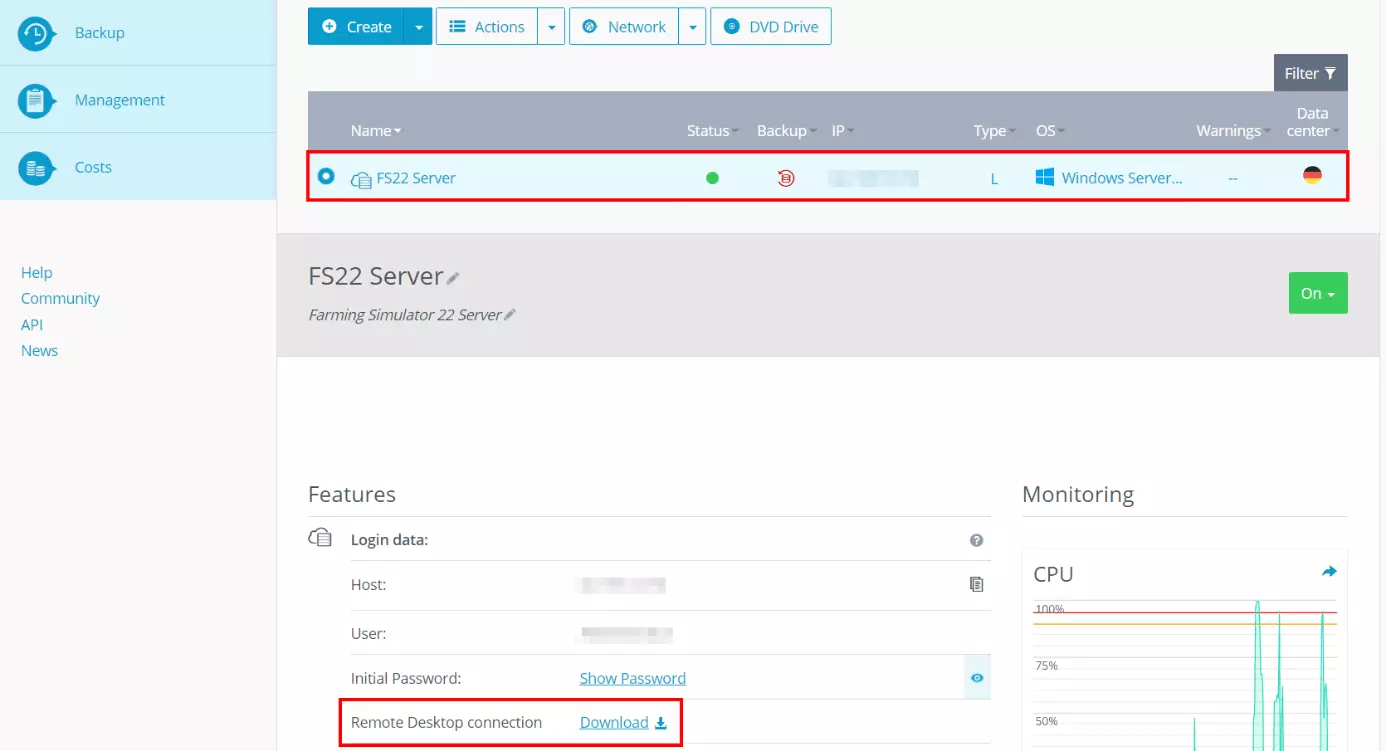
When you want to control and manage hardware resources in a remote data center, you need an active remote connection to the server. IONOS customers can conveniently set up a remote connection from the Cloud Panel. So as a first step, log in to the login page with your individual credentials.
Click on the “Server & Cloud” entry and select the server plan you have rented for hosting the FS 22 server. Under “Login data” you will find a download link called “Remote Desktop connection”. Click this to begin setting up the connection.
Select the “Open with” option or save the setup file locally and then double-click to open it. In the next dialog box, continue by clicking on “Connect”.
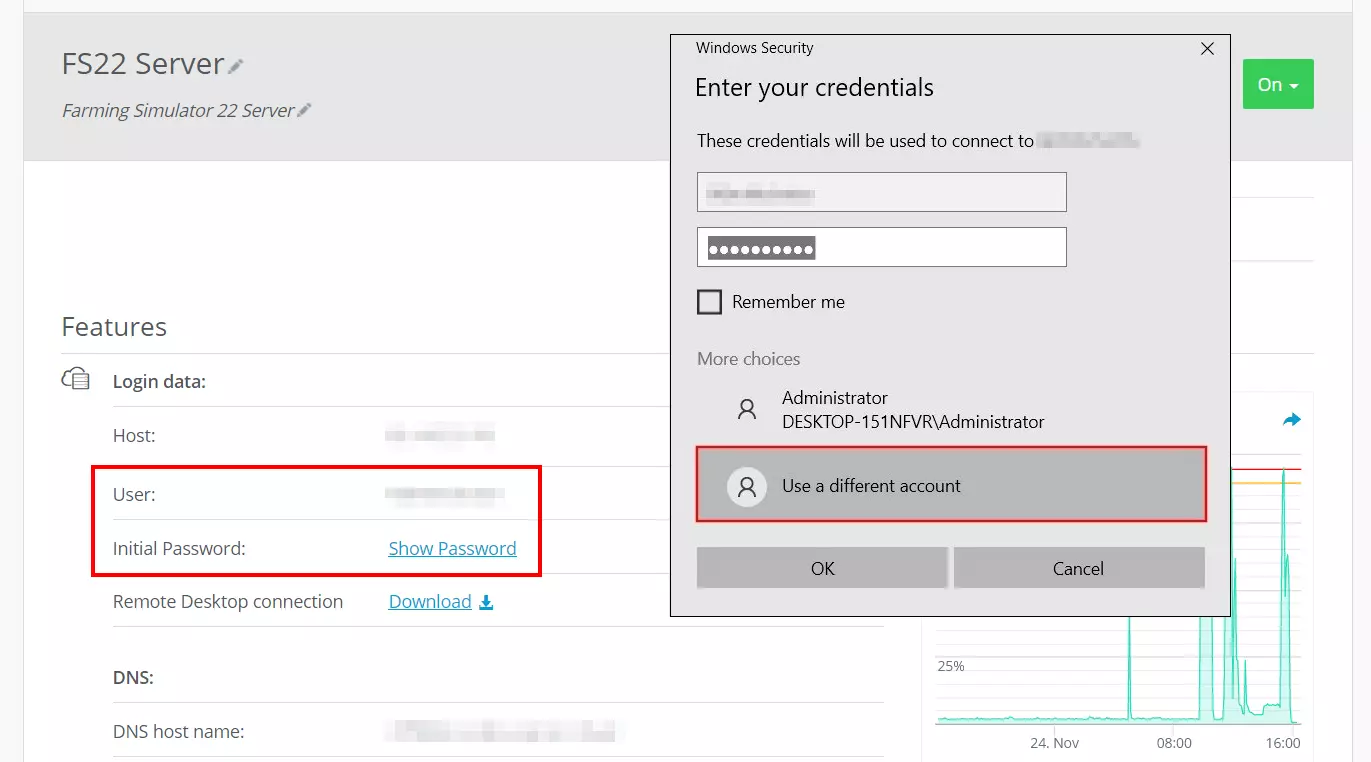
Now you need your login data for the server, which you can also find via “Login data” in the Cloud Panel (“User” and “Initial password”), provided you have not yet defined any individual data. In the dialog box, select “More options” and “Use a different account” one after the other and enter the information to establish the connection.
When connecting to your server for the first time, the system displays a security warning because the FS 22 server’s certificate is not yet trusted. Press “OK” to establish the connection. Checking the “Don’t ask me again for remote connections to this computer” checkbox will ensure that you do not receive a message during subsequent connection attempts.
Step 2: Install Farming Simulator 22
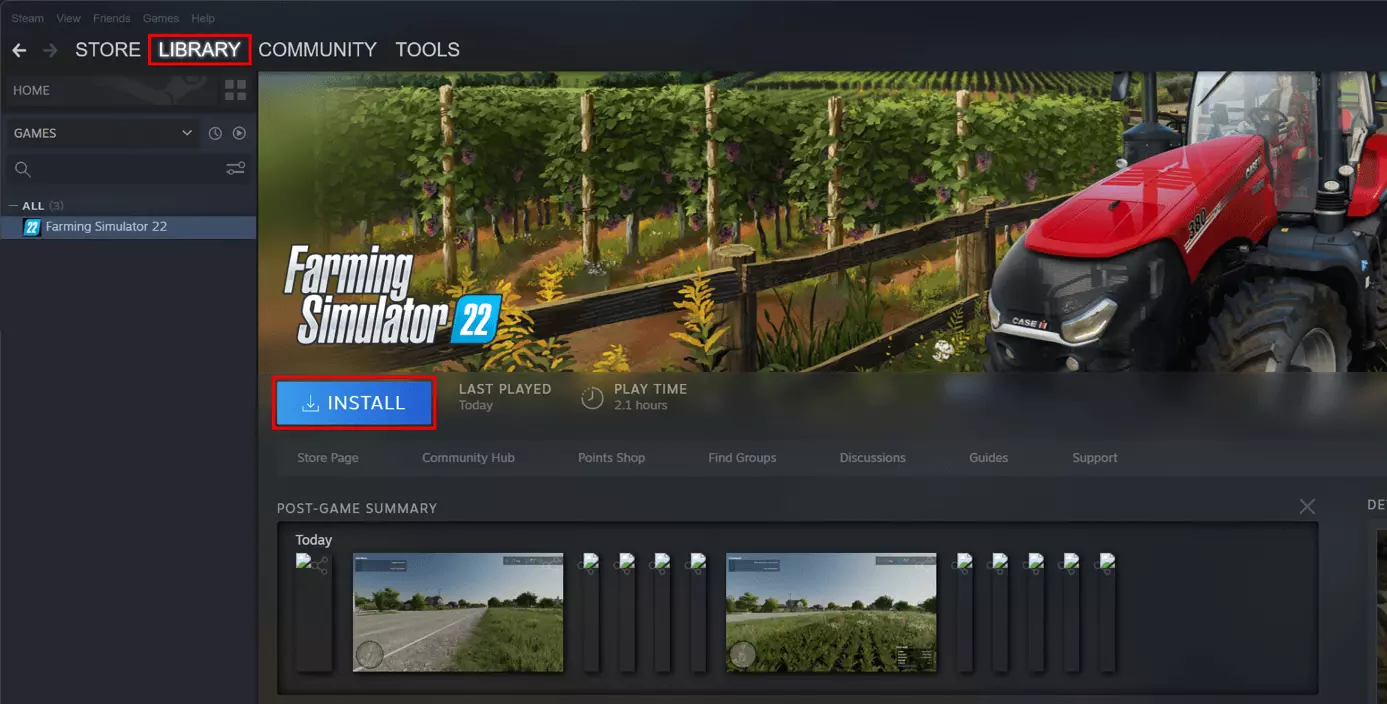
The server software for the Farming Simulator 22 is part of the default installation. Once a connection to the server is made, you install FS 22 on the hardware. To do this, select the usual way via the platform of your choice, for example, via Steam’s game library, where you start the simulator installation by clicking the “Install” button after the purchase. As already mentioned, this must be an additional or new license if you want to connect to the server later on.
Step 3: Start game and enter product key
If you have purchased a digital license from the manufacturer’s website, enter the product key now. When installing via Steam, this step is not required. In this case, you can proceed directly onto the next step.
To enter the key, start up the simulator in the usual manner; the query will appear. On ordinary servers without a graphics card you will get the following message: “Error: Could not init 3D system. Shader Model 6.0 is required”. You will also be prompted to install the latest video drivers. However, since the server itself doesn’t need to display graphics, you can simply reject this suggestion. Now the game will automatically quit.
Try out your VPS for 30 days. If you're not satisfied, you get your money back.
Step 4: Release ports
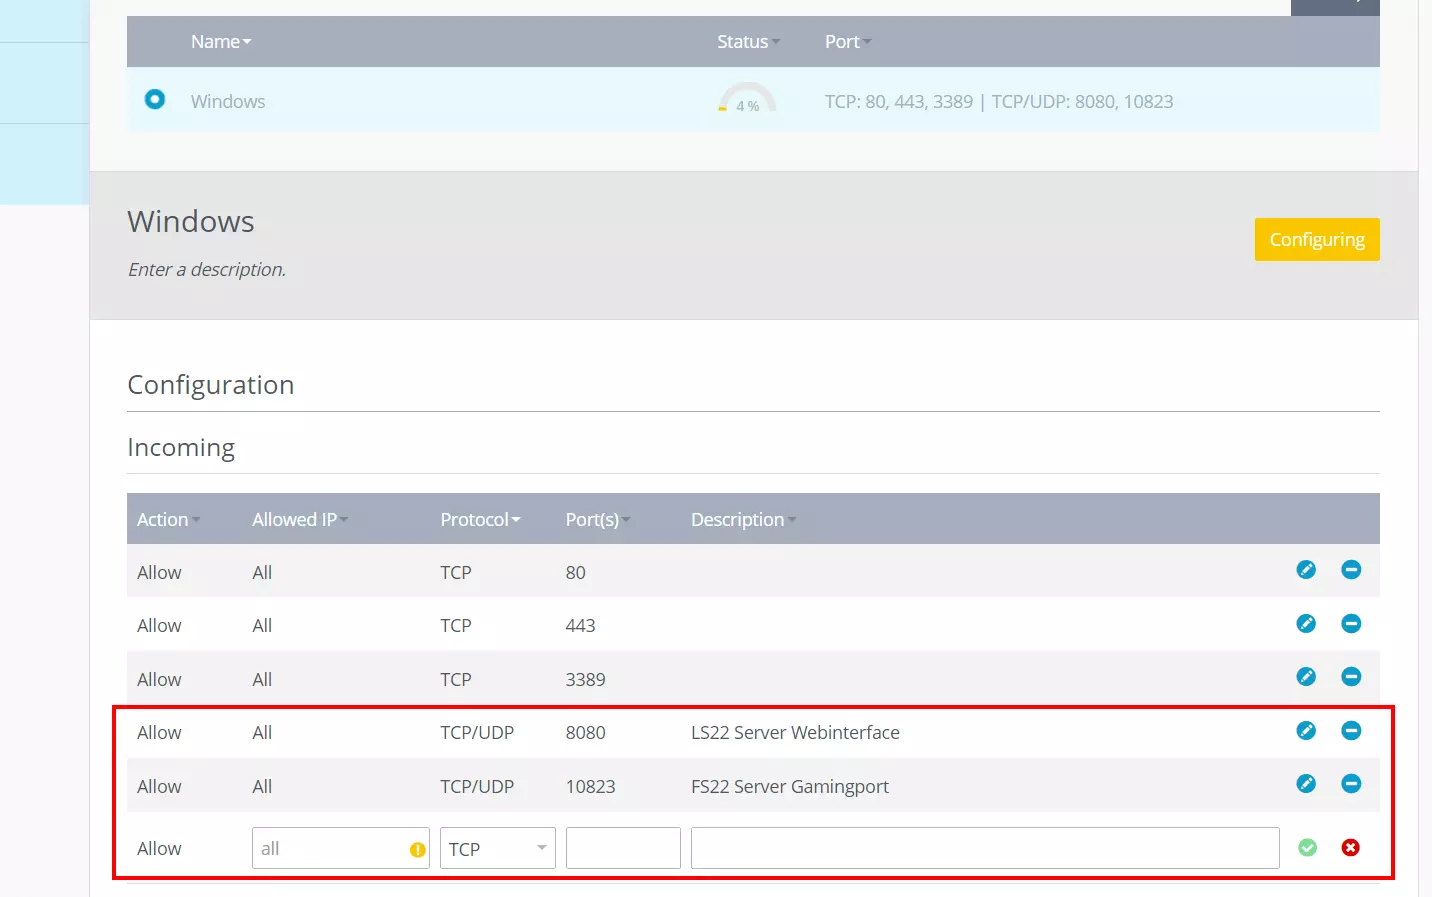
In order to access the web interface of the dedicated server and to allow users to connect to the server, you need to enable the appropriate ports. The communication with the interface runs via port 8080, the communication with the game or the FS 22 server via port 10823. You can release ports in the Cloud Panel:
After selecting your FS 22 server, launch the “Network” from the left-hand menu and then the “Firewall policies” submenu. Add new rules for the server according to the following pattern for the two ports:
- Allowed IP: all (leave the field blank for this purpose)
- Protocol: TCP/UDP
- Port(s): Port number
- Description: individual description of the port share (for example, enter “FS 22 server web interface” so that you can easily assign the port later.)
Step 5: Launch FS 22 Dedicated Server software
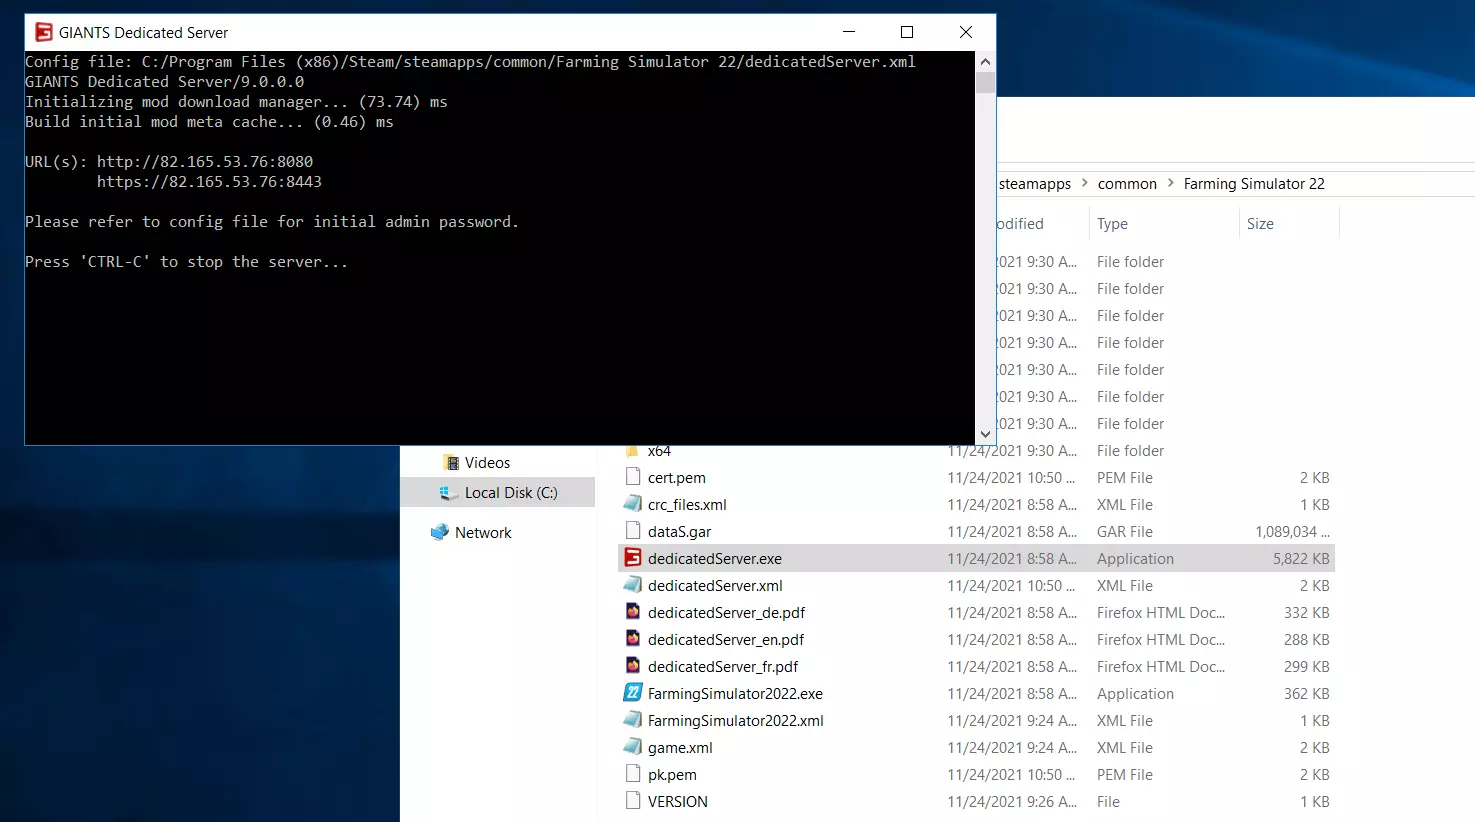
Now start the software for the dedicated server by double-clicking on the dedicatedServer.exe file. You can locate it in the directory where you installed Farming Simulator 22. When installing via Steam, this is will be “C:\Program Files (x86)\Steam\steamapps\common\Farming Simulator 22” by default.
A window with a command line will open; you don’t need to take any action.
All further settings are now made via the web interface, which you can call up with the browser of your choice as follows:
http://[IP address of your server]:8080/Example address: 'http://192.168.0.100:8080'
You can access the web interface of the FS 22 server via your computer.
Step 6: Register in web interface
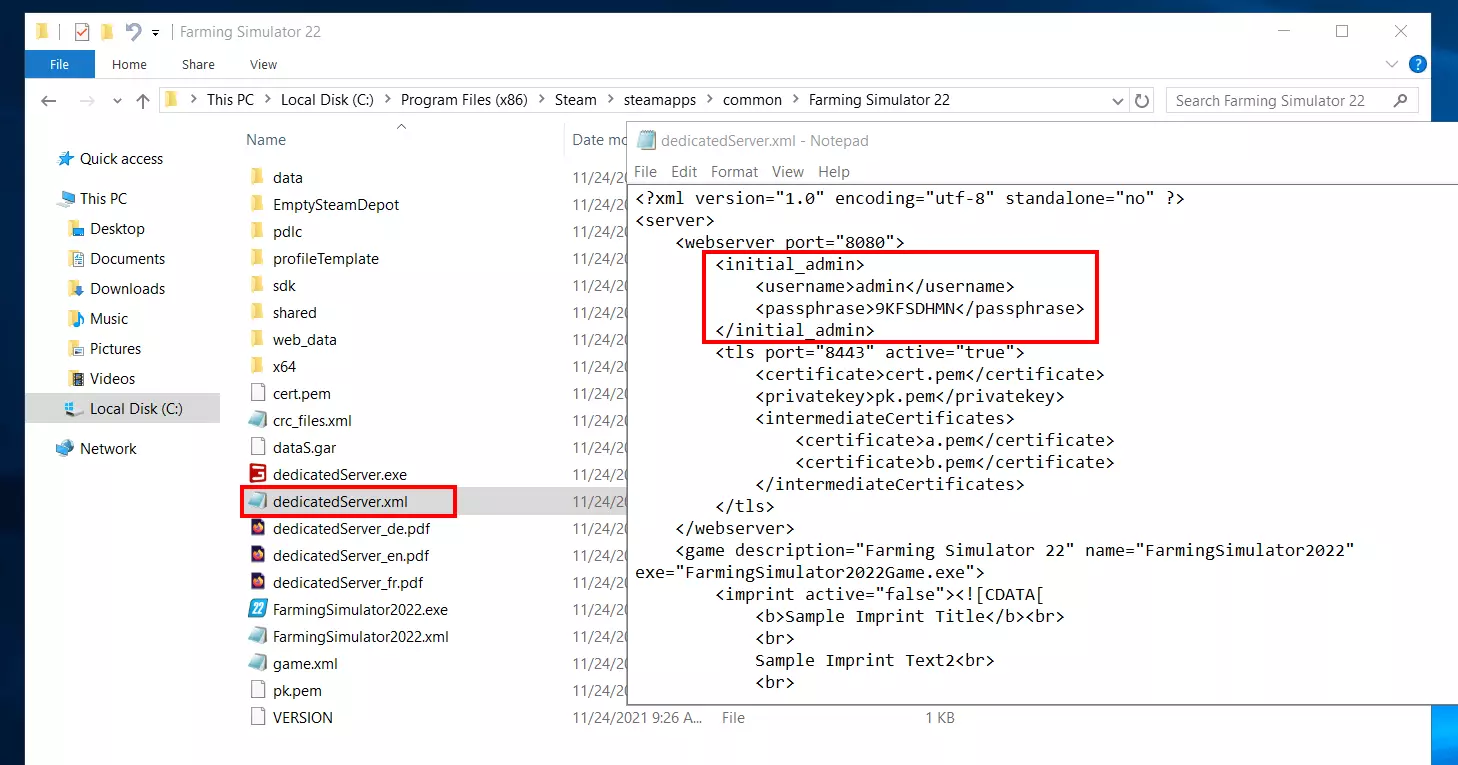
Access to the web interface is only possible using the appropriate credentials. They are automatically generated during start-up of the Dedicated Server software and saved in the dedicatedServer.xml file. Open the document using any editor of your choice, look for the “initial_admin” line and enter the username and password information listed in the web application.
Boost the security when logging in to the web interface of your FS 22 server by entering individual values for “username” and “passphrase” and saving the XML document.
Step 7: Configure FS 22 server
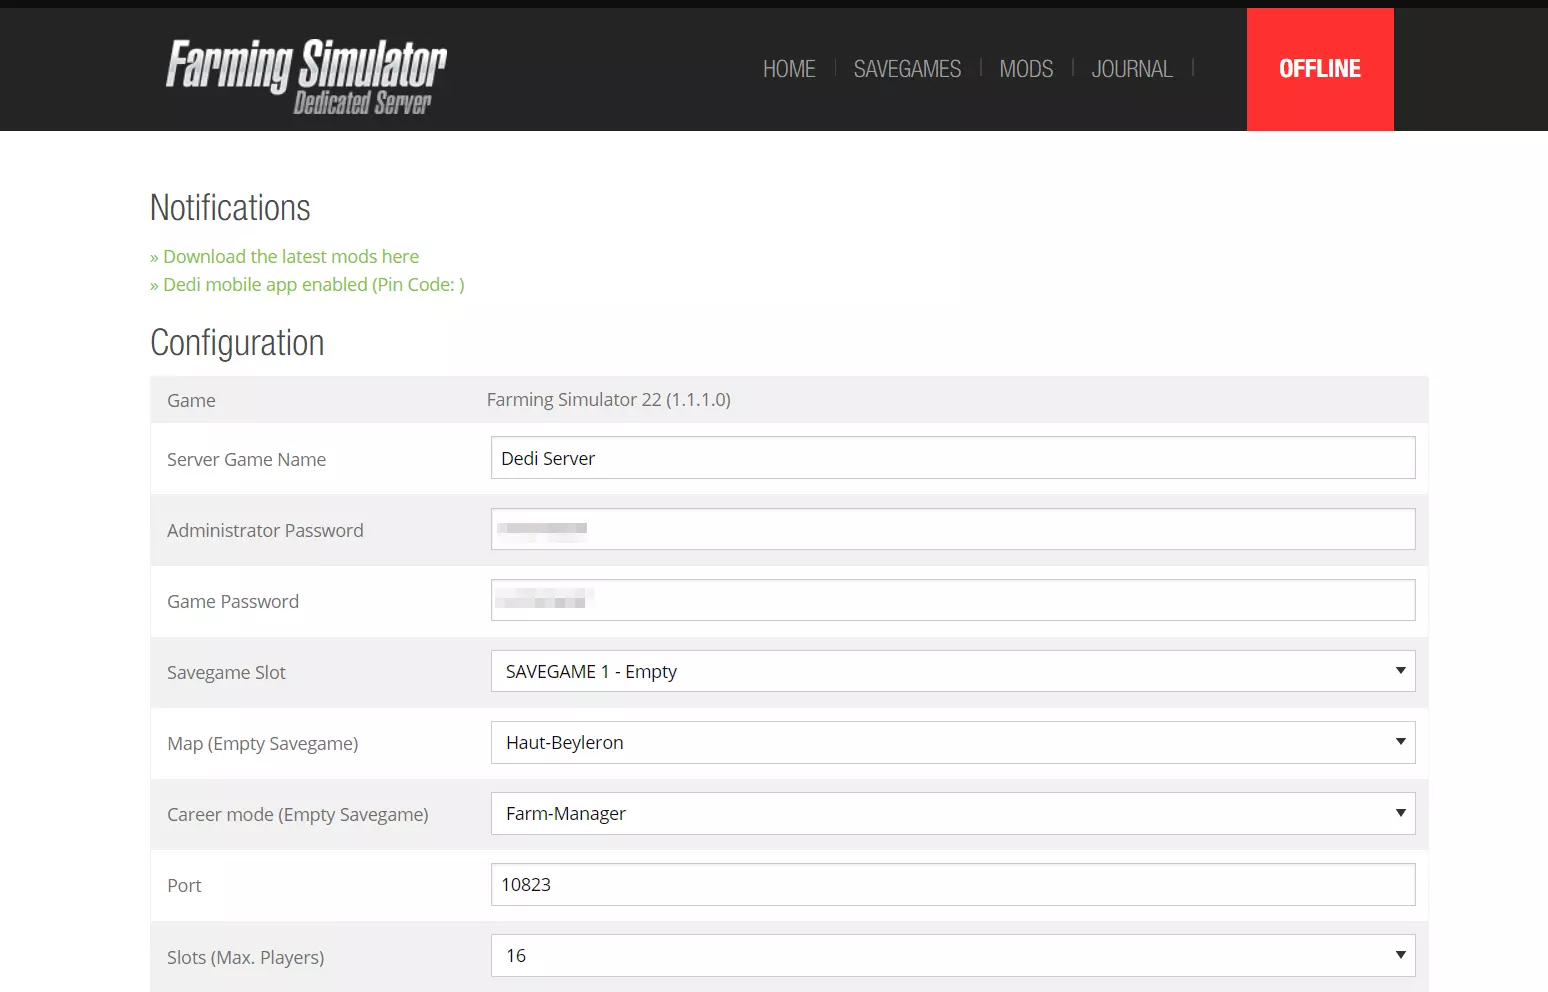
After logging into the web interface, you can configure the server. Simply assign a server name and a secure administrator password. The game password is important for everyone who wants to join your server. In addition, you can decide whether the crossplay feature and UPnP should be turned on or not. Other configuration options include:
- Map: Select whether you want your adventure to take place in Elmcreek, Alder Ridge, or Haut-Beyleron.
- Career mode: Select between the modes “Farm Manager” and “Start from scratch”.
- Port: Number of the gaming port communication of the game runs through; if you enabled the standard port 10823 in the previous step, you should use it at this point again.
- Slots: Set the maximum number of players (between 2 and 16).
- Game language: What language should the game use?
Click the “Download the latest mods here” link in the web interface to download and install purchased DLCs and mods. With mods you can, for example, add new vehicle models, activate other types of buildings or unlock additional gameplay options.
Step 8: Start the Farming Simulator 22 server
Want to stop the FS 22 server? Simply select the “Stop” button in the web interface. Alternatively, you can also terminate dedicatedServer.exe or shut down the server.
Sep 9: Connect to the server
Make a statement with your own .gg domain and let the games begin. Register your own .gg domain now with IONOS.


