How to set up and configure a Factorio server
Your best option for a dedicated Factorio server is to run it on hardware rented from an external provider. This ensures that the serve has a good internet connection and is available whenever you need it. Once Factorio is installed, all you need to do is enter command-line commands to get the server up and running.
Should I host a Factorio server on my own PC or in a data center?
You can run a dedicated Factorio server on any device that the construction game is installed on. It’s possible to run the server on your private computer and simultaneously connect to the server to play the game. However, this will increase the load on your PC. On top of this, your Factorio server will only be online when your computer is switched on. If you turn off your computer, the server will be unavailable.
If you rent a server from a provider, you will be able to leave the server running at all times. You and your fellow players will be able to join the game any time you wish. You will also benefit from good latency speeds and a stable operation since servers from hosting providers have a good broadband connection.
What are the requirements for a dedicated Factorio server?
The computing requirements needed to host a Factorio server are, compared to others, quite low. You should first make sure that you have enough CPU, RAM and storage since these requirements will increase as your world grows. If you want to use mods, you will need to go beyond the minimum requirements in order to run the game. The number of active users also plays a role in determining the requirements for your Factorio server.
Minimum requirements:
- CPU (Processor): AMD or Intel from 2.4 GHz (2 core); excellent single core power preferred
- RAM (Memory): 2 GB RAM for 1–4 players, 4 GB RAM for 5–12 players, 8 GB RAM for more than 12 players
- Storage (HDD): at least 10–15 GB
When selecting hardware, you also need to take the operating system into account. A dedicated Factorio server can run on Microsoft operating systems as well as on traditional Linux distributions like Debian and Ubuntu. If you are running Windows Server 2022 on your system, you will need the following:
- 1.4-Ghz processor (64 bit)
- 512 MB or 2 GB memory (with or without graphic interface)
- 32 or 36 GB hard drive (with or without graphic interface)
If you rent a server, you can use it for other things as well. For example, you can create another gaming server such as a Satisfactory server or host a TeamSpeak server so that you are able to easily communicate with your fellow players.
What options are there for hosting a Factorio Server with IONOS?
If you’ve decided to use an external provider to host a Factorio server, you’ll be faced with the challenge of not only choosing a suitable provider but also the right type of server. With IONOS, you can choose between three different types of servers, which are available at different prices.
- vServer: The IONOS vServer (VPS) accesses virtual resources from a set host system and has a fixed monthly price.
- Cloud Server: The resources made available from an IONOS cloud server are also virtual. However, they are not from a fixed host system but from a network of multiple systems. This allows the performance to be scaled flexibly. With this model, you are billed by the minute and only pay for the resources you use.
- Dedicated Server: With a dedicated server from IONOS, you have access to dedicated enterprise hardware with powerful single core power. This server solution is more expensive and is also billed by the minute.
With a dedicated server from IONOS, you’ll have a hardware setup that is suitable for various uses, including multiple gaming servers, complex web uses and resource-heavy business software.
Dedicated Factorio server: Gaming scenarios and suitable IONOS options
As we mentioned earlier, there are certain factors that influence the amount of resources you will need for your Factorio server. These include the number of players, how advanced your game is, and whether you use mods or not. To help you decide which is the best option for you, you can take a look at the table below, which includes three different scenarios along with the IONOS server that is most suitable for each scenario.
| Factorio server needs | Recommended IONOS server |
|---|---|
| 1–4 players; server always online | VPS L |
| 5–12 players; server always online; advanced gaming use and use of mods | VPS XL |
| > 12 players; server always online; very advanced gaming use and use of mods | AR6-32 SSD |
How to set up your own Factorio server: A step-by-step guide
Once you’ve got the necessary hardware, you can move on to the creation and configuration of your dedicated Factorio server. In the following example, we’ll show how IONOS customers (vServers, cloud servers, dedicated servers) can set up a Factorio server. In this example, we are using Windows Server 2022 operating system.
Step 1: Establish a remote connection to the server
To install the Factorio server on your rented hardware, you will first need to connect to it. For connections using Windows Server 2022, you can use the remote desktop protocol, which is available by default. As an IONOS customer, you can set this up using the online customer center (Cloud Panel). To do this, follow these steps:
- Log in to the IONOS login page using your login credentials.
- Open the section Servers & cloud.
- Select the server from the list that you want to create and host your dedicated Factorio server on.
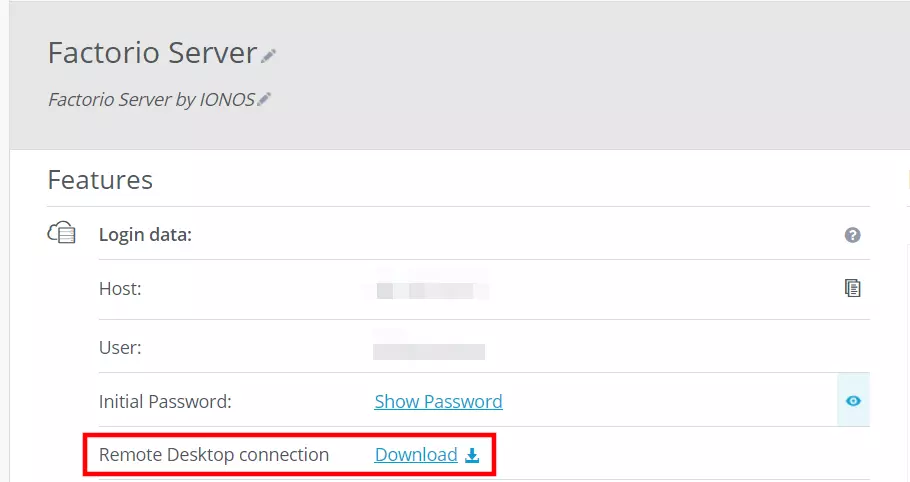
- Under Access data, where you can also find the IP address and the login data for your server, click on the download link in the Remote desktop connection area.
- Run the downloaded .rdp file by double-clicking it.
- Then click on Connect. Enter your server’s login data and confirm the security certificate.
Step 2: Install Factorio
The software you need for your dedicated Factorio server is part of the normal installation of the game. You can install the game on your server using Steam or from the official Factorio website. You can use the license that you’ve already purchased to install the game on the server. You don’t need to obtain an additional license.
You need to make sure that the Factorio version installed on the server is the same version that everyone who is going to use the server has. If you are using mods on your Factorio server, you need to make sure that all users have the same mods installed.
Step 3: Write down the authentication token
If you bought Factorio from Steam, you’ll need to get the authentication token. This is needed in order to list your Factorio server as a public server. If you bought the game from the official website, you don’t need the authentication token. You just need your login data for factorio.com.
You’ll only get an authentication token if you’ve already created a normal multiplayer game using the Factorio client (Multiplayer -> Host new game). If you’ve already done this, connect your Factorio license with the Steam servers and set up a username.
Load the following directory on the PC that you installed Factorio on. You’ll need to use your personalized username to do so:
C:\Users\USERNAME\AppData\Roaming\FactorioIn this directory, you’ll find the file player-data.json. Open this file using your preferred editor and look for the “service-token” row. Note down the code inside the straight quotation marks or simply copy it over to a document of your choosing.

Step 4: Configure your dedicated Factorio server
You can now start to configure your server. To do so, use the primary .json file in the subdirectory .\Factorio\data:
- map-gen-settings.json:: In this file, you can set the parameters used by the map generator (e.g., maximum size of the map).
- map-settings.json: In this file, you can set the game’s generic settings. This includes the difficulty or how far pollution spreads.
- server-settings.json: This is where you set the primary server settings, which includes the server name, maximum number of players, and how often automatic saves occur.
Delete “example” from the name of the configuration files. This is only shown when using the standard settings and isn’t needed for advanced server settings. If you copy the renamed configuration files into the factorio.exe directory, you’ll be able to find the settings more easily later on.
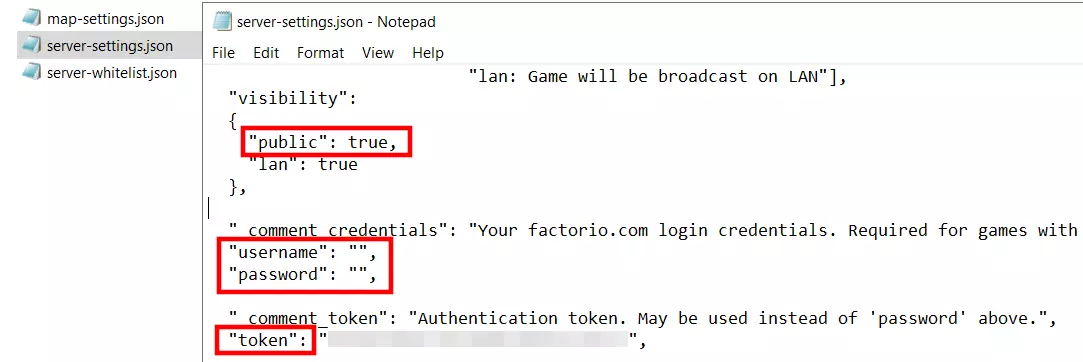
The two most important settings that ensure your Factorio server is available online can be set in the server-settings.json file: You need to set the public parameter to true under the visibility options. If you don’t do this, your server will only be available on your local network. The other most important setting can be found under “username”. Enter the username you created in step 3 and then enter the authentication code under “token”. Instead of using the token, you can use your factorio.com password in the “password” field.
Step 5: Open UDP port 34197
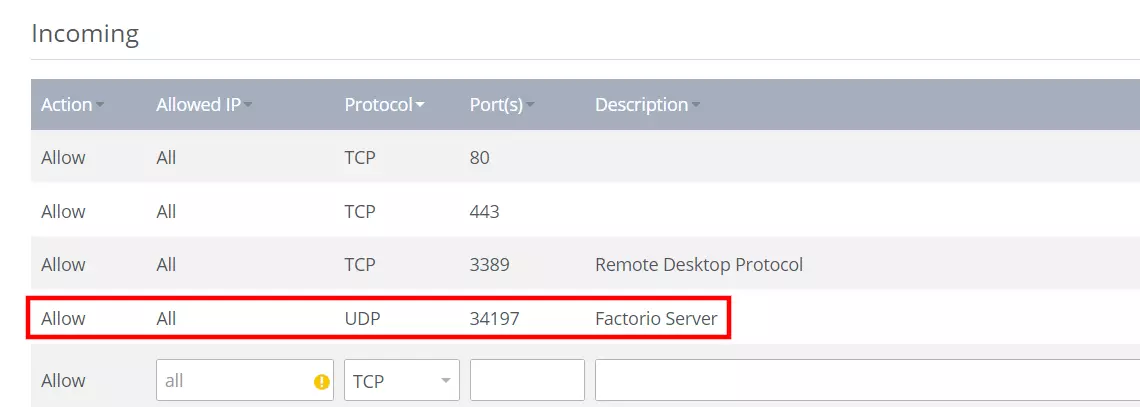
So that the Factorio server and the clients looking for the connection via the internet can communicate, you also need to open UDP port 34197 in your server’s firewall settings. If you’re an IONOS customer, you can open it as follows:
- Log in to your IONOS account.
- Open the section Servers & cloud.
- Select the server that you have installed your dedicated Factorio server on.
- In the side menu on the left of the Cloud Panel, click on Network and then Firewall settings.
- Under the Inbound option, set a new rule for the UDP port 34197. The port description is optional.
Step 6: Create savegame or connect to one
The dedicated Factorio server is only available if you have a savegame. You can either create one or connect to one. To start a completely new game, you can open the command prompt and enter the directory .\Factorio\bin\x64. To do this, you will need to use the “cd” command and enter the full path. If you install the game via Steam, the command will look as follows:
cd C:\Program Files (x86)\Steam\steamapps\common\Factorio\bin\x64In the directory, enter the following to create a game with the name “savegame.zip”:
@echo off
title Factorio Server
factorio.exe --create savegame.zip
pauseIf you’ve changed the settings in step 4, you need to enter a different command to use the parameters set in map-gen-settings.json and map-settings.json.
@echo off
title Factorio Server
factorio.exe --create savegame.zip --map-gen-settings map-gen-settings.json --map-settings map-settings.jsonIf you haven’t copied the configuration files into the .\Factorio\bin\x64 directory, you have to enter the exact pathway to the setting files in the command prompt.
If you want to use an existing game for your Factorio server, simply copy the corresponding savegame file into the .\Factorio\bin\x64 directory.
Step 7: Start your Factorio server
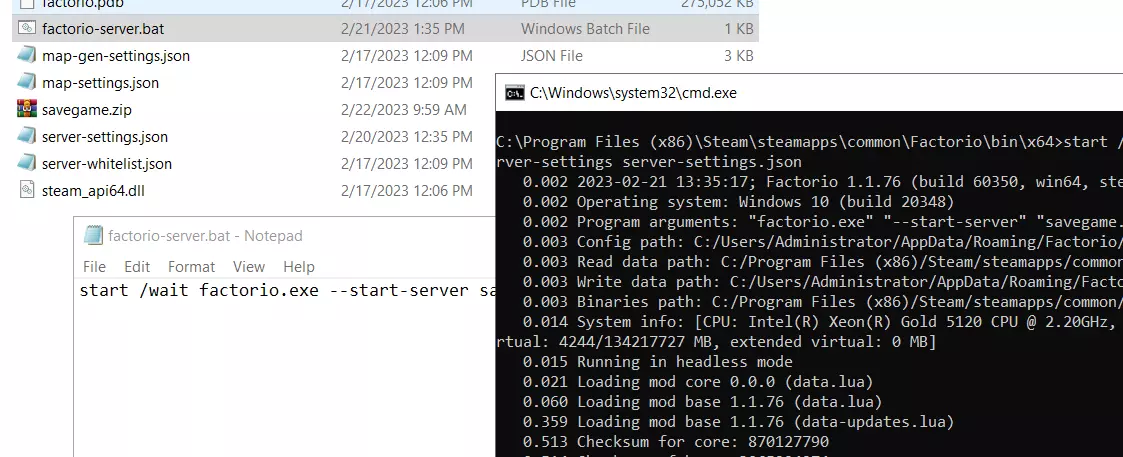
You can now start your server using your desired settings and the savegame. The simplest way to start the game is via a batch script and the commands you’ve already saved in the directory .\Factorio\bin\x64. To do this, open the directory and create a new file with the name factorio-server.bat. Add the following content to start the server using the savegame you either created or connected to and your server settings.
start /wait factorio.exe --start-server savegame.zip --server-settings server-settings.jsonSave the script and start the Factorio server by double-clicking the batch file. The server will start automatically in a new command window.
Step 8: Connect to your Factorio server
You and your fellow players can now connect to your dedicated Factorio server. Simply start the game on your device and do the following:
- Click on Multiplayer.
- Select Search for public games.
- Use the search feature (Ctrl + F) to search for your server. You can also use the list to search for your server.
- Once you’ve found your Factorio server, click on Join game.
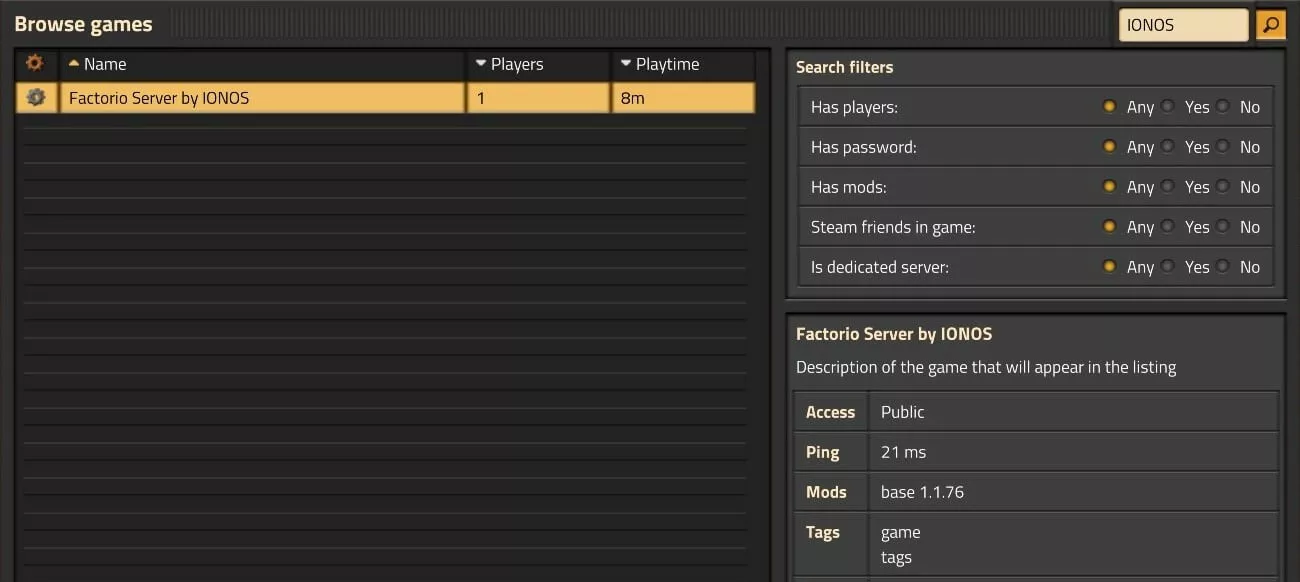
After a short version synchronization and connection, you can start your joint adventure on the server.
Want to run your own Factorio server 24/7 and know exactly how much it’s going to cost? Then rent a VPS from IONOS and get access to hardware at a fixed monthly price.

