How to host your own Eco server
You can use your own ideas to design the game world with your own Eco server. Externally rented hardware is recommended as a hosting base for optimal performance. Installation is convenient with the Steam client.
Save the world together in the online multiplayer game Eco. Players build their own civilization with their fellow players on a virtual planet which is being threatened by a meteorite. The project is doomed without a strategy to create sustainable way of life. Players with an Eco dedicated server are in a great starting position for this task.
Thanks to free starting credit, you can test the IONOS cloud server for 1 month free of charge (or until the credit is used up) and experience the perfect combination of performance and security!
Eco: Host a server on your own PC or in a data center?
There are several public community servers where you can play Eco with other players. However, you have no choice in when the server is online, which configurations apply, and with whom you ultimately play. This all changes with your own Eco dedicated server, whereby you have two options in terms of hosting:
- You host the server on your own PC.
- You host the server in the data center of a provider.
Running the server on your own device will save you the cost of rented hardware and you won’t become dependent on a provider. However, in this case, your Eco server is only online when your computer is running. As well as this, many private devices reach their performance limits rather quickly, especially if you are playing with more than three players. In terms of Internet connection, hosting with a provider has its advantages, as very few private connections are suitable for the smooth operation of a gaming server.
If you rent hardware for an Eco server, you can use the resources for other purposes and set up a Minecraft server or create a Valheim server.
What are the requirements for an Eco dedicated server?
The hardware requirements for an Eco dedicated server application depend on two factors: the world size and the number of players active on the server at the same time. You choose the world size when creating the game world at the beginning. The world will have a total size of 0.52 km2/0.32 miles2 if you keep the default values for the X and Y axis (72 x 72). Larger dimensions require more computing power and memory for the server to calculate the game world. The same applies if the number of players increases during the game.
The developer Strange Loop Games states the following minimum setup in the official Wiki for a server with the smallest possible game world:
- Processor (CPU): Intel/AMD 2.4 gigahertz and more
- Working memory (RAM): 4 gigabytes
- Hard drive space: 20 gigabytes (including save point; not including standard game world backup)
In addition to these server application requirements, there are also the requirements for the operating system used. For example, the Microsoft Windows Server 2019 system would require the following additional capacities:
- 1.4 GHz processor (64-bit)
- 512 MB or 2 GB RAM (without or with graphical user interface, respectively)
- 32 or 36 GB hard disk space (without or with graphical user interface, respectively)
Eco requires that the .NET framework is installed (4.6.2 or newer), so the Windows systems would be the preferred choice. However, the Eco server application also runs on any Linux distribution which supports .NET since version 9.0.
These options are available at IONOS for Eco dedicated servers
Many hosting providers offer rented hardware for gaming servers. They are typically available at different prices and for different types of servers, which can make choosing a suitable solution difficult. At IONOS, you can choose between the following server models, which in turn have different plans:
- vServer: A vServer from IONOS, known also as Virtual Private Server, or VPS for short, gives you access to virtualized resources. You share the underlying hardware with other customers, but you still get a top performance for a reasonable fixed monthly price.
- Cloud Server: The Cloud Servers from IONOS are also based on virtualized resources. They are billed by the minute, so you only pay for the performance used.
- Dedicated Server: Dedicated servers are also billed by the minute. However, the hardware is reserved exclusively for you. This gives you full control over the resources and configuration.
Different Eco server scenarios and corresponding IONOS plans
In the following section, we have summarized three possible scenarios, which differ in terms of world size, number of players and online time and assigned suitable server plans from IONOS for each scenario.
| Eco Dedicated Server Scenario | Recommended IONOS Server |
| 2-4 players; 72 x 72 game world (0.52 km2); permanently online | VPS M RAM |
| 5-12 players; 140 x 140 game world (1.96 km2); permanently online | VPS XL RAM |
| 20+ players; 200 x 200 game world (4 km2); permanently online | Dedicated Server AR6-32 SSD |
The dedicated server from IONOS offers the perfect basis for a powerful and permanently available gaming server, for both the Eco server and the Ark server.
Create your Eco server: Step-by-step tutorial
You can start installing and setting up your Eco server once you have the appropriate hosting environment and credentials. We describe the process for IONOS customers (vServer, Cloud Server, Dedicated Server) in our detailed tutorial. Windows Server 2019 is used as the operating system.
Step 1: Establish remote connection to the server
The first step involves establishing a remote connection to access your rented server resources. IONOS customers can conveniently set up a remote connection using the Cloud Panel. Log in through the following login page.
Select the “Server & Cloud” category once logged in and choose your IONOS server plan. An overview page will open with information regarding the status of the server and important server data. Under “Login data”, you will see “Remote desktop connection” along with a download button, which will configure the remote connection.
Run the .rdp file in the default selection “Remote Desktop Connection” and start the setup process by clicking “Connect” when the security notice appears. Enter the login data for your server (the initial login data can also be found in the Features section of the Cloud Panel) and confirm the server’s security certificate as trusted to establish the remote connection.
Step 2: Install Eco server application with Steam client
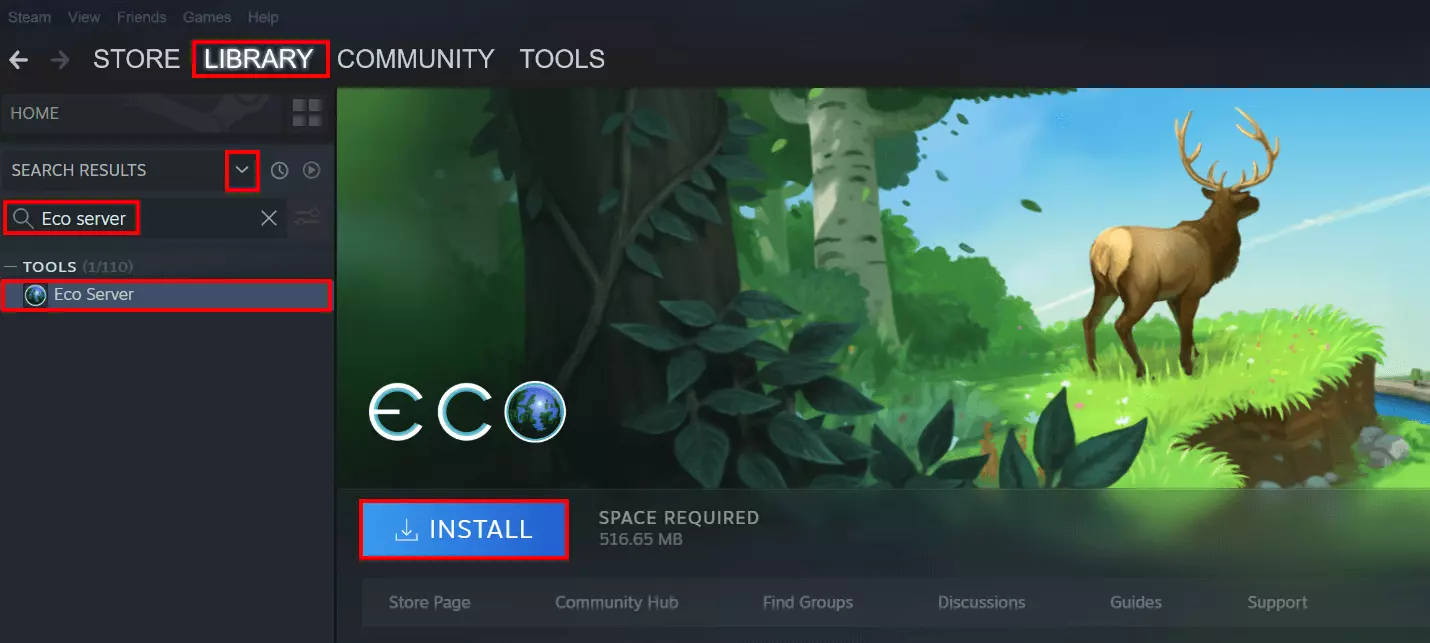
You can start installing the Eco dedicated server software once the connection has been successfully established. If you have purchased the game with Steam, you can also get the application from the library on the gaming platform. Simply install the Steam client on your server and complete the following steps:
- Log in to the client with your Steam account.
- Click “Library” in the top bar on the platform.
- Open the drop-down menu in the left side of the interface using the down arrow.
- Check the box next to “Tools”.
- Search for “Eco server” using the search bar.
- Select the server tool and click “Install”.
If you purchased the game through the website rather than Steam, you can download the installation files for the Eco server directly through the official Eco website using your Strange Loop Games account.
Step 3: Enable Eco server ports
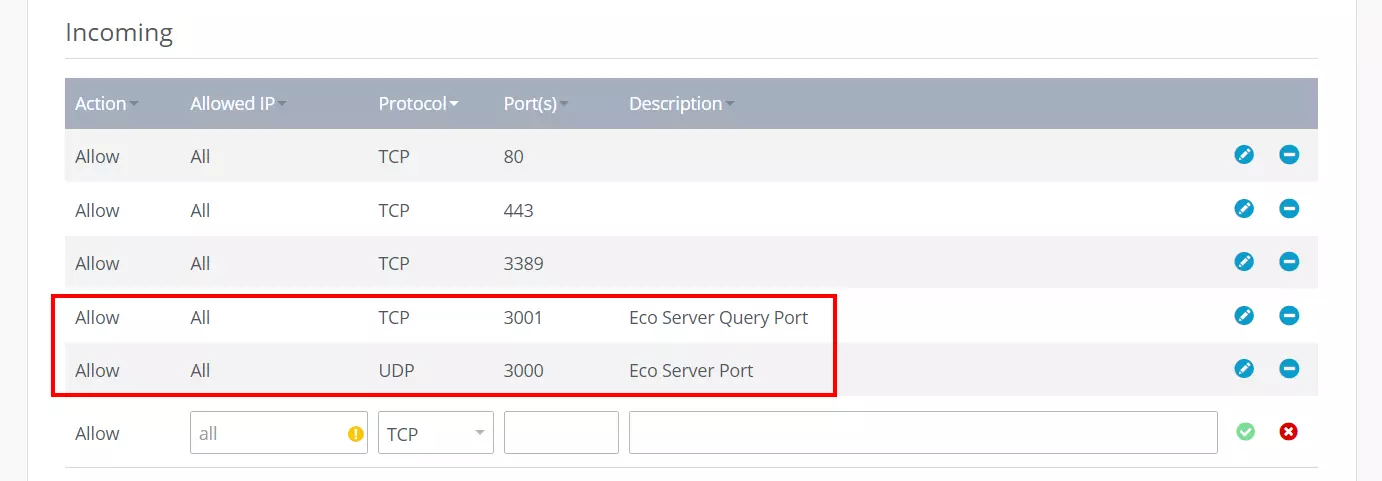
The appropriate ports for communication must be enabled to allow you and other users to connect to the game server. In the case of Eco, this is server port 3000 (UDP), which can be used to reach the server, and query port 3001 (TCP), which is used to query information such as the number of players or the server name.
The two ports must be enabled in your rented server’s firewall settings. Customers with an IONOS server can also do this step through the Cloud Panel. The following steps must be completed:
- Log in to the Cloud Panel.
- Go to the “Server & Cloud” section.
- Select your server plan.
- In the left side menu, click “Network” and “Firewall Policies”.
- Under “Incoming”, add the rules for UDP port 3000 and TCP port 3001.
It may take some time for the new rules to be adopted by the server. You can see the progress in the status indicator in the Firewall Policies menu.
Try out your VPS for 30 days. If you're not satisfied, you get your money back.
Step 4: Start and update the server
Press the “Start” button once the server application has been installed. The client will then automatically check for updates for the Eco server, update the program files, and start the game world.
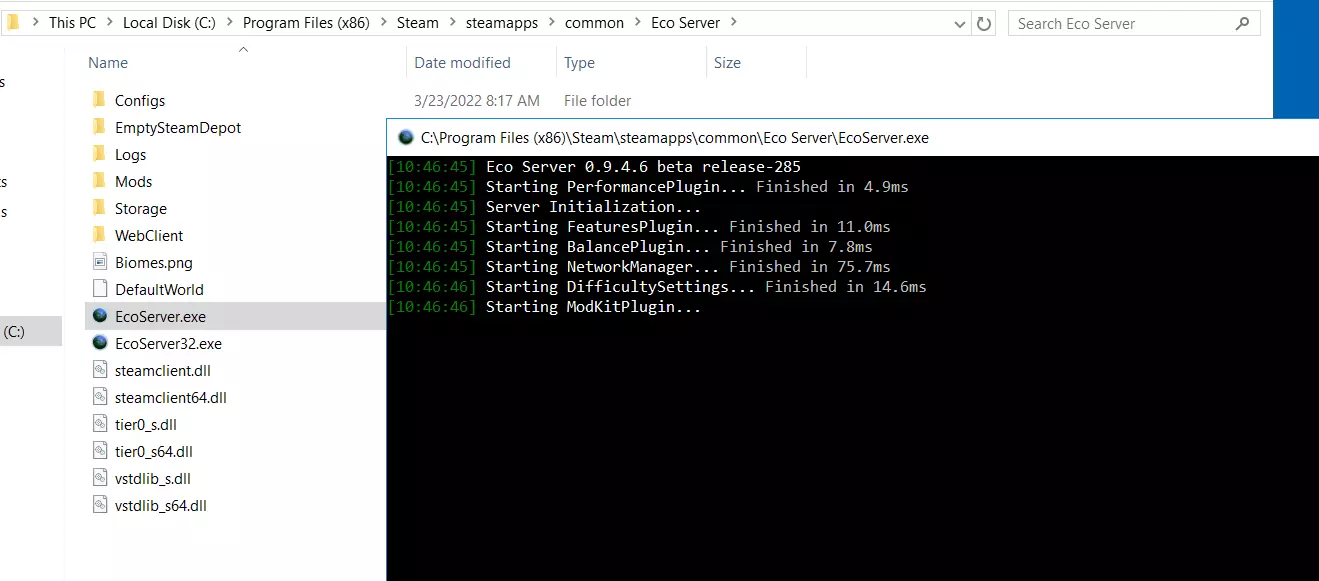
You can alternatively run EcoServer.exe in the installation directory if you choose to start the server later. The following path is used by default during installation:
Steam\teamapps\common\Eco ServerStep 5: Configure the Eco server
The Eco server tool will start automatically once the important server data has been loaded. Here, you can choose the important settings and options for your server. You can also choose settings for progress (experience, craft time, costs, etc.), meteor (start time of the meteor, impact date), or seed and size of the world. A detailed overview is provided by the official Eco Wiki.
The most important settings are the backup function and the server settings.
Configure server backup:
The Eco server’s backup function is activated by default and it is an important feature for saving the game in its current state. However, the backup copies will take up a lot space on your server as the game progresses, so you need to pay attention to your capacities. You can turn off the feature by going to the “Backup” tab in the tool and changing the “Enabled” line to “False”. Alternatively, you can lower the maximum number of hourly, daily, and weekly backups by entering the appropriate values.
Configure server settings:
You can choose the basic server settings in the “Network” tab. You must also select the “Config” sub-tab prior to this, as you can only see who is currently connected to your server in the alternative “Display” tab. You can then set the server to be listed publicly in the Config menu:
Public Server -> TrueStep 6: Connect to the server
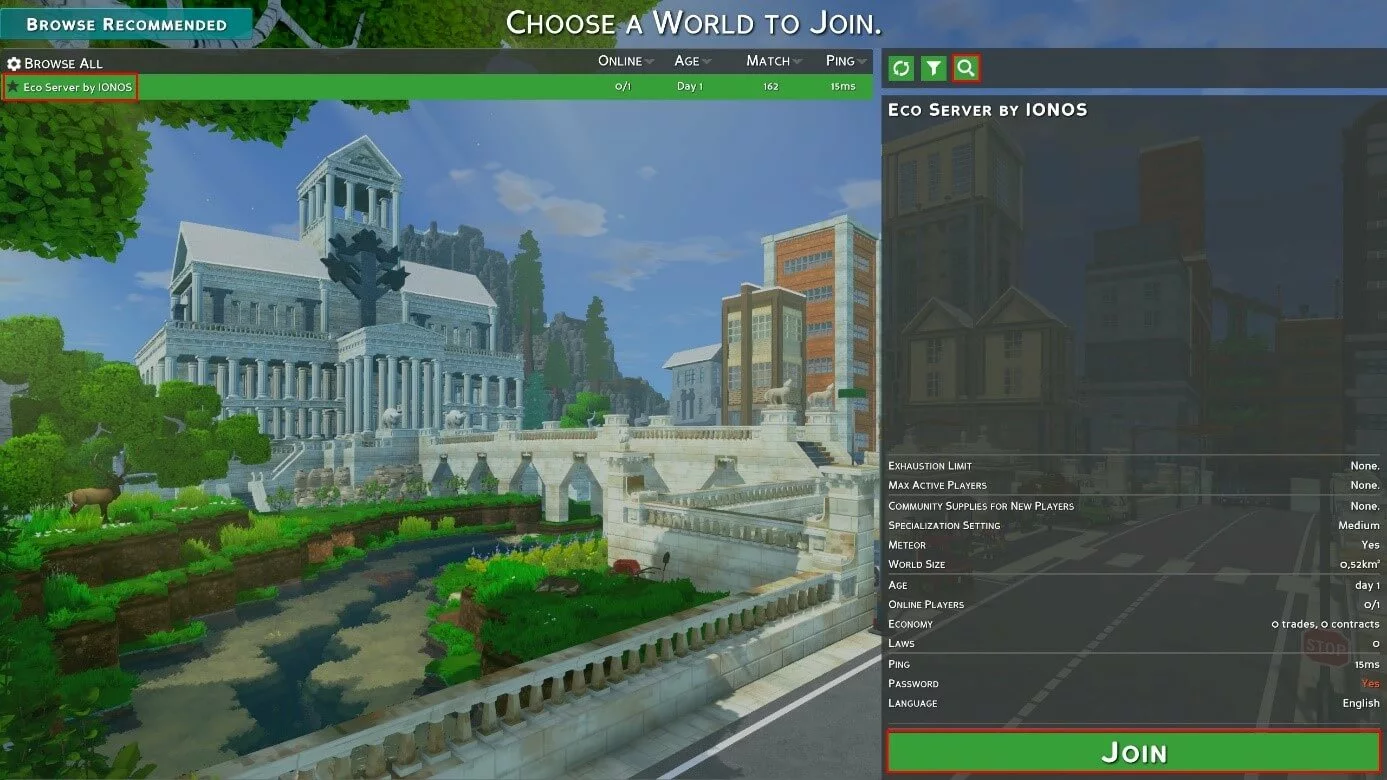
You can finally connect to the Eco dedicated server once the configuration is finished. Simply start the game and proceed as follows:
- Click “New game”.
- Click “Search All”.
- Use the magnifying glass icon to search for your server.
- Select the correct search result and click “Join”.
Make a statement with your own .gg domain and let the games begin. Register your own .gg domain now with IONOS.


