How to create a Discord bot
Discord bots can take over various automated tasks in your Discord channels. The prerequisite is having your own Discord server. Keep reading to find out how to make a Discord bot and how to add a pre-made one to your server.
- Simple registration
- Premium TLDs at great prices
- 24/7 personal consultant included
- Free privacy protection for eligible domains
The short version: How to make a Discord bot
How to integrate a pre-programmed Discord bot:
- Select a Discord bot from a website offering a Discord bot list (e.g. “top.gg”).
- Click on “Invite” on the bot website.
- Select your server and grant the bot the permissions it needs.
- The bot will then be added to your Discord server.
How to make your own Discord bot:
- Turn on “Developer mode” in your Discord account.
- Click on “Discord API”.
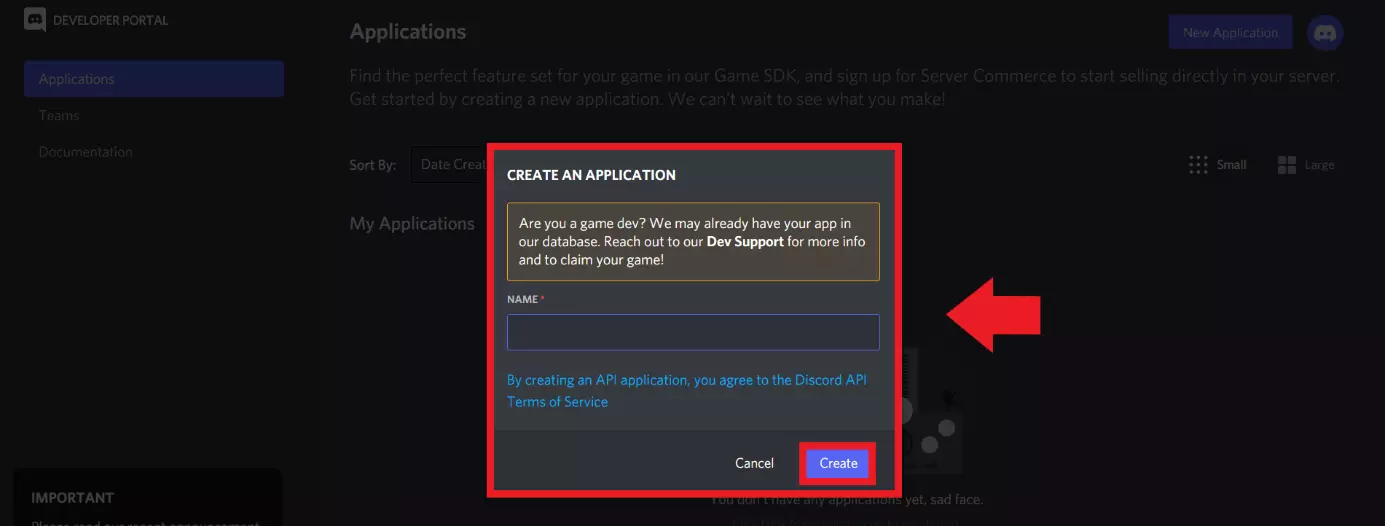
- In the Developer portal, click on “Applications”. Log in again and then, back in the “Applications” menu, click on “New Application”.
- Name the bot and then click “Create”.
- Go to the “Bot” menu and generate a token using “Add Bot”.
- Program your bot using the bot token and save the file.
- Define other details for your bot under “General Information”.
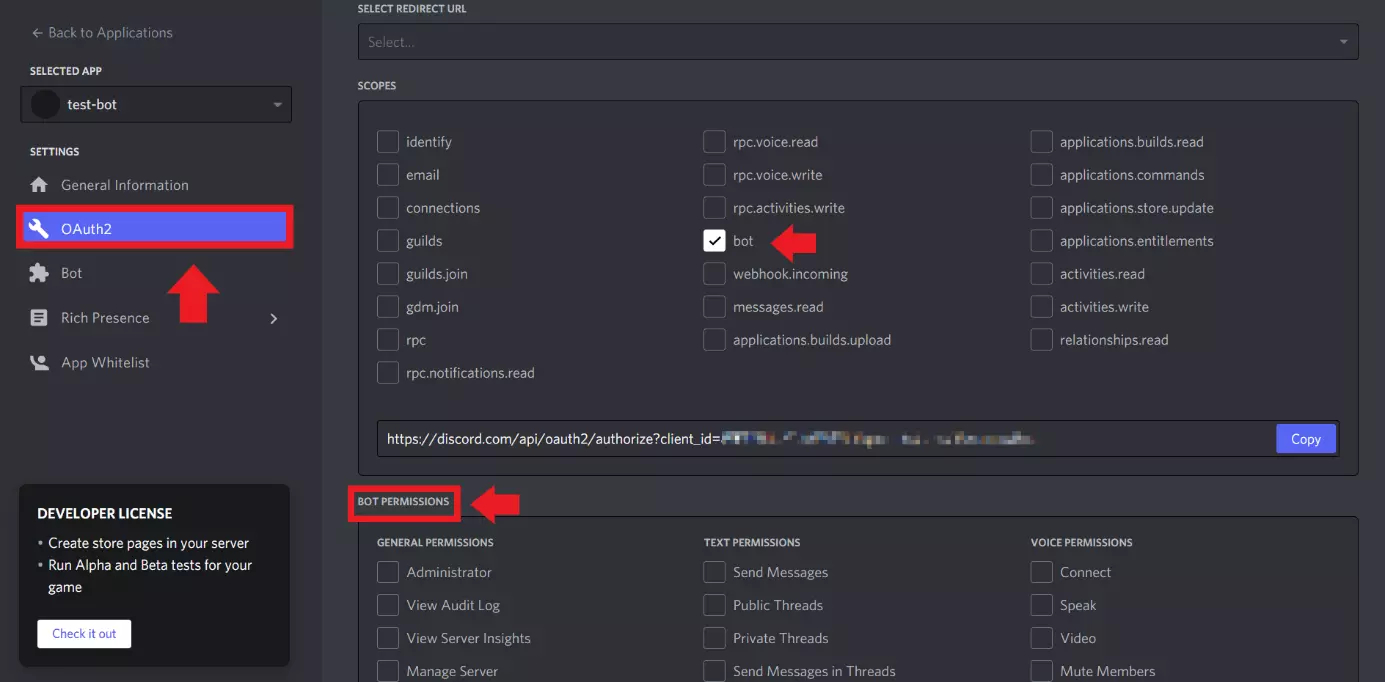
- Click on “OAuth2”, activate “bot”, set the permissions, and then click on “Copy”.
- Select your server to add your bot to it.
What is a Discord bot?
Bots have become a central part of the Internet. These automated programs can take on tasks and fulfill them independently. For example, a bot could act as a customer service associate, collect data from social media, or crawl the web to improve search machines. In Discord, users can employ bots with a variety of features, in order to improve the functionality or entertainment value of their server.
Some popular forms of Discord bots include:
- Discord music bots, which automatically play music
- Voice command bots for voice control of Discord
- Allrounder bots that combine various functions, e.g. gaming integration, automatic notifications, and moderating
- Translation bots
- Statistics bots for analyzing server data
Discord bots are particularly practical for the gaming community, as they can automatically communicate with a dedicated Valheim server or Minecraft server, evaluate user behavior, and establish a connection between Discord and the gaming server.
If Discord isn’t for you and you prefer working with TeamSpeak, check out our guide on setting up your own TeamSpeak server.
How to make a Discord bot: A step-by-step guide
The first thing you’ll need is a Discord account, if you don’t already have one. Then use the account to set up your own Discord server, which is where you’ll integrate the bot. From this point you have two options for using a Discord bot:
Integrate a pre-programmed Discord bot
If you’re not a skilled programmer, your best bet is to use one of the numerous pre-programmed bots out there. You can find a wide variety of bots with either broad or specialized functions on websites like “top.gg”.
To use a pre-programmed Discord bot, take the following steps:
Step 1: Go to a Bot list website such as “top.gg”. Once you’ve chosen a bot, you’ll be redirected to the bot website. Alternatively, you can go directly to the website of your chosen Discord bot. For example, if you know that you want to download the music bot Hydra, you can go directly to the website “hydra.bot”.
Step 2: Click on “Invite” on the bot page to invite the Discord bot to your Discord server.
Step 3: Enter the login information for your Discord account.
Step 4: At this point, a window should open where you can choose the server that you want to add the Discord bot to. Grant the bot the necessary permissions.
Step 5: The bot will then appear as a user in your channel. You can usually read about the bot’s features and commands in the bot instructions or using the command “.help”.
Creating your own Discord bot
If you don’t want to rely on a pre-made bot and prefer to write your own program, you’ll need to have basic programming knowledge. That makes this option significantly more complicated for beginners. However, with the appropriate skills, it’s absolutely possible to create your own Discord bot in the programming language of your choice. To this end, Discord offers a developer API where you can register a new application including a token (password).
You’ll need:
- Your own Discord server
- Programming tools such as node.js (a JavaScript tool) or Python 3
- Notepad++ (text editor)
Follow these steps to create your own Discord bot:
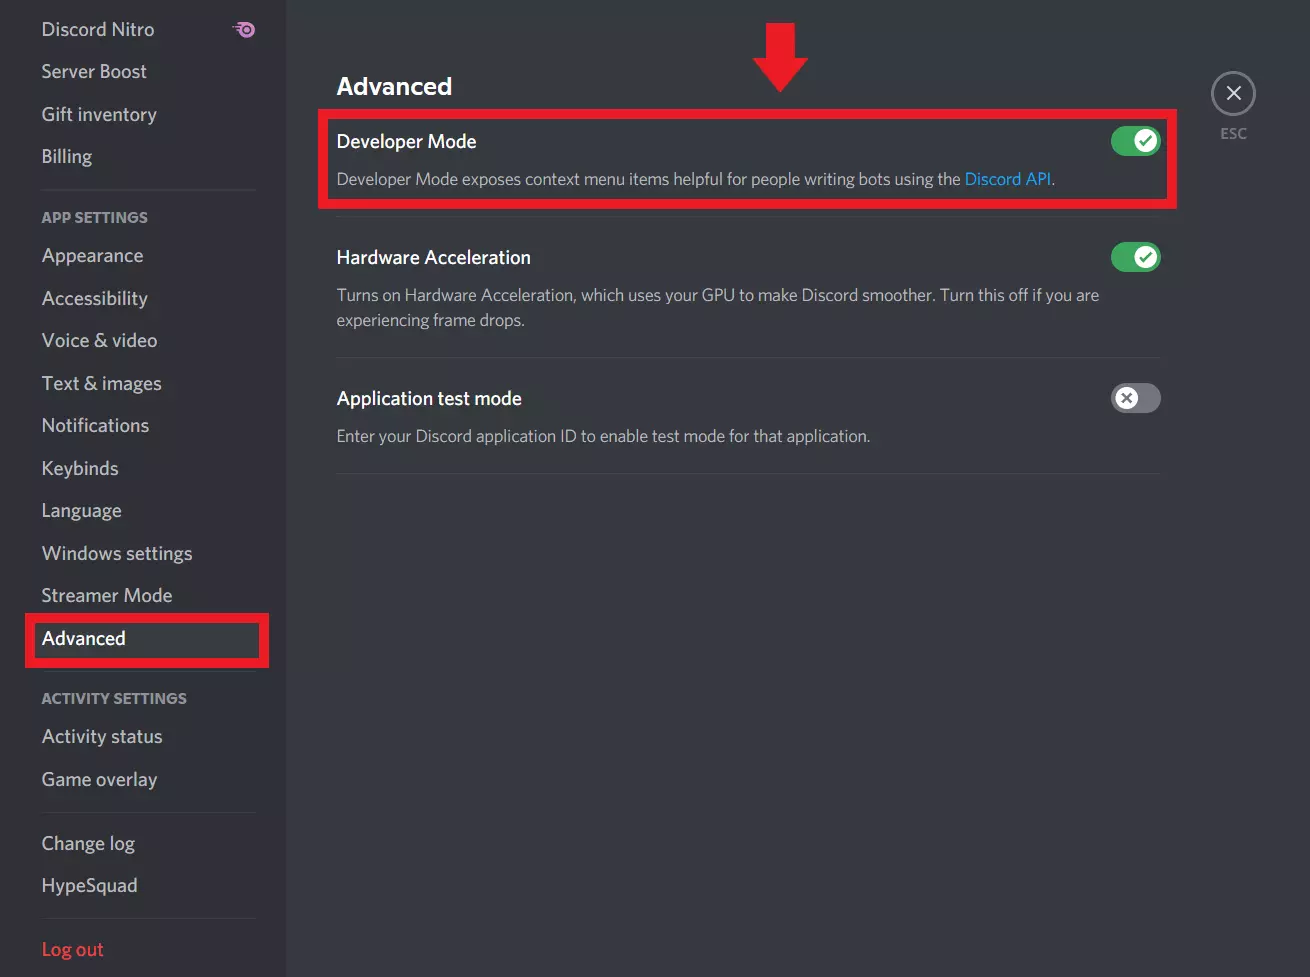
Step 1: Log into your Discord account and click on “Advanced” in the sidebar. Then activate “Developer Mode”. Then click on “Discord API”.
Step 5: Now it’s time to start programming your bot. Since this involves advanced programming steps, you should have previous knowledge of programming languages and tools. Use an IDEA programming environment, programming tools like Python 3 or node.js, or a text editor like Notepad++. After you’ve written the bot, save the bot file.
Step 6: Back in Developer Mode in Discord, go to “General Information” and set details like the description and app icon.
Step 8: The authentication link including client ID should look as follows:
https://discordapp.com/oauth2/authorize?&client_id=IHRE-ID&scope=bot&permission=8Step 9: Select your Discord server in order to add your bot.
