How to move the taskbar in Windows 11
To move the taskbar in Windows 11, you can use the “Personalization” menu in Windows or the registry. Via “Personalization”, the taskbar can be aligned left or centered along the bottom of the screen. Using the registry, you can fix the taskbar to the left, right or top edge of the screen.
Step-by-step guide to move the taskbar in Windows 11
The taskbar is located at the bottom of the desktop in Windows 11. However, users may prefer to move the taskbar to a different part of the display. Windows provides several options to change the layout, design, and menu orientation. To personalize Windows, you can, among other things, use the Windows 11 Dark Mode, switch the Windows 11 keyboard, set a transparent taskbar in Windows 11 or change the Windows wallpaper. Another handy personalization option is moving the taskbar.
Windows offers two options for this.
Method 1: Windows menu “personalization”
The “Taskbar” menu in “Personalization” can be used to rearrange the start menu, app icons or even to pin a website to the taskbar in Windows 11.
Step 1: First, launch Windows settings by pressing the Windows shortcut [Windows] + [i] key. Alternatively, enter the search term “Settings” in the Windows search or right-click on the Windows icon. The fastest way to open the “Taskbar settings” is to right-click an empty area of the taskbar.
Step 2: In the settings, navigate to the “Personalization” item in the left menu bar.
Step 3: In the “Personalization” menu, the “Taskbar” category is located on the right. Under “Taskbar behavior” you’ll find the menu item “Taskbar alignment”. You can use it to left-align or center the Start menu, app icons, and attached programs. By default, these are centered.
Method 2: Windows registry
Moving the taskbar to a different edge of the display isn’t quite as simple. But you can customize your Windows layout as you desire. To do this, use the registry. Please note, however, that (as of September 2022) Windows 11 doesn’t allow you to move the taskbar to another screen edge. Therefore, moving it to the left or right may cause problems with scaling and operation.
Proceed as follows to move the taskbar with the registry:
Step 1: Open the “Run” menu with the shortcut [Windows] + [R], type the CMD command “regedit” and hit [Enter]. Alternatively, enter the term “registry editor” in the Windows search.
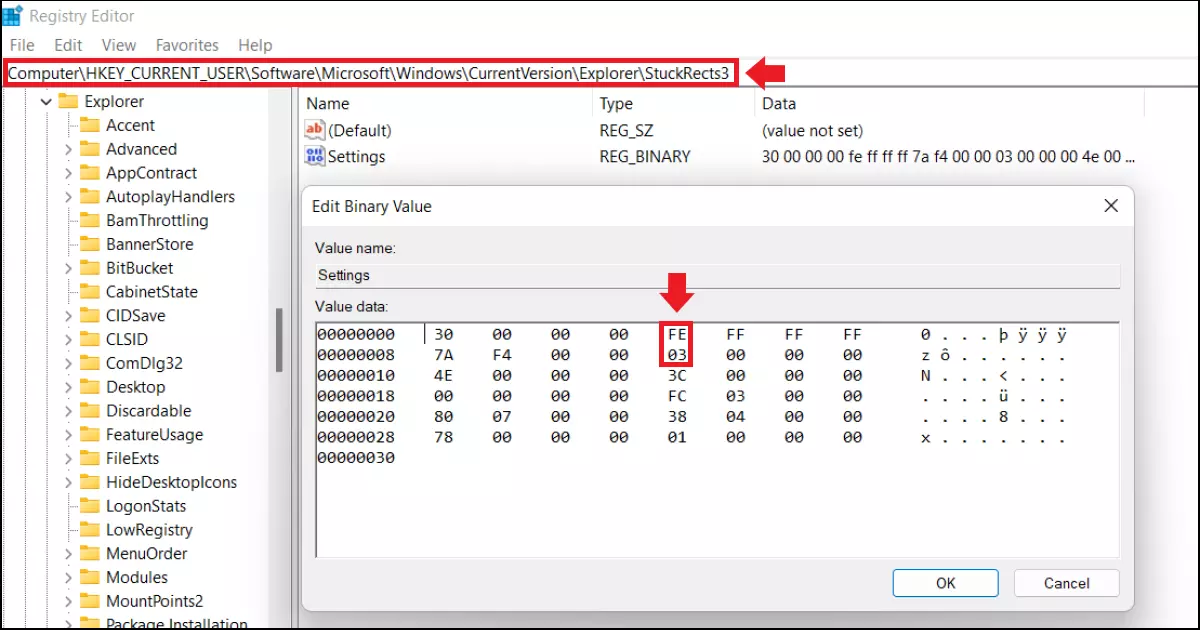
Step 2: You’ll now be taken to the Windows Registry Editor menu. Open the HKEY_CURRENT_USER\Software\Microsoft\Windows\CurrentVersion\Explorer\StuckRects3 path and double-click on “Settings”.
Step 3: Change the values for the Windows settings. The crucial area for your changes is under “FF” in the second line under the fifth value. You’ll find the value “03” preset there. Use the following values to change the position of the taskbar:
- 00: Move taskbar to left edge of screen
- 01: Move taskbar to upper edge of screen
- 02: Move taskbar to right edge of screen
- 03: Move taskbar to lower edge of screen

Step 4: Once you’ve changed the value, hit “OK” to apply the changes.
Step 5: Restart Explorer. Press [Windows] + [R] to open the “Run” dialog. Type “cmd” and press [Ctrl] + [Shift] + [Enter] to open the command prompt as an administrator. Type the “taskkill /f /im explorer.exe” command and press [Enter]. Then type “start explorer.exe” and press [Enter] again.
Step 6: You’ll now find the taskbar at the position you defined.

