How to use SSH keys with PuTTY on Windows
The PuTTY SSH client for Microsoft Windows does not use the same key format as the OpenSSH client. If you want to use PuTTY, you have to create a new SSH public and private key using the PuTTYgen tool or convert an existing OpenSSH private key.
SSH (Secure Shell) can carry out authentication using a traditional username and password combination or by using a public and private key pair. The SSH key pair establishes trust between the client and server, thereby removing the need for a password during authentication. While not required, the SSH private key can be encrypted with a passphrase for added security.
What do I need to use SSH keys with PuTTY?
- PuTTY SSH client for Microsoft Windows
- Remote server that is accessible over OpenSSH
How to install PuTTY and PuTTYgen
Both PuTTY and PuTTYgen are required to convert OpenSSH keys and to connect to the server over SSH. These two tools can be downloaded individually or, preferably, as a Windows installer from the PuTTY Download Page.
Once the PuTTY Windows installer is downloaded, double-click the executable file in the Download folder and follow the instructions in the installation wizard. The default settings are suitable for most installations. Both PuTTY and PuTTYgen should now be accessible from the Windows Programs list.
How to use existing public and private keys
If you have an existing OpenSSH public and private key, copy the id_rsa key to your Windows desktop. This can be done by copying and pasting the contents of the file or using an SCP client such as PSCP, which is supplied with the PuTTY installation package or FileZilla.
Next, launch PuTTYgen from the Windows Programs list.
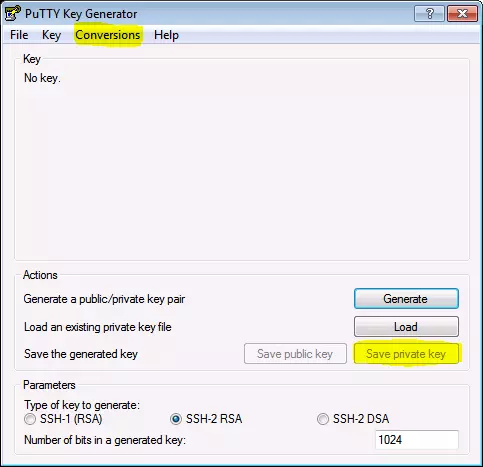
- Click Conversions from the PuTTY Key Generator menu and select Import key.
- Navigate to the OpenSSH private key and click Open.
- In the Actions section, go to Save the generated key and select Save private key.
- Choose an optional passphrase to protect the private key.
- Save the private key to the desktop as “id_rsa.ppk”.

If the public key is already appended to the “authorized_keys” file on the remote SSH server, connect to the server with the private key.
Otherwise, proceed by copying the public key to the server.
How to create new public and private keys
Launch PuTTYgen from the Windows Programs list and proceed with the following steps.
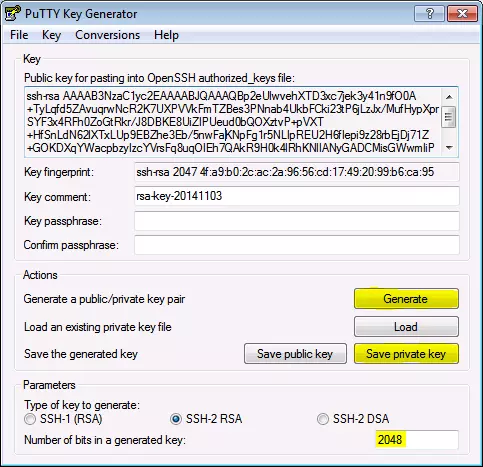
- Under Parameters, locate the Number of bits in a generated key: field at the bottom of the window. Increase the number of bits to 2048 or higher.
- Under Actions, go to Generate a public/private key pair and click Generate.
- You will be instructed to move the mouse cursor around within the PuTTY Key Generator window. This acts as a randomizer when generating the private key.
- Once the key information appears, click Save private key under Actions / Save the generated key.
- Save the private key to the desktop as “id_rsa.ppk”.
- The public key is located in the field Public key for pasting into OpenSSH authorized_keys file: in the Key section at the top of the window.

How to copy a public key to a remote server
The OpenSSH public key is located under Public key for pasting info OpenSSH authorized_keys file: in the Key section. The public key begins with ssh-rsa followed by a string of characters.
- Highlight the entire public key in the PuTTY Key Generator and then copy the highlighted text.
- Launch PuTTY and log into the remote server with your existing user credentials.
- Use your preferred text editor to create and/or open the authorized_keys file:
vi ~/.ssh/authorized_keys- Paste the public key into the authorized_keys file.
ssh-rsa AAAAB3NzaC1yc2EAAAABJQAAAQBp2eUlwvehXTD3xc7jek3y41n9fO0A+TyLqfd5ZAvuqrwNcR2K7UXPVVkFmTZBes3PNnab4UkbFCki23tP6jLzJx/MufHypXprSYF3x4RFh0ZoGtRkr/J8DBKE8UiZIPUeud0bQOXztvP+pVXT+HfSnLdN62lXTxLUp9EBZhe3Eb/5nwFaKNpFg1r5NLIpREU2H6fIepi9z28rbEjDj71Z+GOKDXqYWacpbzyIzcYVrsFq8uqOIEh7QAkR9H0k4lRhKNlIANyGADCMisGWwmIiPJUIRtWkrQjUOvQgrQjtPcofuxKaWaF5NqwKCc5FDVzsysaL5IM9/gij8837QN7z rsa-key-20141103- Save the file and close the text editor.
- Adjust the permissions of the authorized_keys file so that the file does not allow write permissions for a group.
chmod 600 ~/.ssh/authorized_keys- Log out of the remote server.
How to connect to a remote server with a private key
Now it’s time to test SSH key authentication. Close the PuTTYgen tool and then launch PuTTY again.
- Enter the remote server Host Name or IP address under Session.
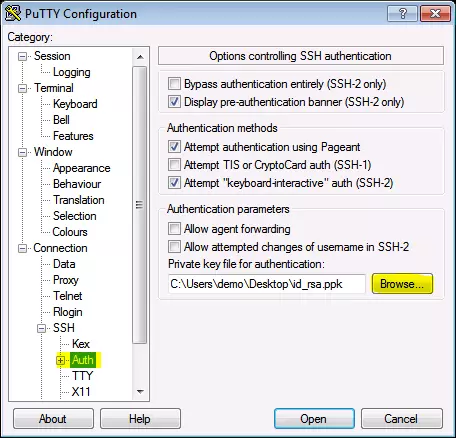
- Navigate to Connection > SSH> Auth.
- Click Browse… under Authentication parameters / Private key file for authentication.
- Locate the “id_rsa.ppk” private key and click Open.
- Finally, click Open again to log into the remote server with key pair authentication.


