Elasticsearch Tutorial
Those who need a powerful full-text search usually choose Apache Solr. While this project is still a good choice, there has been an interesting alternative on offer since 2010: Elasticsearch. Just like Solr, Elasticsearch is based on Apache Lucene, but offers other features. Here’s an overview of the features of the search server and an Elasticsearch tutorial for how to implement the full text search in your own project.
What is Elasticsearch?
Elasticsearch belongs to the most important full-text search engines on the internet. Large companies also use the software – Facebook, for example, has been working successfully with Elasticsearch for several years, and GitHub, Netflix, and SoundCloud also all rely on the successful search engine.
Given the amount of information on some websites, a high level of user-friendliness can only be guaranteed if a functional full-text search is used. If you don't want to use Google or Bing to offer your website visitors a search function, you’ll have to embed your own search function instead. This is possible with Elasticsearch. The open source project is based on the freely available Apache Lucene.
Elasticsearch has the advantages of having had a stable predecessor, and expands the former ones with further features. Just as with Lucene, the search works via an index. Instead of examining all documents during a search query, the program checks a previously created index of the documents, in which all contents are stored in a prepared form. This process takes much less time than searching all documents.
While Lucene gives you a completely free hand in terms of where and how to use the full text search, this also means that you have to start from scratch. Elasticsearch, on the other hand, enables you to get started faster. With Elasticsearch, it is possible to build up a stable search server in a short time, which can also easily be distributed to several machines.
Several nodes (different servers) merge to form a cluster. The so-called “sharding” method is used. Elasticsearch breaks up the index and distributes the individual parts (shards) to several nodes. This also distributes the calculation load – for large projects, the full-text search is much more stable.
Elaticsearch is – just like Lucene – based on the object-oriented programming language Java. The search engine outputs search results in JSON format and delivers them via a REST web service. The API makes it very easy to integrate the search function into a website.
In addition, together with Kibana, beats and logstash – collectively known as Elastic-Stack – Elasticsearch offers practical additional services with which you can analyze the full text search. Elastic, the company behind the development of Elasticsearch, also offers paid services – such as cloud hosting.
What does Elasticsearch offer that Google et al. do not?
Google is already a successful option – and you can easily integrate its popular search function into your own website. So why choose the extra work of building your own search engine with Elasticsearch? One possible answer is that with Google Custom Search (GCS) you are dependent on Google, and have to allow advertising (at least in the free version) in the search results. With Elasticsearch, however, the code is open source, and if you have set up a full text search function, it is yours – you are not dependent on anyone.
You can also customize Elasticsearch to suit your needs. For example, if you run your own online platform or e-shop, you can set up the search function so that you can also search the profiles of registered users using Elasticsearch. GCS is a bit stretched when used for this purpose.
Elasticsearch vs. Apache Solr: What are the key differences?
Both Elasticsearch and Apache Solr are based on Lucene, but have been developed into independent programs. However, many users wonder which project they should choose. Although Elasticsearch is a little younger and, unlike Solr, is not supported by the experienced Apache community, it has become highly popular. The main reason for this is that it is simpler to implement. Furthermore, Elasticsearch is particularly popular because of the way it handles dynamic data. Through a special caching procedure, Elasticsearch ensures that changes do not have to be entered in the entire global cache. Instead, it is enough to change a small segment. This makes Elasticsearch more flexible.
Ultimately, however, the decision often only has to do with the different approaches regarding open source. Solr is fully committed to the Apache Software Foundation’s “Community over Code” idea. Every contribution to the code is taken seriously, and the community decides together which additions and enhancements make it into the final code. This is different with the further development of Elasticsearch. This project is also open source and is offered under a free Apache license – however, only the Elastic team determines which changes make it into the code. Some developers do not like this, and so choose Solr.
Elasticsearch tutorial
When you start working with Elasticsearch, you should start off by knowing a few basic terms. The informational structure is worth mentioning:
- Index: A search query at Elasticsearch never applies to the content itself, but always to the index. All contents of all documents are stored in this file and are already prepared, so the search takes only a short time. It is an inverted index: For each search term, the place where the term can be found is specified.
- Document: Outbound for the index are the documents in which data occurs. They don’t necessarily have to be complete texts (for example blog articles) – mere files with information are sufficient.
- Field: A document consists of several fields. In addition to the actual content field, other metadata also belongs to a document. With Elasticsearch you can search specifically for metadata about the author or the time of creation.
When we talk about data processing, we’re primarily talking about tokenizing. An algorithm creates individual terms from a complete text. For the machine, there is no such thing as words. Instead, a text consists of a long string, and a letter has the same value for the computer as a space. For a text to be meaningfully formatted, it must first be broken down into tokens. For example, whitespaces, spaces and hyphens are assumed to be markers for words. In addition, the text must be standardized. Words are written in uniform lowercase, and punctuation marks are ignored. Elasticsearch adopted all of these methods from Apache Lucene.
In the following tutorial we will work with version 6.3.0 of Elasticsearch. If you are using a different version, some code examples or instructions might work differently.
Installation
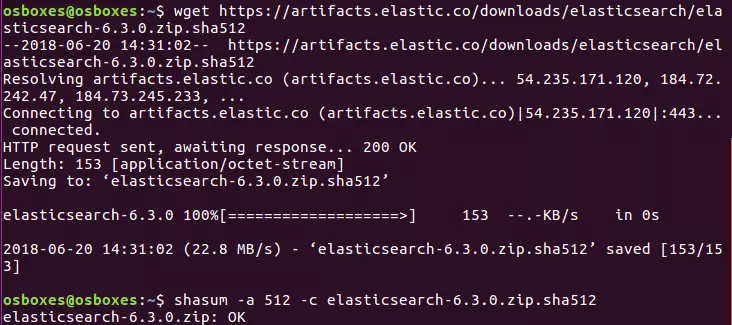
The files needed for Elasticsearch are freely available on the official Elastic website. The files are offered there as ZIP or tar.gz packages, which is why they can be easily installed under Linux and Mac using a console.
Elastic offers Elasticsearch in two different packages. The standard version also includes paid features that you can try out in a trial version for some time. Such packages marked with OSS (open source software) only contain free components released under the Apache 2.0 license.
For ZIP:
wget https://artifacts.elastic.co/downloads/elasticsearch/elasticsearch-oss-6.3.0.zip
wget https://artifacts.elastic.co/downloads/elasticsearch/elasticsearch-oss-6.3.0.zip.sha512
shasum -a 512 -c elasticsearch-oss-6.3.0.zip.sha512
unzip elasticsearch-oss-6.3.0.zip
cd elasticsearch-6.3.0
For tar.gz:
wget https://artifacts.elastic.co/downloads/elasticsearch/elasticsearch-oss-6.3.0.tar.gz
wget https://artifacts.elastic.co/downloads/elasticsearch/elasticsearch-oss-6.3.0.tar.gz.sha512
shasum -a 512 -c elasticsearch-oss-6.3.0.tar.gz.sha512
tar -xzf elasticsearch-oss-6.3.0.tar.gz
cd elasticsearch-6.3.0The ZIP archive can also be downloaded and used for installation in Windows, because the package contains a batch file that you can run. Alternatively, Elastic now also provides an MSI installer, but this is still in its beta phase. The installation file of the latter contains a graphical interface that guides you precisely through the installation.
Because Elasticsearch is based on Java, this programming language must also be installed on your system. Download the Java Development Kit (JDK) free of charge from the official website.
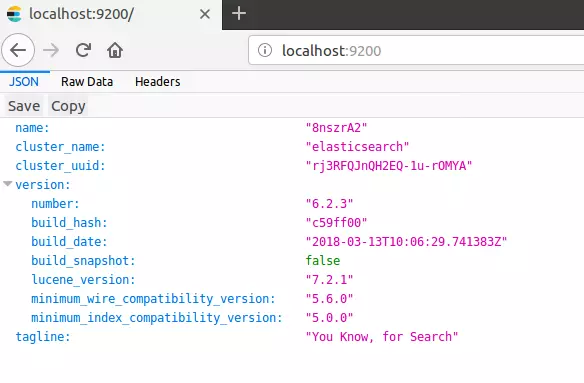
Now run Elasticsearch from the console by navigating to the appropriate bin folder and typing “elasticsearch” – whether you are running Linux, Mac, or Windows. Then open a browser of your choice and call the following localhost port: http://localhost:9200/. If you have installed Elasticsearch correctly and Java is set correctly, you should now be able to access the full text search.
You can communicate via the REST API with Elasticsearch, for which you also need an appropriate client. Kibana is a good choice (also a free open source offer from Elastic). This program enables you to use Elasticsearch directly in your browser. To do this, simply go to http://localhost:5601/ to access a graphical user interface. How to install and set up Kibana correctly is explained in our Kibana tutorial|. In Kibana and any other client, you can use the HTTP methods PUT, GET, POST, and DELETE to send commands to your full-text search.
Index
The first step is creating your index and feeding it with data. You can use two different HTTP methods for this: POST and PUT. You use PUT if you want to specify a specific ID for the entry. With POST, Elasticsearch creates its own ID. In our example, we would like to set up a bibliography. Each entry should contain the name of the author, the title of the work, and the year of publication.
POST bibliography/novels
{
"author": "Isabel Allende",
"title": "La casa de los espíritus",
"year": "1982"
}
If you want to use the input like this, you must use the Kibana console. However, if you do not want to use this software, you can also use cURL as an alternative. Instead of the previous command, you must then enter the following in the command line:
curl -XPOST http://localhost:9200/bibliography/novels -H "Content-Type: application/json" -d '{"author": "Isabel Allende", "title": "La casa de los espíritus", "year": "1982"}'In the following we’ll show you the code for Kibana only – but this can be easily transferred into cURL syntax.
Elasticsearch should, if you have entered everything correctly, return the following information at the beginning of the message:
{
    "_index": "bibliography",
    "_type": "novels",
    "_id": "AKKKIWQBZat9Vd0ET6N1",
    "_version": 1,
    "result": "created",
}
At this point it’ll become clear that Elasticsearch now finds an index with the name “bibliography” and the type “novels.” Since we used the POST method, Elasticsearch automatically generated a unique ID for our entry. The entry is currently in the first version and was recently created.
One type (_type) was a kind of subcategory in Elasticsearch. It was possible to gather several types under one index. However, this led to different problems and so Elastic currently plans to no longer use such types. In version 6.x _type is still included, but it is no longer possible to combine several types under one index. As of version 7.0, the plan is to completely delete types, as the developers explain in their blog.
You can also use PUT to give your entry a very specific ID. This is defined in the first line of the code. You also need PUT if you want to change an existing entry.
PUT bibliography/novels/1
{
"author": "William Gibson",
"title": "Neuromancer",
"year": "1984"
}
The following output is very similar to the one we get with the POST method, but Elasticsearch gives us the ID we gave to the entry in the first line. The order of specification is always _index/_type/_id.
{
    "_index": "bibliography",
    "_type": "novels",
    "_id": "1",
    "_version": 1,
    "result": "created",
}
With the PUT command and the unique ID we can also modify entries:
PUT bibliography/novels/1
{
"author": "William Gibson",
"title": "Count Zero",
"year": "1986"
}
Since the entry with ID 1 already exists, Elasticsearch only changes it instead of creating a new one. This is also reflected in the output:
{
    "_index": "bibliography",
    "_type": "novels",
    "_id": "1",
    "_version": 2,
    "result": "updated",
}
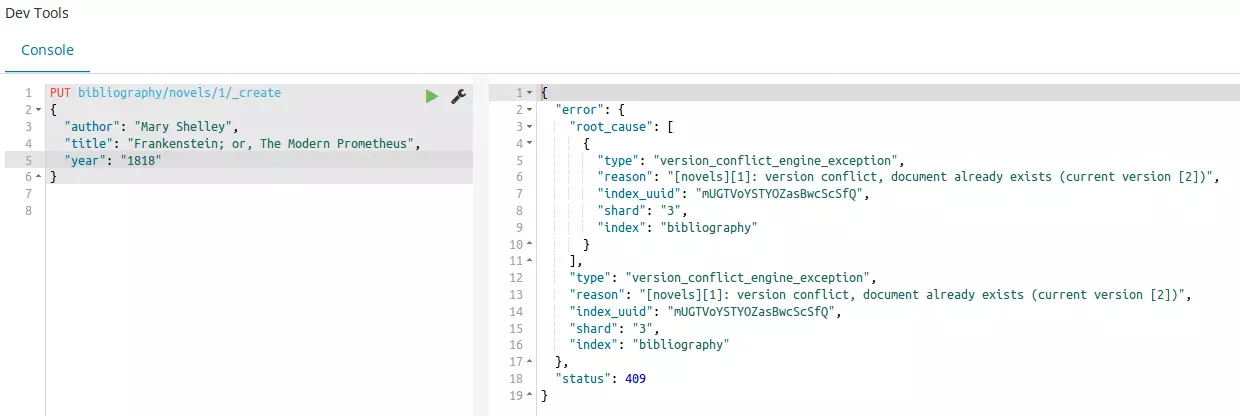
The version number has increased to 2, and as a result we get “updated” instead of “created.” Of course you can do the same with an ID created by Elasticsearch at random – but due to the length and order of the characters the work would take a lot more effort. The procedure also means that Elasticsearch simply overwrites an entry if, for example, you get confused with the ID numbers. To avoid accidental overwriting, you can use the _create endpoint:
PUT bibliography/novels/1/_create
{
"author": "Mary Shelley",
"title": "Frankenstein; or, The Modern Prometheus",
"year": "1818"
}If you make changes to an entry as described, you create a completely new entry and must therefore also enter all entries completely. You can only integrate changes into the existing entry. To do this, use the _update endpoint:
POST bibliography/novels/1/_update
{
"doc": {
    "author": "Franz Kafka",
"genre": "Horror"
    }
}
Now we have added an additional field to the entry and changed an existing field without deleting the others – but only in the foreground. In the background, however, Elasticsearch created the complete entry, but inserted the existing content independently.
In principle, we have so far simply written an entry into a database, and can therefore retrieve it directly. For this we use the GET method.
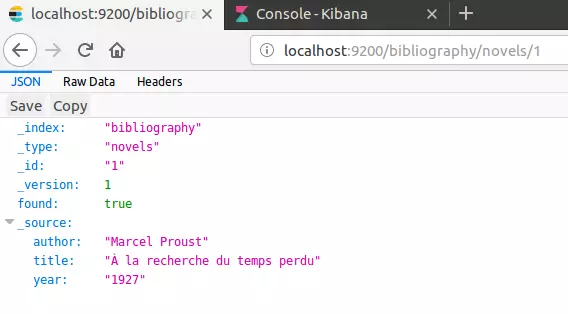
GET bibliography/novels/1You can also simply display the entry in the browser:
http://localhost:9200/bibliography/novels/1{
"_index": "bibliography",
"_type": "novels",
"_id": "1",
"_version": 2,
"found": true,
"_source": {
"author": "William Gibson",
"title": “Count Zero",
"year": "1984"
}
}In addition to this information, you will find the fields of the document under _source. Elasticsearch also tells us that an entry has been found. If you try to load a non-existing entry, no error message would appear. Instead, Elasticsearch reports “found”: false, and there are no entries under _source.
You also have the option to extract only certain information from the database. Let’s assume that you have not only stored bibliographic data in your index, but also the complete text of each recorded novel. This would also be displayed with a simple GET request. Let's assume you are currently only interested in the name of the author and the title of the work – then you can only specifically ask for it:
GET bibliography/novels/1?_source=author,titleIf you are not interested in the metadata of an entry, it is also possible to display only the content:
GET bibliography/novels/1/_sourceLet's assume you want to find not just one single entry in your index, but several at the same time. Elasticsearch has implemented the _mget-endpoint (for multi-get). If you use it, specify an array of multiple IDs:
GET bibliography/novels/_mget
{
    "ids": ["1", "2", "3"]
}
Even if an entry does not yet exist, the complete query won’t run incorrectly. All existing data is displayed. As for the non-existent data, Elasticsearch gives feedback that it cannot find them.
Similar to loading an entry, deleting it also works. However, you work with DELETE instead of GET:
DELETE /bibliography/novels/1In the following output, Elasticsearch tells you that it found the entry under the specified ID:
{
    "_index": "bibliography",
    "_type": "novels",
    "_id": "1",
    "_version": 5,
    "result": "deleted",
}
The program also increases the version number by one. There are two reasons for this:
- Elasticsearch only marks the entry as deleted and does not remove it directly from the hard disk. The entry will only disappear in the further course of indexing.
- When working with distributed indexes on multiple nodes, detailed version control is extremely important. That's why Elasticsearch marks every change as a new version – including the deletion request.
You can also only make changes to a specific version number you know. If there is already a newer version in the cluster than the one you specified, the change attempt results in an error message.
PUT bibliography/novels/1?version=3
{
"author": "Marcel Proust",
"title": " À la recherche du temps perdu",
"year": "1927"
}
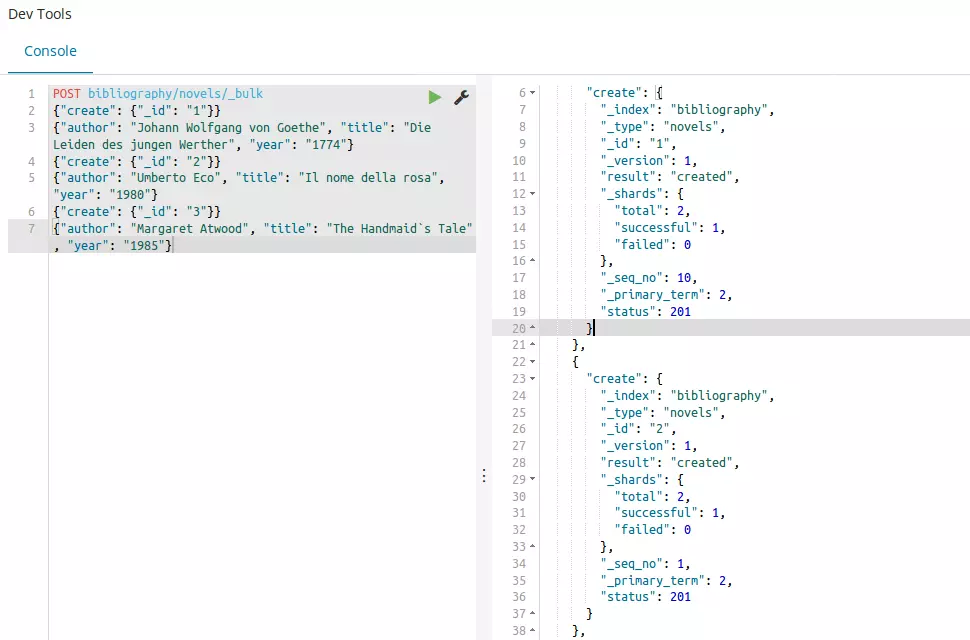
You can not only call several entries at once, but you can also create or delete several entries with _bulk commands. Elasticsearch uses a slightly modified syntax for this.
POST bibliography/novels/_bulk
{"delete": {"_id": "1"}}
{"create": {"_id": "1"}}
{"author": "Johann Wolfgang von Goethe", "title": "Die Leiden des jungen Werther", "year": "1774"}
{"create": {"_id": "2"}}
{"author": "Umberto Eco", "title": "Il nome della rosa", "year": "1980"}
{"create": {"_id": "3"}}
{"author": "Margaret Atwood", "title": "The Handmaid’s Tale", "year": "1985"}
Each command has its own line. First you specify which action should be performed (create, index, update, delete). You also specify which entry you want to create and where. It is also possible to work in several indexes with such a bulk statement. To do this, you would leave the path to POST empty and assign a separate path to each action. When creating entries, you must also specify a request body in a new line. This contains the content of the entry. The DELETE statement does not require a request body, since the complete entry is deleted.
Up to now, we have always given the same content in the examples – no matter which field it was: Elasticsearch interpreted all information as a coherent character string. But this is not always appropriate for every field. That is why mapping in Elasticsearch exists. This determines how the algorithms have to interpret an input. You can use the following code to display which mapping is currently used in your index:
GET bibliography/novels/_mappingAll fields are assigned to the types text and keyword. Elasticsearch knows 6 core datatypes and even more special fields. The 6 main types are partly subdivided into further subcategories:
- string: This includes both text and keyword. While keywords are considered exact matches, Elasticsearch assumes that a text must be analyzed before it can be used.
- numeric: Elasticsearch knows different numerical values, which differ above all in their scope. For example, while the type byte can take values between -128 and 127, long has a range of -263 to 263-1.
- date: A date can be specified either to the day or with a time. You can also specify a date in the form of Unix time: seconds or milliseconds since the 1. 1. 1970.
- boolean: Fields formatted as boolean can have either a true or false value.
- binary: You can store binary data in these fields. To transmit them, use Base64 encoding.
- range: Used to specify a range. This can be either between two numerical values, two data, or even between two IP addresses.
These are only the main categories that you will probably use most often. For more types, see the Elasticsearch documentation. The main difference between the individual types is that they are either exact-value or full-text. Elasticsearch understands the content of the field as either an exact input or a content that has to be processed first. Analyzing is also important in the course of mapping: analyzing a content is divided into tokenizing and normalizing:
- Tokenizing: Single tokens are made from a text. These can include individual words, but also fixed terms from several words.
- Normalizing: The tokens are normalized by lower-casing them all and reducing them to their root forms.
If you have included a document in the index and performed your mapping correctly, all of the content will be included in the inverted index correctly. To use mapping for yourself, you need to create a completely new index. Mapping of existing fields is not possible.
PUT bibliography
{
    "mappings": {
        "novels": {
            "properties": {
                "author": {
                    "type": "text",
                    "analyzer": "simple"
                },
                "title": {
                    "type": "text",
                    "analyzer": "standard"
                },
                "year": {
                    "type": "date",
                    "format": "year"
                }
            }
        }
}
}
So far, we have defined the two fields author and title as text - as full-text. Therefore, they still need a suitable analyzer. While we provide the field for the title of the novel with the standard analyzer, we need to choose the less complex simple analyzer for the author name. We’ll define the year of publication as date – which is an exact value. Since Elasticsearch accepts a year, month, and day as the standard format, we’ll change this, since in this instance, we want to limit the specification to the year.
Search
In the previous section, we used Elasticsearch and its index mainly for the purpose of a database. However, the real benefit of Elasticsearch is its full-text search. This means instead of entering the ID of a document and finding the entry, we now set Elasticsearch so that you can search for specific content. To use the search engine, the program has provided the _search endpoint. You can use this in combination with the GET method to display all entries, for example:
GET bibliography/novels/_searchFor more complex search queries _search uses a body in brackets. However, some HTTP servers do not provide this for the GET method. Therefore, the developers have decided that these kinds of requests also work as POSTs.
You can also leave the path blank to search through all existing indexes. In the output you will find the interesting information under hits:
"hits": {
    "total": 3,
    "max_score": 1,
    "hits": [
        {
            "_index": "bibliography",
            "_type": "novels",
            "_id": "2",
            "_score": 1,
            "_source": {
                "author": "Umberto Eco",
                "title": "Il nome della rosa",
                "year": "1980"
            }
        },
    ],
    }
}
All other entries in our index are also listed in the output (and only omitted here for the sake of clarity). The feedback from Elasticsearch provides us not only with the actual content but also two additional information that can help us to understand the full text search:
- hits: Every entry that meets the search criteria is considered a hit by Elasticsearch. The program also displays the number of hits. Since there are 3 entries in the index in our example and all can be displayed, “total” applies: 3.
- score: In the form of a score, Elasticsearch indicates how relevant the entry is in relation to our search query. Since we simply searched for all posts in our example, they all have the same score of 1, and the entries are sorted in descending order of relevance in the search results.
In addition, Elasticsearch provides information on how many shards are involved in the search results, how many milliseconds the search took and whether a timeout has occurred.
If you had now seen the first 10 search results and only wanted to display the following 15, you must use a combination of both parameters:
- size: How many results should Elasticsearch display?
- from: How many entries should the program skip before displaying them?
GET bibliography/novels/_search?size=15&from=10Elasticsearch distinguishes between two different search types. On the one hand it uses a “lite” version and on the other hand a more complex variant that works with the query DSL – a specific search language. In the lite version, you have to enter your search query directly into the search query as a simple string:
GET bibliography/novels/_search?q=atwoodHowever, you can only search within a specific field:
GET bibliography/novels/_search?q=author:atwoodIn fact, in the first example, you also search in a particular field without having to specify it: the _all field. If you insert the contents of a document into the index sorted in fields, Elasticsearch creates an additional field in the background. In it, all contents from the other fields are additionally stored to make this kind of search within all fields possible.
If you want to combine several search criteria, use the plus sign (+). Using the minus sign, (-) you’ll exclude certain criteria. However, if you use these operators, you must apply a percentage encoding in the search query:
GET bibliography/novels/_search?q=%2Bauthor%3Aatwood+%2Btitle%3AhandmaidElasticsearch's query string syntax offers even more subtle characteristics to customize your search. In the software documents the Elastic developers summarized the essentials you’ll need, with the opportunity to expand your knowledge.
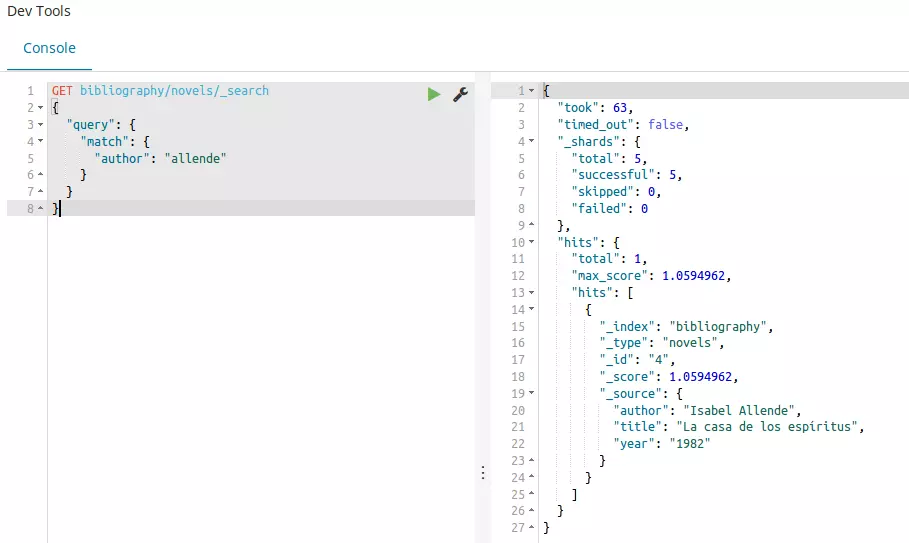
This search variant is well suited for simple queries, but for more complex tasks the “lite” version won’t be able to cope as easily. The risk of entering an error in the long string is too high. For this, Elasticsearch offers a more convenient method in the form of Query DSL. The starting point of this kind of search is the query parameter in combination with a match query:
GET bibliography/novels/_search
{
    "query": {
        "match": {
"author": "allende"
}
    }
}The result shows us all entries that contain the term “allende” in the author field. It also tells us that analyzing worked in mapping, because Elasticsearch ignores upper and lower case. To display all entries, you can use match_all in addition to the simple variant already presented:
GET bibliography/novels/_search
{
    "query": {
        "match_all": {}
    }
}
The opposite of this search is match_none. Elasticsearch also gives you the possibility to search in several fields with one search term:
GET bibliography/novels/_search
{
    "query": {
        "multi_match": {
            "query": "la",
            "fields": ["author", "title"]
        }
    }
}
To enable complex search requests, you can combine several search terms and evaluate them differently. These are the three available to you:
- must: The search term must be in the result.
- must_not: The search term may not be in the result.
- should: If this term appears, the relevance in the search results is increased.
In practice, you will combine this with a Boolean query:
GET bibliography/novels/search_
{
    "query": {
"bool": {
        "must": {
            "match": {
                "title": "la"
            }
},
        "must_not": {
            "match": {
                "title": "rabbit"
            }
        },
        "should": {
            "match": {
                "author": "allende"
            }
        }
    }
}
}
You can also expand your search by adding a filter. This allows you to specify criteria that restrict the search results:
GET bibliography/novels/search_
{
  "query": {
"bool": {
    "must": {
      "match": {
        "title": "la"
      }
},
    "filter": {
      "range": {
        "year": {
          "gte": "1950",
          "lt": "2000"
        }
      }
    }
  }
}
}
In the previous example, we linked the filter to a spectrum – only entries that appeared between 1950 and 2000 are to be displayed.
With this tool you have everything you need to implement the full text search for your project. However, Elasticsearch also offers other methods to refine your search and make it more complex. You can find more information on the official website of Elastic. If you want to extend the full text search, you can also create your own scripts with other languages like Groovy and Clojure.
Pros and cons of Elasticsearch
Elasticsearch can be a powerful full text search, with the minor setback that the open source idea is now somewhat restricted. Otherwise the full text search offers numerous advantages – also compared to the direct competitor Apache Solr.
| Pros | Cons |
| Open source | Elastic as the gatekeeper |
| Quick and stable | |
| Scalable | |
| Many ready-made program modules (Analyzer, full text search...) | |
| Easy implementation thanks to Java, JSON, and REST-API | |
| Flexible and dynamic |


