DHCP: What’s behind the Dynamic Host Configuration Protocol
These days, connecting devices to an existing TCP/IP network is really quite easy: you used to have to manually (and tediously) assign IP addresses by hand and then enter them into the various systems. This address management now takes place automatically. The Dynamic Host Configuration Protocol (DHCP) makes it possible for communication hardware (such as routers, hubs, or switches) to automatically assign an individual address to connection-seeking devices and integrate them into a network.
- Simple registration
- Premium TLDs at great prices
- 24/7 personal consultant included
- Free privacy protection for eligible domains
What is DHCP?
The Dynamic Host Configuration Protocol is an extension of the Bootstrap Protocol (BOOTP) developed in 1985 that connects simple devices like terminals and workstations that don’t have a hard drive with a boot server. These devices then access your operating system over the server. DHCP was developed as a solution for larger networks and portable computers. It complements BOOTP and others with the ability to automatically assign reusable network addresses as well as additional configuration options. After the first definitions of the protocol in the RFCs 1531 and 1541 (both 1993), the final standard specification was made official in 1997 in the RFC 2131. The Internet Assigned Numbers Authority (IANA) assigned UDP ports 67 and 68 (for IPv6: ports 546 and 547) to the communication protocol, which are also assigned for the Bootstrap Protocol.
Address assignment with DHCP operates according to the Client/Server principle: the connection-seeking device requests an IP address configuration from a DHCP server, which in turn accesses a database from which the network parameters that need to be set are acquired. Among other things, this server, which is part of any modern DSL router, can assign the following settings to the client using its database information:
- Unique IP address
- Subnet mask
- Standard gateway
- DNS server
- Proxy configuration such as WPAD (Web Proxy Auto-Discovery Protocol)
DHCP process: How the DHCP client and server communicate
Automatic address assignment via the Dynamic Host Configuration Protocol proceeds in four consecutive steps:
- To begin, send the client a DHCPDISCOVER package with the target address 255.255.255.255 and the source address 0.0.0.0. With this so-called broadcast, all network users are contacted to locate available DHCP servers and inform them of the address request. Ideally, there’s only a single server so that there are no complications with the assignment.
- The broadcast answers all of the contacted DHCP servers that are listening on port 67 and waiting for corresponding requests with a DHCPOFFER package. In addition to a possible free IP address and the MAC address of the client, this also contains the subnet mask as well as the IP address and ID of the server.
- The DHCP client chooses from the address data the one it wants and informs the desired server by means of a DHCPREQUEST. All other servers will also receive this message, even though they know that the choice has been made in favor of another provider. The client also asks the server for the activation of the data that is being offered. In addition, the DHCPREQUEST is used to confirm the previously received parameters.
- Finally, the server confirms the TCP/IP parameters and transmits them back to the client using a DHCPACK package (DHCP acknowledged). This contains additional information — for example, about the DNS, SMTP, or POP3 server. The DHCP client now locally saves all of the data that was received and connects to the network. If the server is no longer available or the IP has been assigned to another client during the configuration process, it responds with DHCPNAK (DHCP not acknowledged).
The automatically given address is saved in combination with the MAC address in the server’s database, at which time the configuration is made permanent. The device always connects to the network with the assigned IP address, which is blocked for other clients. But this has the disadvantage that new DHCP clients don’t receive an address if the entire address range has already been assigned — even if some of the IPs aren’t actively used anymore. Essentially, this is why dynamic IPs and some in cases, manual assignment via DHCP server, both of which will be discussed in the next section, are more widespread.
DHCP: Manual and dynamic address assignment
The problem of encountering a completely occupied address range is rather unlikely when using dynamic address assignment. In principle, this method largely resembles automatic assignment, but there is a small, subtle difference: The IP configurations transmitted by the DHCP server aren’t valid indefinitely, they come instead with an administrator-defined lease. This specifies how long the device can access the network with the respective IP address. Before this time window expires, standard clients have to request an extension by sending another DHCPREQUEST package. If this doesn’t happen, then there is no so-called DHCP refresh and the server makes the address in question available again.
While administrators don’t have much to do with either the automatic or the dynamic assignment options, the situation is completely different with manual addressing. With this method, which is also referred to as static DHCP, the available IP addresses are assigned manually to specific MAC addresses by means of the DHCP server. There is no restriction on the validity period.
Because of the increased effort in the administration, which defeats the purpose of the Dynamic Host Configuration Protocol, this type of assignment only makes sense for very small application scenarios. For example, static IPs are necessary if server services are hosted on the computer in question and computer is also available to other network users at any time. It’s important for port forwarding that the IP address remains unchanged as well.
DHCP informs the Domain Name System
In order for the IP addresses assigned by the clients to be given their fully qualified names in the domain, a DNS server needs to provide name resolution. If a previously entered address or host name is changed, the name server needs an update. With the constantly changing IP addresses that come from dynamic assignment via a DHCP server. Manual implementation would be very time-consuming for the administrator of the network, as well as for the user who wants to connect to the internet with their devices at home. But thanks to DHCP servers, neither has to deal with the updates necessary for dynamic allocation, since the servers take care of the information exchange and update the DNS server as soon as a new IP address has been assigned.
How safe is DHCP?
One weakness of the Dynamic Host Configuration Protocol is that it’s fairly easy to manipulate: Since the client contacts all potential DHCP servers, it is possible, for example, for attackers to bring their own provider into play if you have access to that network. One such “rogue” DHCP server tries to be faster than the actual server with its response to the connection request of the client. If successful, it can then transmit manipulated or unusable parameters. To do this, it can start a denial-of-service attack on the network, for example, by not transmitting a gateway, assigning a subnet to each client, or responding to all requests with the same IP address. A more dramatic scenario would be the attempt to use a false gateway and false DNS information to inject a foreign router that cuts off or even redirects the data traffic of the client. One such man-in-the-middle attack aims — as opposed to the first type of attack — not to crash the network, but to access sensitive data like bank data, passwords, or address information. Regardless of the type of attack, strangers need direct access to your network to abuse the DHCP protocol for their purposes. If you take the necessary safety precautions, you can take advantage of the benefits of the communication protocol with having to fear such attacks. To be responsible for a larger local network, the complete protection from external and internal attack attempts as well as the constant monitoring of all network process with tools like Nagios should already be part of your routine. In IONOS’s guide on the topic of Wi-Fi security, you can read more about which possibilities there are for protecting your wireless networks.
How to enable and disable DHCP
If you want to join a local or wireless network with your device, you usually access the Dynamic Host Configuration Protocol automatically without having to make any changes to the network settings. Computers with Microsoft Windows operating systems, for example, have long been pre-set to act as DHCP clients who automatically obtain their IP addresses. By default, this uses the dynamic assignment style, in which the configurations have to be extended regularly or are assigned again after expiring. In local networks, using the corresponding DHCP server settings, the automatic assignment of fixed address information can also be used.
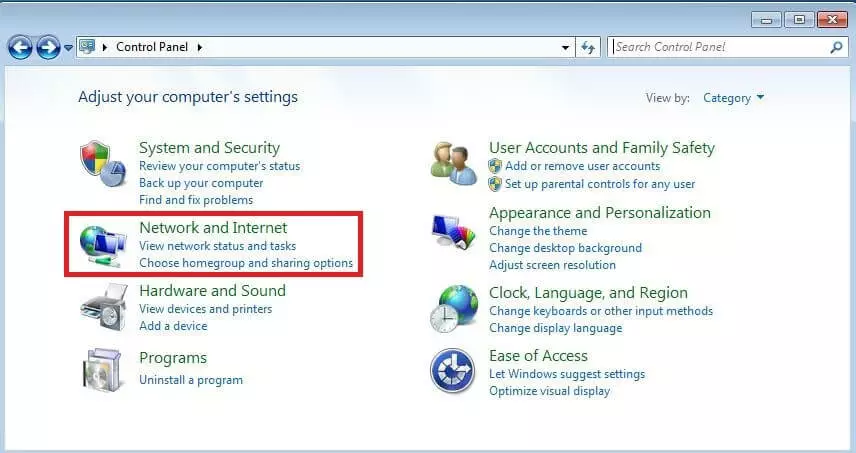
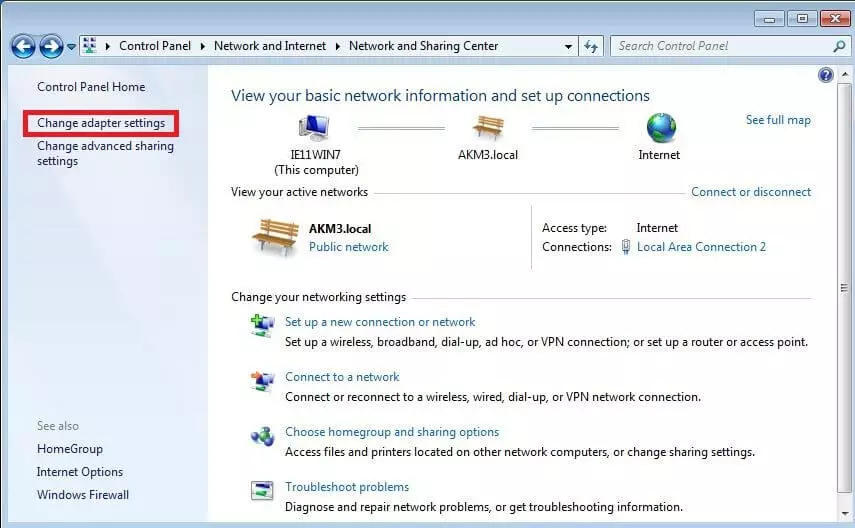
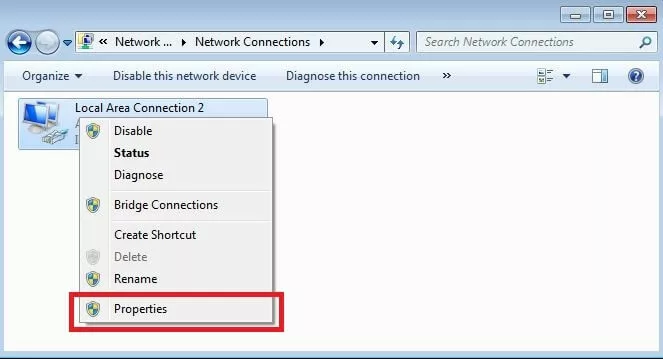
If you would like to test the current settings of the address assignment or disable DHCP and switch to a manual option, you can do so with the steps described below — the one condition is that you have to have administrator rights.
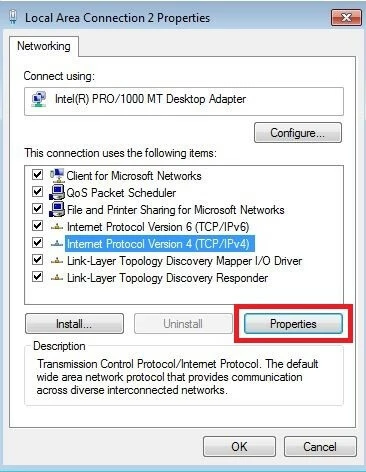
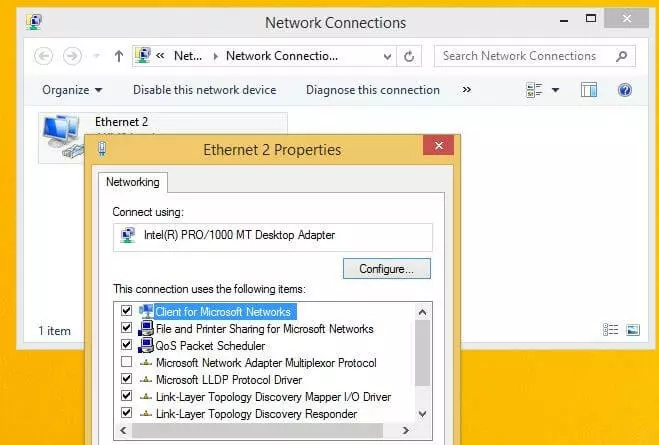
- In the following menu, you’ll see all of the services that the selected network connection has access to. For the configuration of DHCP under Windows 7, the internet protocol (TCP/IPv4 or IPv6) is important, so it’s necessary to now select the appropriate version and open an overview of the defined properties by clicking on the button with the same name.
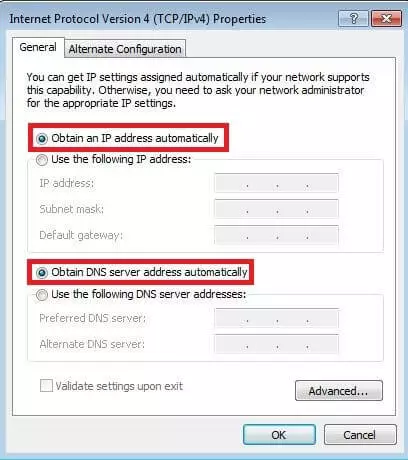
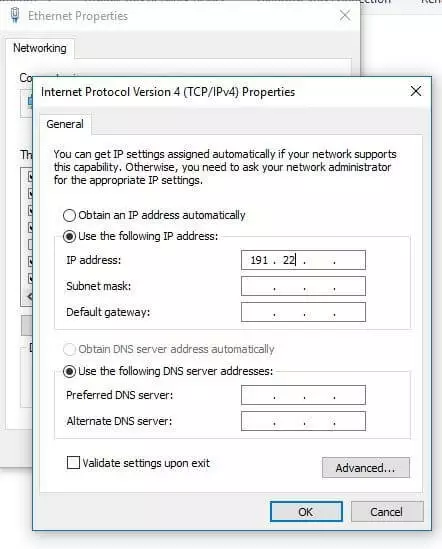
- In the properties menu of the internet protocol, you can now see whether the DHCP is automatically referring to the IP address and DNS server, as in the screenshot below. Otherwise, you have the option to define a fixed IP address, standard gateway, subnet mask, or the preferred DNS server.
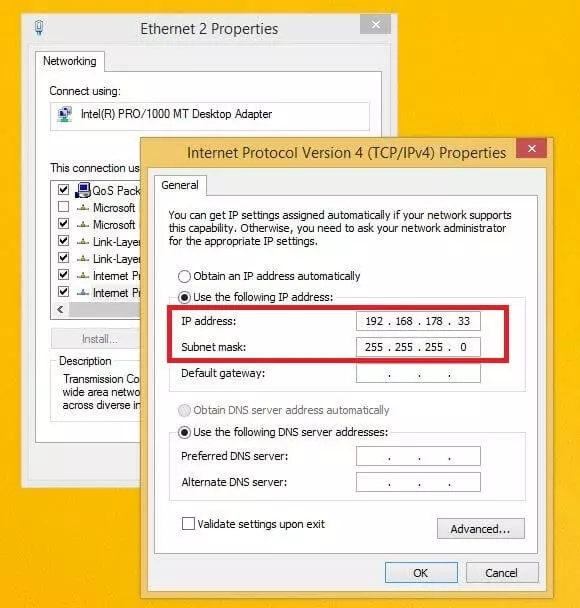
- If you intend to disable DHCP, you should always give a fixed IP address and a subnet mask (default 255.255.255.0) in this step. You define the potential address range for the IP in the settings of the DHCP server, which you can request, for example, via the user interface of your router, since it acts as a server. There, you can also switch off the DHCP server and the address assignment via the protocol.
Configure DHCP on Windows 8
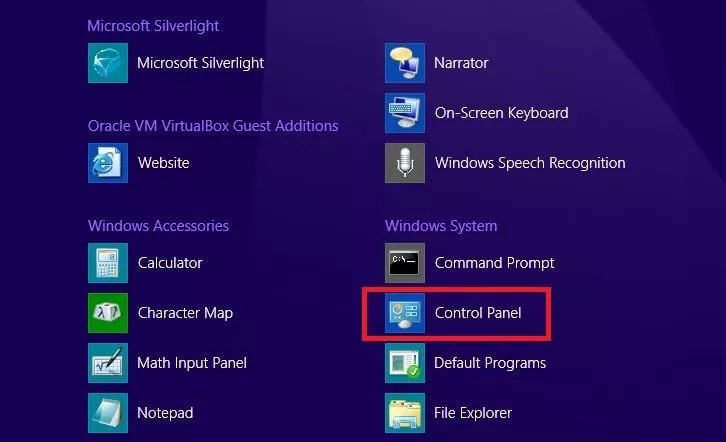
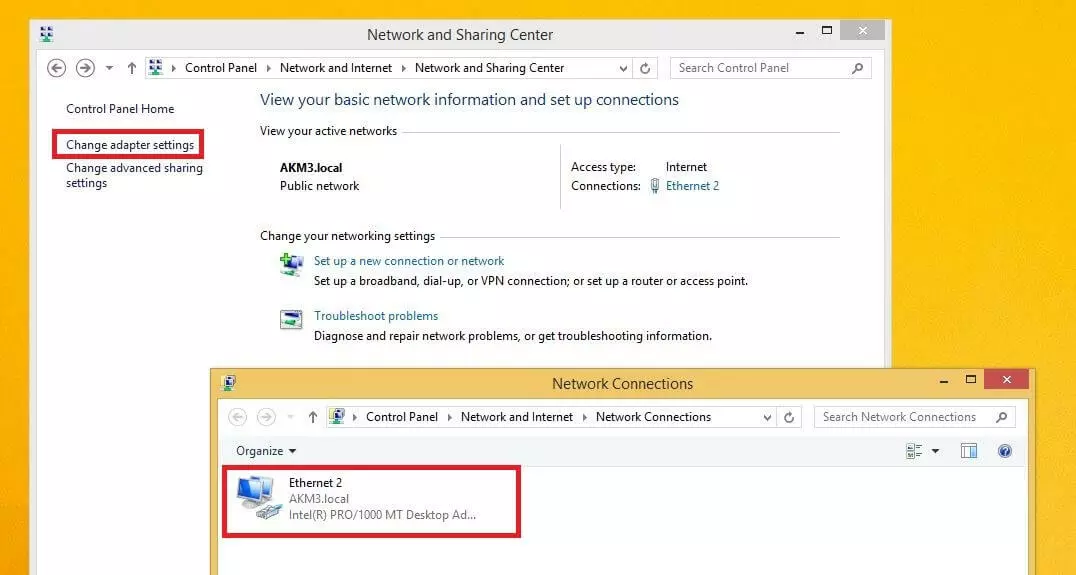
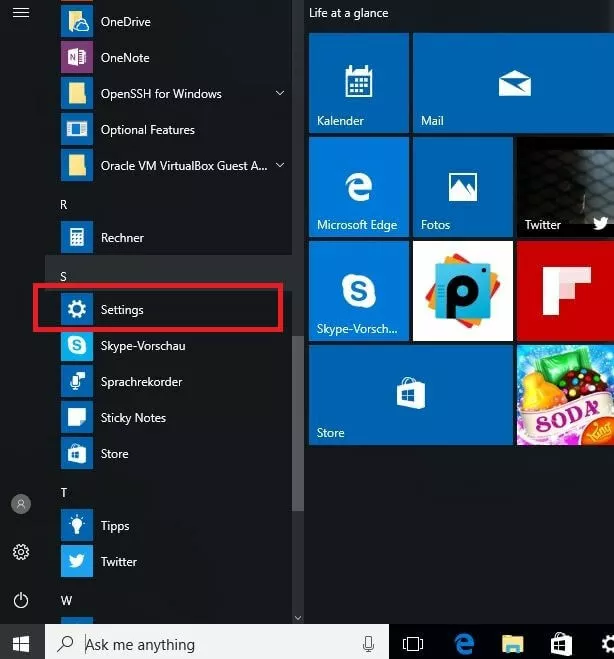
- Click on the start menu and search for the control panel in the listed apps. You can also access this using the key shortcut [Windows key] + [X] and selecting the “Control Panel” from the menu that pops up.
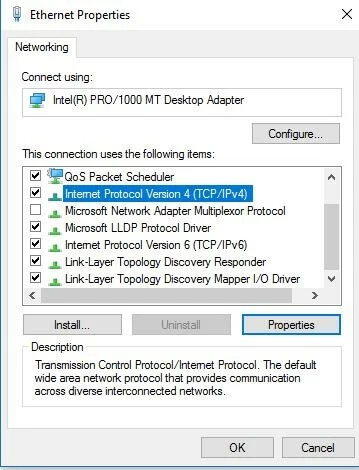
- Find the internet protocols IPv4 and IPv6 in the list. Choose the desired version and click on “Properties”.
- In this options menu, you’ll see how the IP address allocation is currently controlled by your system. If you want to enable static DHCP on Windows 8 instead of the usual automatic method, choose “Use the following IP address” and select the desired address including the subnet mask (standard: 255.255.255.0). You also have the option of entering the default gateway (usually the IP address of the router) and the address of the preferred DNS server.
- To disable DHCP, it’s again necessary to enter the corresponding settings in the server you’re using.
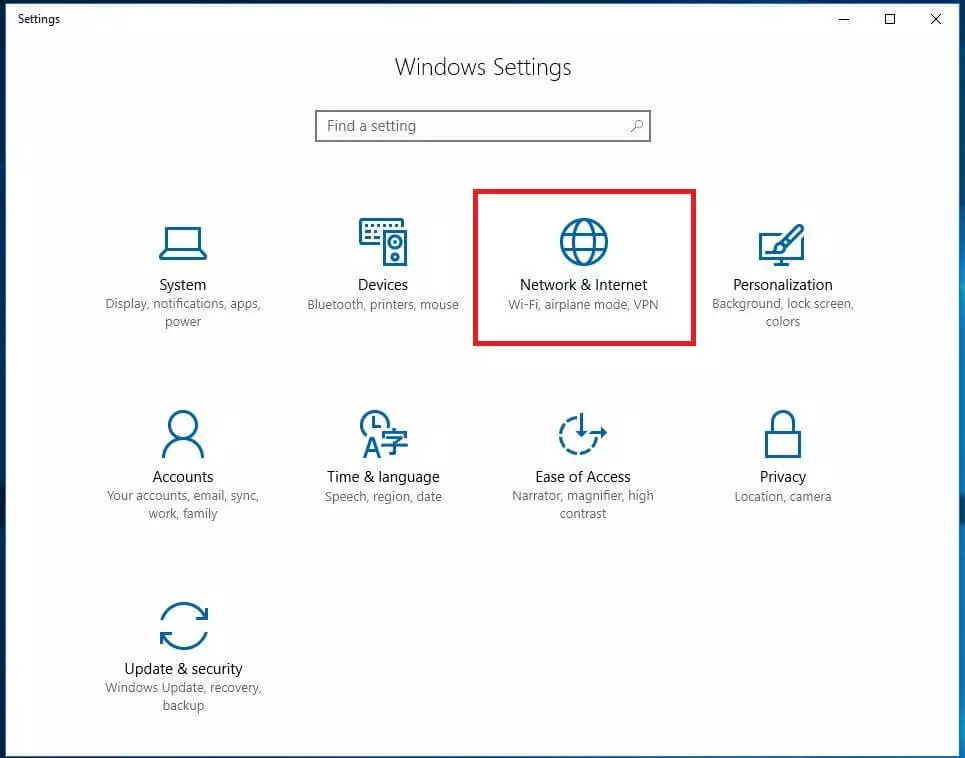
- Right-click on the desired LAN connection and select the “Properties” button in the dropdown menu.
- From the list of enabled and disabled protocols and services, search for the entry of the preferred internet protocol version, select it, and then click on the properties button.
- The default setting here is “Obtain an IP address automatically”. But you can also enable automatic assignment by selecting it, or opt for a static address and enter the desired network parameters manually (like in the following screenshot).
- To disable DHCP on Windows 10, you have to access the interface of your DHCP server and enter the corresponding settings there.


