How to turn on automatic hyphenation in Word
The Word hyphenation feature is a practical way to correctly separate words at the end of lines. You can turn it on and off as you please. When deactivated, words are not split in two. Instead, a new line is started for words that are too long to fit on the previous line.
- Store, share, and edit data easily
- Backed up and highly secure
- Sync with all devices
How to turn on automatic hyphenation in Word quick guide
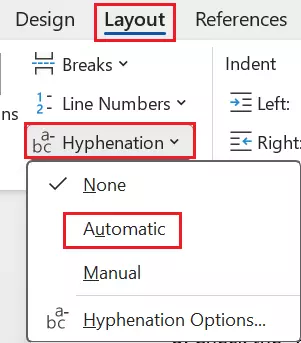
- Open your Word document and select Layout from the menu at the top of the screen.
- Click on Hyphenation. A drop-down menu will now appear.
- Select the desired type of hyphenation (None, Automatic or Manual).
How to turn on and customize automatic hyphenation in Word
If you decide to use the hyphenation feature in a Word document, you have the option of using it for the whole document or for individual paragraphs. You can even manually define specifications.
The instructions shown here apply to Office versions from 2016 onwards and Microsoft 365. If you are using a different version of Office, the steps may differ slightly.
Enabling automatic hyphenation in Word
In Word, hyphenation is disabled in the default settings. You can activate it by doing the following:
- Click on Layout in the ribbon at the top of the screen.
- Select the option Hyphenation.
- Put a checkmark next to Automatic.

Automatic hyphenation is now enabled for the entire document.
- Store, share, and edit data easily
- Backed up and highly secure
- Sync with all devices
Deactivating Word hyphenation for individual paragraphs
If you don’t want to use the hyphenation feature in certain paragraphs, simply do the following:
- Select the paragraph(s) where you don’t want hyphenation applied.
- Click on the right mouse button to open the drop-down menu.
- Click on the menu item Paragraph….
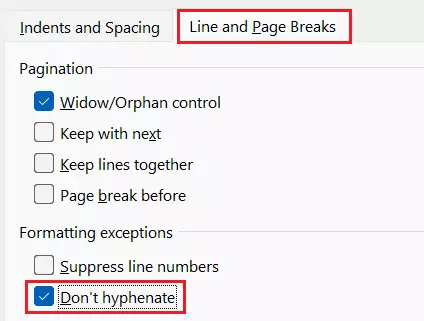
- Go to the tab Line and Page Breaks.
- Put a checkmark in the field Don’t hyphenate and click OK.

Customizing Word hyphenation
In addition to this approach, there are other ways to customize hyphenation in Word:
- Click on the arrow next to Hyphenation in the Layout tab.
- Select Manual. Here, you can use different types of hyphenation.
- In the Manual Hyphenation dialog box, you can set individual breakpoints and then confirm them when you’re done.

Inserting protected hyphens using a shortcut
You also have the option to set up protected (non-breaking) hyphens. You can do this by highlighting a passage in the text and then pressing the Word key combination [Ctrl] + [Shift] + [hyphen].
How to enable hyphenation in Word for Mac
With a Mac, you can switch on hyphenation in the same way you would on Windows. Click on Layout at the top and then select Hyphenation. Place a checkmark next to Automatic Hyphenation and click OK.
Turning on and adjusting manual hyphenation in Word for Mac
Hyphenation in Word can also be set up manually on Apple computers. To do this, you can follow the steps listed above for Windows. Alternatively, you can click on Hyphenation in the Extras menu and select Manual.
Word will now recognize all the different options for hyphenation. You can select the positions you want for hyphenation in the Suggested hyphenation field.
If you want to manually set up hyphenation for a specific area in the document, simply highlight the section of the text before performing the steps above.
Customizing hyphenation in Word for Mac
If you are a Mac user and want to separate text and syllables in a Word document using custom settings, do the following:
- In the Layout menu, select Hyphenation Options.
- Check the box next to Automatically hyphenate document.
- In the field labeled Hyphenation zone, you can define the distance you want between the last part of a word and the right-hand margin.
- With Limit consecutive hyphens to, you can specify how many consecutive lines can end with hyphens.

