How to remove read-only from Excel
To remove Excel read-only, you need to follow the same steps you would take to unlock a Word document. We explain how to disable read-only in Excel (with and without a password), unlock protected sheets and workbooks, and edit documents marked as “final”.
- Store, share, and edit data easily
- Backed up and highly secure
- Sync with all devices
Quick guide on how to remove read-only from Excel
- Go to File and click Save as.
- Open Tools and the submenu General Options.
- Remove the password and the checkmark next to Read-only recommended and save.
This quick guide and all subsequent instructions apply to the Excel versions of Microsoft 365 as well as Excel 2021, 2019 and 2016.
Why might an Excel file be read-only?
If an Excel file is read-only, it’s usually to prevent unauthorized changes to a spreadsheet. If you want to share the final version of a spreadsheet with colleagues or clients, or include it in a report or presentation, it makes sense to activate the read-only feature. This file attribute can prevent accidental or unauthorized changes.
Just like when encrypting Excel files, making sheets or entire workbooks read-only is done to protect sensitive content from unauthorized access and to prevent changes to data and complex formulas and links. Alternatively, you may want to prevent changes to an Excel file if you’ve finished editing the file. In that case, you can mark the document as “final”.
How to remove read-only in Excel without a password
When read-only is enabled but a workbook is not password-protected, it serves as a recommendation. When users open a read-only Excel file, they’ll see the following message: “The author would like you to open ‘Filename’ as read-only unless you need to make changes. Open as read-only?”

You can open the file with or without write protection. To remove Excel read-only (without a password), proceed as follows:
- Go to the File tab.
- Click on Save as and select the desired storage location.
- In the Save as menu, click on Tools and then General Options.
- Remove the checkmark next to Read-only recommended and then save the file.

- Store, share, and edit data easily
- Backed up and highly secure
- Sync with all devices
How to remove read-only in Excel when a file is password-protected
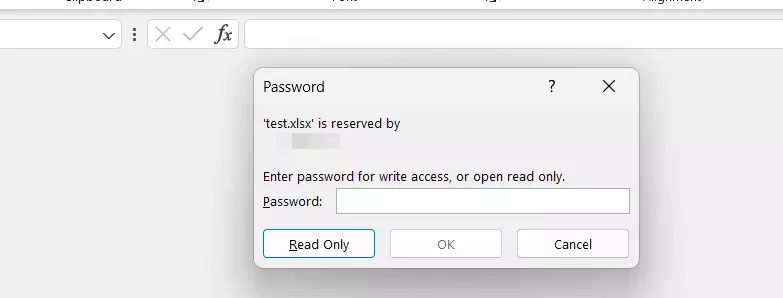
It’s easy to recognize a password-protected read-only Excel file because a message will remind you that “‘Filename’ is reserved by…” and you’ll be prompted to enter the correct password.

To unlock a password-protected Excel file from being read-only, you have the following options:
- Password known: Enter the correct password and click OK. Once you open the file, you can edit and save it. You can remove read-only from the Excel document at any point by going to Save As > Tools > General Options and deleting the password from the dialog window as well as the checkmark next to Read-only recommended.
- Password not known: Open the read-only Excel document by clicking on Read-Only. Save the file using Save As and give it a different name. The newly saved file will no longer be password-protected. However, the read-only recommendation may still be active.
Make it easier to work in Excel by using key combinations and simple and quick Excel shortcuts.
How to remove Excel sheet protection on read-only sheets or workbooks
If an Excel sheet or workbook has been protected, you’ll see the following message pop up when trying to modify the content of the sheet or workbook:

Usually, you’ll need a password to remove sheet or workbook protection. If you have the password, you can remove Excel read-only in the workbook as follows:
- Go to File.
- Then click on Info.
- The option Protect Workbook will be activated and highlighted in yellow. Click on Unprotect Sheet.
- Enter the password to disable read-only in Excel so you can edit the Excel sheet.

How to edit Excel documents marked as “final”
When an Excel document has been marked as “final”, a notification will pop up as soon as you open the file. This clearly states that the document has finished being edited. Click on OK.

The status bar of the Excel spreadsheet will also display the message MARKED AS FINAL highlighted in yellow. Click Edit Anyway to edit the spreadsheet and make the desired changes. You can then save the document as you normally would.

Always monitor the integrity of your files. In addition to protecting your Excel and Word files, you can also encrypt ZIP files. PDFs can be encrypted too. Just as easily as you set up a password, you can also remove a password from a PDF as well.

