Moving cells in Excel
When you create tables or worksheets in Excel, sometimes you have to move columns or rows. Often, you may also need to move specific cells in Excel. During this process, problems frequently arise if contents, formulas, cell references or formatting are accidentally changed. However, there are several simple options for moving cells in Excel without making unwanted changes. Once you’ve selected the cell or range of cells that you want to move, there are three different ways to move their contents from A to B. We’ll explain these methods and show you exactly how they work.
Moving cells in Excel using drag and drop
Using drag and drop to move cells in Excel is one of the most convenient ways of transferring contents in your spreadsheet. Follow these steps to use this option:
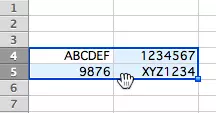
1. First, select the range of cells you want to move.
2. Place the mouse pointer on the border of the selected range. The mouse pointer becomes a four-sided arrow or a hand symbol.
You can copy the selected cell(s) to the new area using drag-and-drop by holding down the Ctrl key on a PC or the Alt key on a Mac and hovering over the border of the selection. If the area is already filled, the cell contents are overwritten.
Moving cells in Excel using Copy and Paste
3. Press Ctrl + V to paste the cell(s) into the destination cell(s).
The advantage of this option is that it requires one less step than Copy and Paste using Ctrl + C because the contents are transferred directly. This saves you the additional step of deletion.
If you move or copy a formula, Excel automatically changes the cell references to the new location.
Moving cells in Excel without changing the contents
If you tend to use formulas or specific cell references often, you should use the $ sign in your formulas.
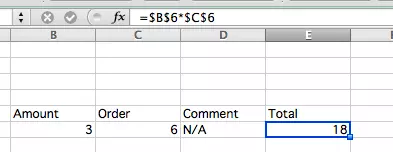
If a reference is anchored using $[column]$[row], the cell reference is retained even if you move the Excel cell with the formula.
1. Anchor the cell references by using $ signs in the formula.
2. Copy the range of cells.
3. You don’t have to adjust cells that you wish to remain flexible.
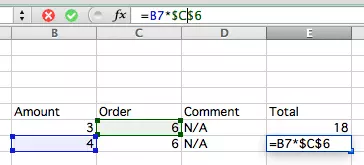
If you want the cell reference in the first column to move when copied, only anchor part of the formula using the $ sign. In the following example, only “B” moves in the row, whereas “C6” was anchored using the $ sign. This means that the formula in “E6” returns a different result.
You can find further practical Excel tips in the following articles: Creating drop-down menus in Excel, Excel shortcuts, Transposing in Excel, Creating spreadsheets in Excel and Deleting empty rows in Excel.


