How to recover an Excel file
When you suddenly lose an important Excel file, it’s easy to feel as though many hours of painstaking work have been wasted. In many cases, though, it’s possible to recover unsaved Excel files (or overwritten ones). But what are the steps for recovering an Excel file?
How to recover an Excel file quick guide
- Open the Excel file you want to recover and click on Recover Unsaved Workbooks in the File tab.
- Select the right version of the Excel file from the list of files saved in various states.
- Restore Excel and save the file.
- Alternatively, you can use backup copies to restore the file if you have activated the backup feature in OneDrive and SharePoint or the Windows File History.
How to restore an unsaved Excel file
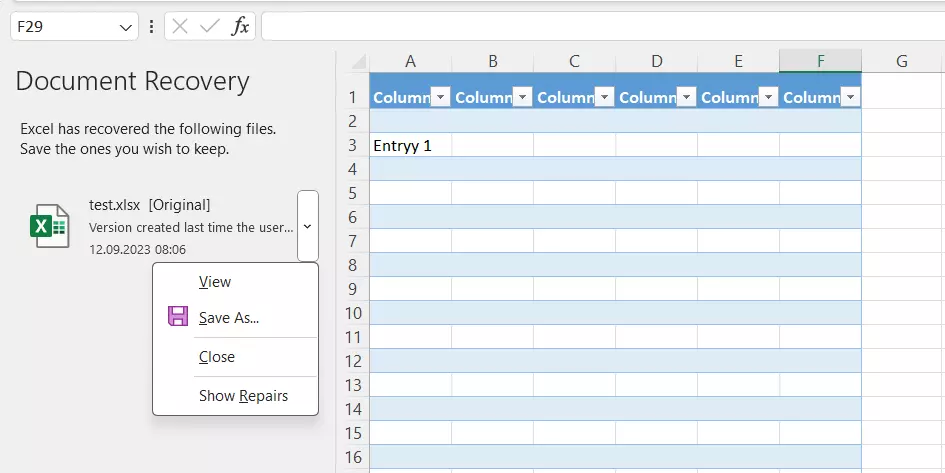
If Excel stops working, crashes while you are working or the power fails, it doesn’t necessarily mean that the file you were working on is lost. All Microsoft Office programs have an automatic backup function built in. This automatic backup feature gives you the option to restore the Excel file when you restart the program if it was not closed properly the last time.
The following instructions apply to the Excel version in Microsoft 365 as well as to the 2021, 2019 and 2016 Excel versions.

You can then recover the respective Excel file via the start window as follows:
- Open the File tab.
- Click on Recover Unsaved Workbooks. A list of all recently opened and incorrectly saved files will appear with the last save date.
- You can restore the file you want to recover with one click.
- Be sure to save the backup as an Excel file again afterwards, as the automatic restore will be deleted when you close Excel.
In some cases, you can also recover an unsaved Excel document at a later date:
- To do this, click on File in the ribbon and on Manage Workbook in the Info section.
- Open the file browser via the menu item Recover Unsaved Workbooks.
- Search for the folder
C:\Users\<username>\AppData\Local\Microsoft\Office\UnsavedFilesorC:\Users\<username>\AppData\Roaming\Microsoft\Excelto recover your unsaved Excel files.

Can’t delete a Windows file? Find the right solution in our article on this topic!
How to recover an Excel file from an Excel backup
For each Excel file, you can specify whether you want to create a backup copy when you save it. You can then use this backup file to recover an Excel file if the program or your device crashes. You can adjust this setting as follows:
- Click the File tab and then Save as.
- In the next window, select Browse and choose the folder where you want to save the file.
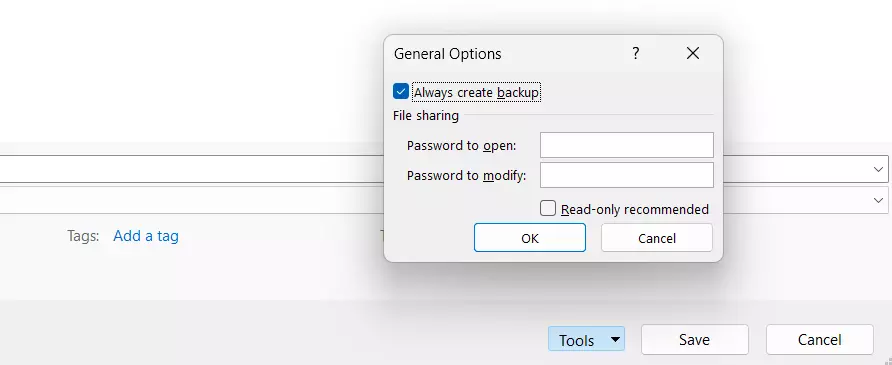
- In the Save As dialog box, click on Tools and then General Options.
- In this dialog box, check the Always create backup option and click on OK to confirm.
You can also access the Open dialog box by using the Excel shortcut [Ctrl] + [O].
Now a backup copy with the extension .xlk will automatically be created each time you save the file.
There are two ways of recovering this backup file:
- You can replace the file extension of the backup file with xlsx and then open it the way you usually would.
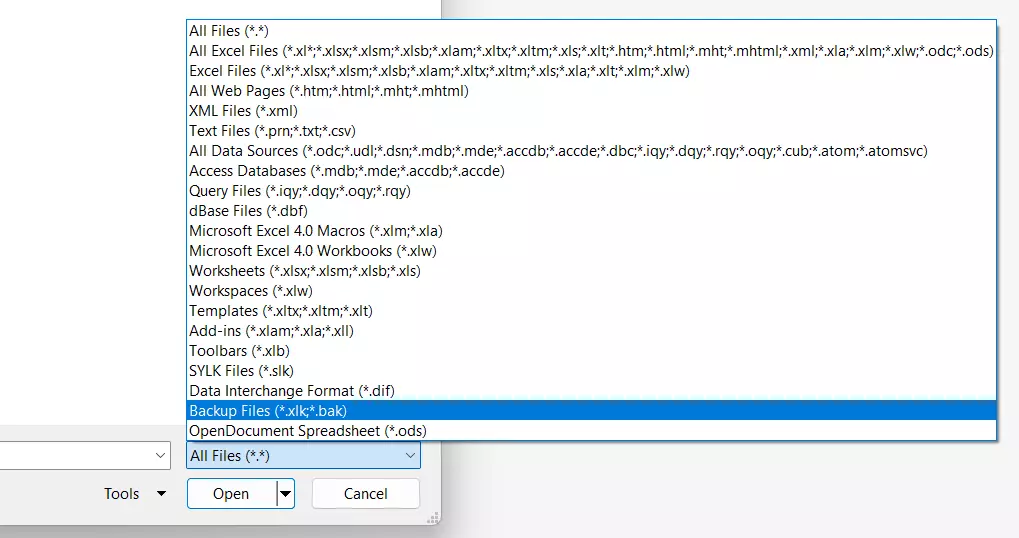
- Or you can select the File tab in Excel and click Open. Click the Browse button and go to the folder where the file is located. In the drop-down list box at the bottom right, select Backup Files instead of All Files. You’ll now see all backup files in this folder. You can then open and edit the xlk file and save it as an Excel file again.
Overwritten Excel document recovery with Windows File History
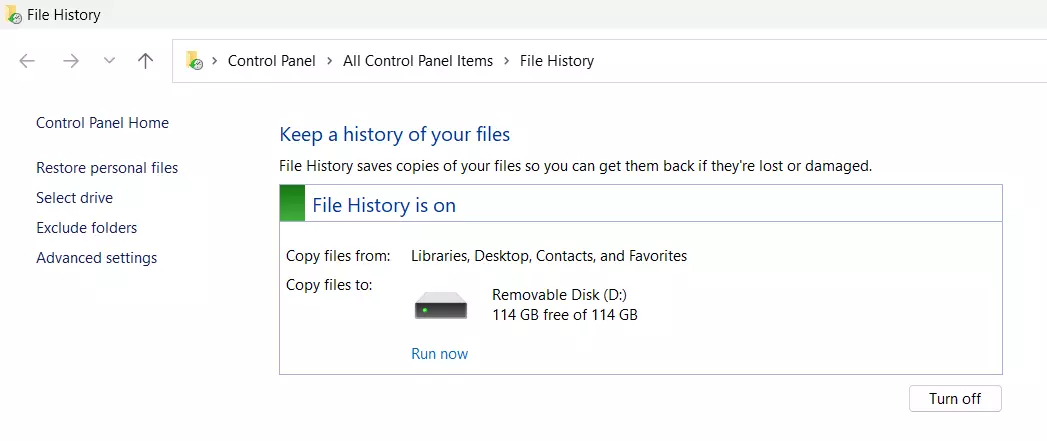
The optional File History feature in Windows 10 saves all files to a separate user directory on an external drive (such as a USB stick) at regular intervals. File History not only protects against loss of data due to hard drive failures or viruses, but also in case you accidentally overwrite files.
If you’ve already enabled File History, you can restore a previous version of an Excel workbook as follows:
- Right-click the file in the File Explorer and select Properties from the context menu.
- Click on the Previous versions tab.
- You will see all saved versions of the Excel file. You can then choose Restore to recover the Excel file or save a copy to another folder.
- Store, share, and edit data easily
- Backed up and highly secure
- Sync with all devices
How to set up File History
To use the method described above, you first have to set up File History in Windows:
- Use the search function to search for “file version history” and click on the corresponding search result.
- Click on Add a drive and select the backup drive you want to use. If Windows finds an external hard drive or a network drive that can be used for File History, that drive will automatically be suggested.
- Activate the file version history.
- Once you activate this option, version history is enabled in the background.
- Click on Backup now to start copying data to the backup drive. Otherwise data will not be copied until the next change.
Selecting folders to back up
File History backs up files that would not be recoverable if lost, but it does not back up applications or operating system files. It selects commonly backed up folders in your user profile automatically for backup. Under Backup options, you can add any other folders such as project folders that are not in your user profile folder on the hard drive.
Can’t open an Excel file? You can find the solution to this problem in our article “Excel file won’t open”.
How to recover an Excel file in OneDrive and SharePoint
If you save Excel files on OneDrive or SharePoint to share them with coworkers, collaborate on documents or use files on multiple devices, the last saved version is automatically backed up. OneDrive and SharePoint have a simple version control feature that allows you to recover the most recent backups of all files at any time. To do this, follow these steps:
- Right-click the file you want to recover.
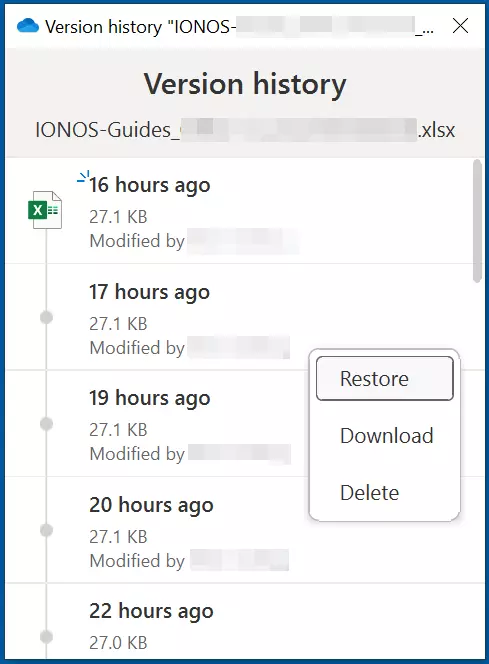
- In the context menu, select Version history. You will see the most recent backups of the file.
- Click the three dots next to the version you want to restore. You can then restore the Excel file with its original name or download and save it with a different name to compare the two versions.
Want to see all the changes made in an Excel document? Then read our article on “how to track changes in Excel”.
- Store, share, and edit data easily
- Backed up and highly secure
- Sync with all devices

