How to print PowerPoint with notes: using all the editing options
A PowerPoint presentation is a visual aid for your talk. Digital notes help you to keep your presentation as clear as possible and avoid forgetting any important content. In case of technical complications, it makes sense to print out your presentation notes to have a hard copy on you. We will provide you with step-by-step instructions on how to print your PowerPoint notes and be fully prepared for your presentation.
- Store, share, and edit data easily
- Backed up and highly secure
- Sync with all devices
How to print PowerPoint slides with notes: step-by-step instructions
If you have prepared important notes on your PowerPoint slides, you should print them. This will provide you with a back-up plan in case of technical issues and also help you if the notes are difficult to read on the screen. PowerPoint provides a practical solution for printing your PowerPoint presentation notes. Follow these step-by-step instructions to learn how to create and edit a print version of your notes.
For more information on how to create digital PowerPoint notes for your presentation, check out our article How to easily create PowerPoint notes.
Step 1: Opening the print settings
Step 2: Printing PowerPoint notes
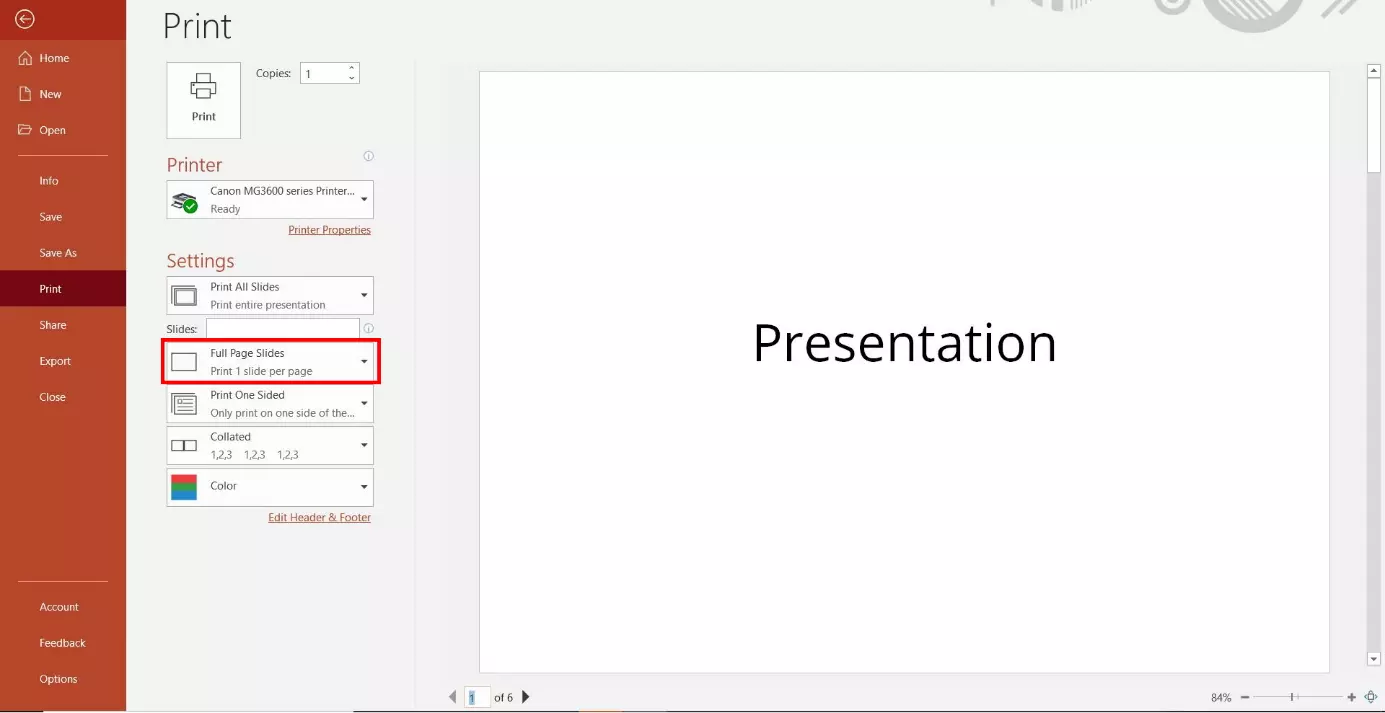
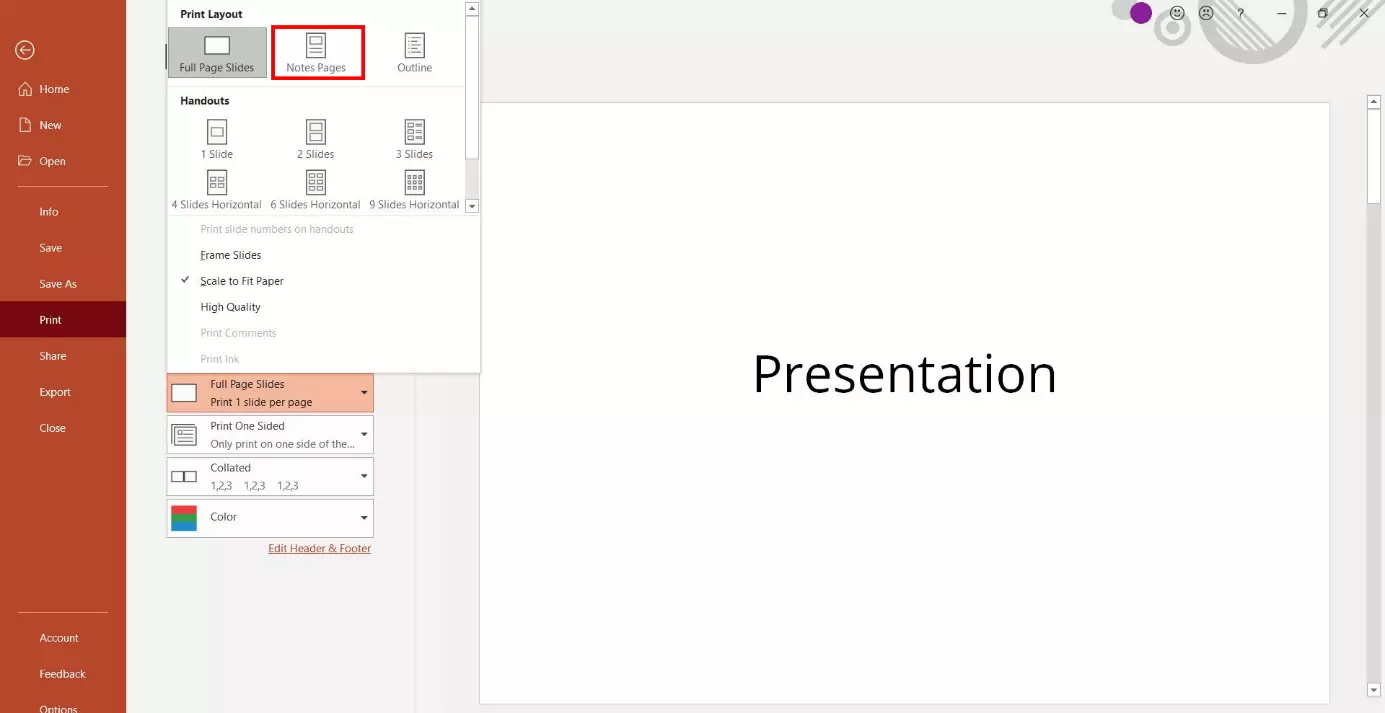
PowerPoint will then open the print settings for printing your presentation. Under the heading “Settings”, click on the drop-down menu displaying “Full Page Slides” to bring up additional options to choose from.
PowerPoint provides keyboard shortcuts to allow you to open a variety of functions even faster. For example, to quickly access the print settings, you can press the keyboard keys [Ctrl] and [P] at the same time.
Step 3: Configuring additional print settings
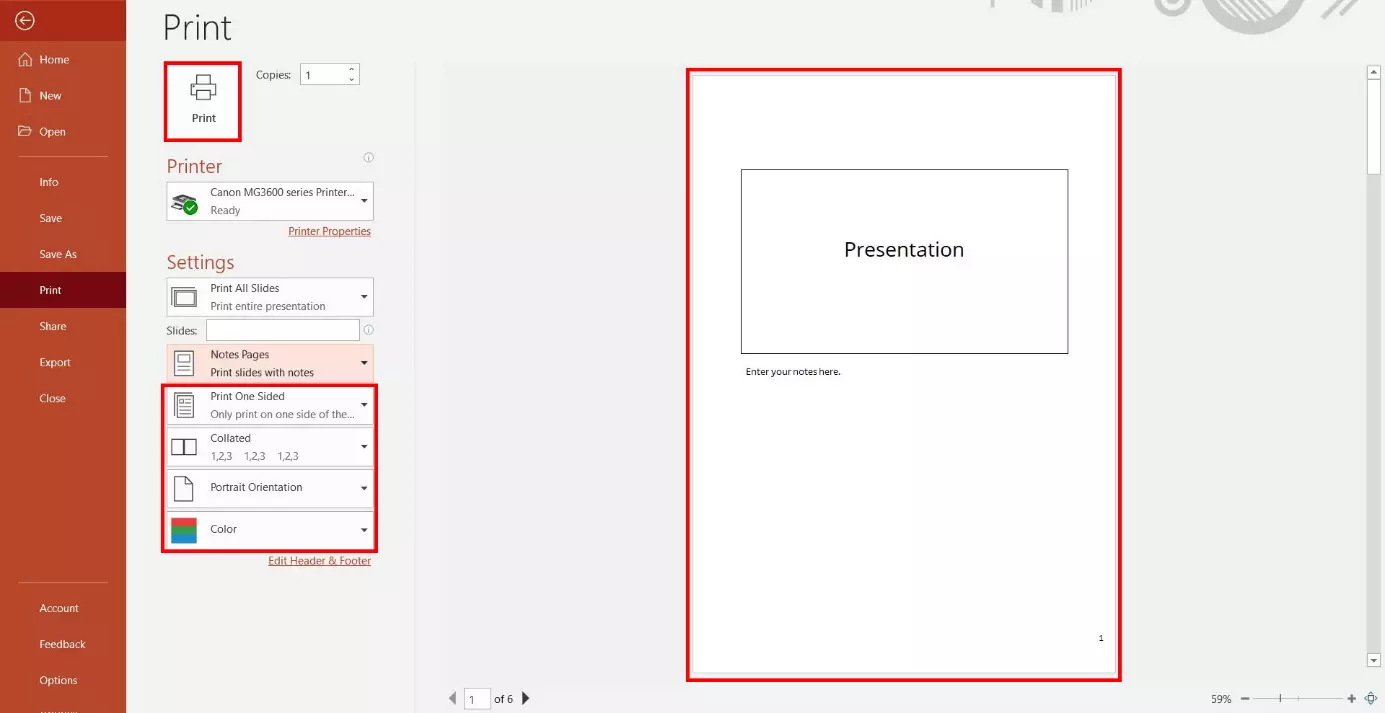
The program will show you a print preview on the right-hand side. If you print your entire presentation in PowerPoint with notes, each page will contain one slide and its corresponding notes. There are several drop-down menus available with additional print settings if needed. If you make any changes to the settings, PowerPoint will automatically reflect these changes in the print preview. Portrait layout is the default setting when printing notes. Alternatively, you can also select landscape layout for printing. Additional optional settings include color settings and double-sided printing (as long as your printer supports the option). Once you have configured all the settings, you can start printing by left-clicking on the “Print” button.
How to print notes without slides
You also have the option of only printing PowerPoint notes (without their corresponding slides). However, this requires a little manual work since you have to remove the slide thumbnail for each notes page involved.
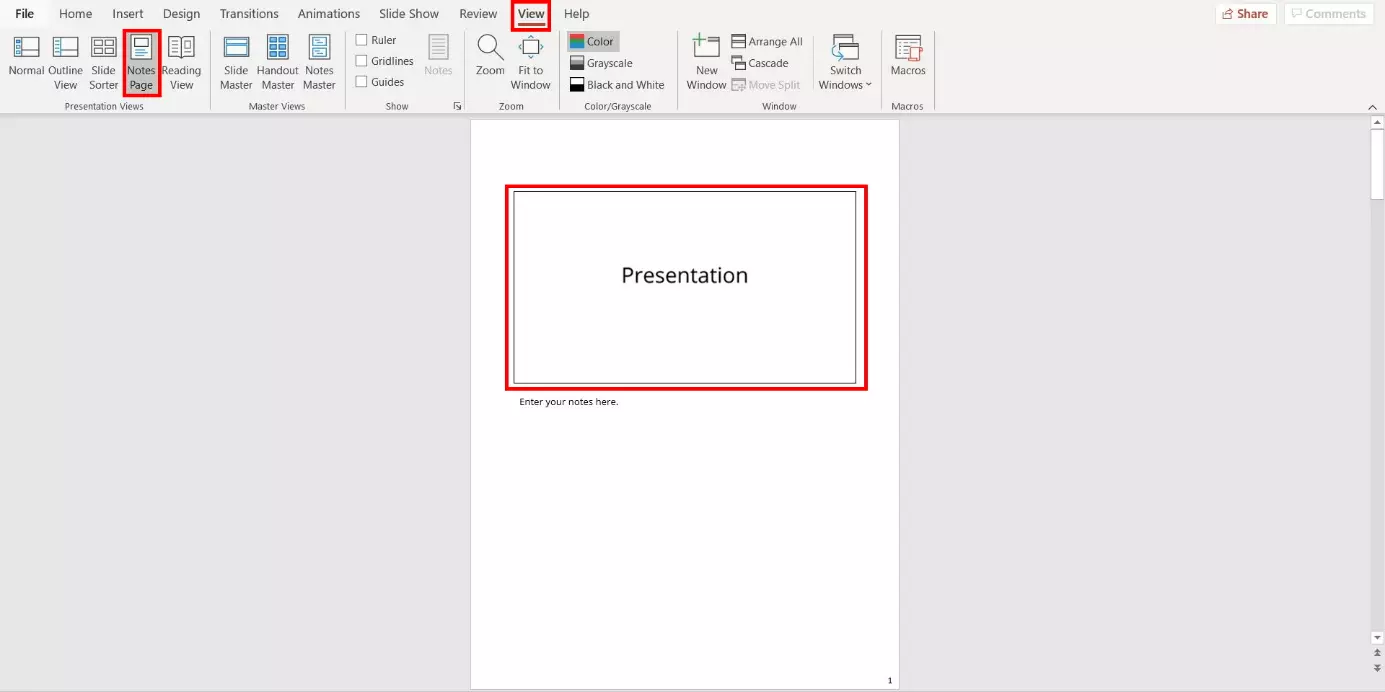
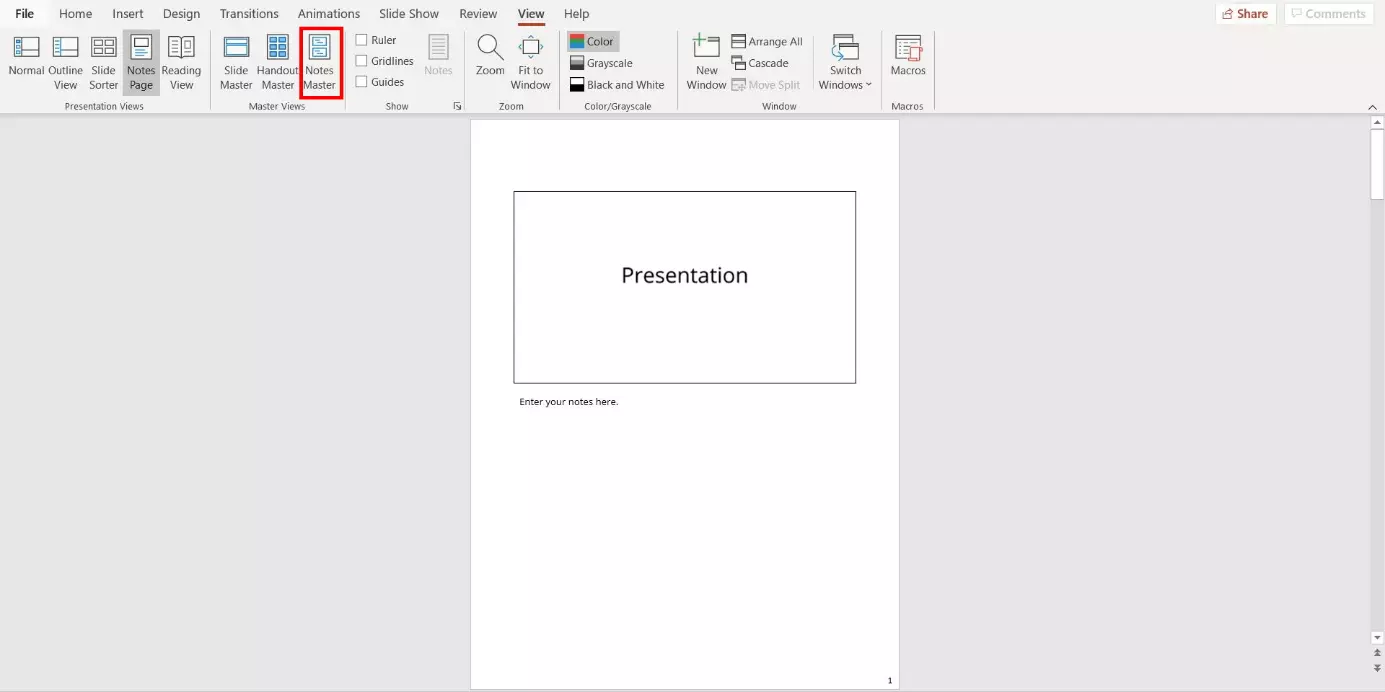
Select the “View” tab located in the menu and then click on “Notes Page”. To delete the slide thumbnail, left-click on it to select it and then press the [Delete] key on your keyboard. Repeat this step until you have removed all the slides (i.e. their thumbnails for the print version). Then, follow the instructions found under “How to print PowerPoint slides with notes” to print out your notes.
Notes Master: creating layouts for your notes
Using the PowerPoint Master Views, you can define uniform settings which the program will automatically apply to all your slides. This function can also be used for notes, such as to prepare them to be optimally printed later on. Follow our step-by-step instructions to configure the general Notes Master settings.
Step 1: Opening Notes Master
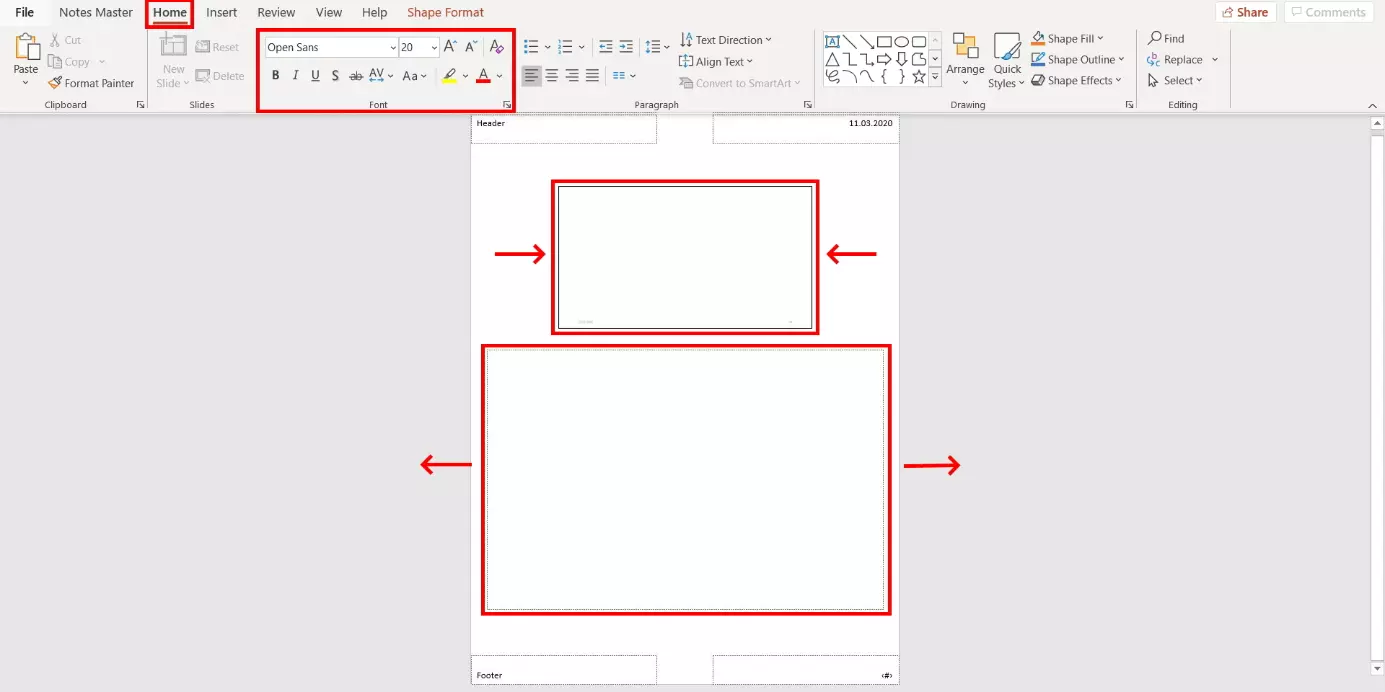
PowerPoint will then open a new section. The presentation software will automatically apply any settings you define here to all the notes in your presentation. We will use two examples to illustrate which settings can be defined in this section.
Changing the sizes of the different areas
So, you need the size of your notes to be readable, but the slides themselves are fine as small images. In this case, you can adjust the dimensions of these two areas. To do so, left-click and hold the edge of the frame for the section you want to adjust and drag it to the desired size.
Changing the font
Step 2: Applying the Notes Master settings
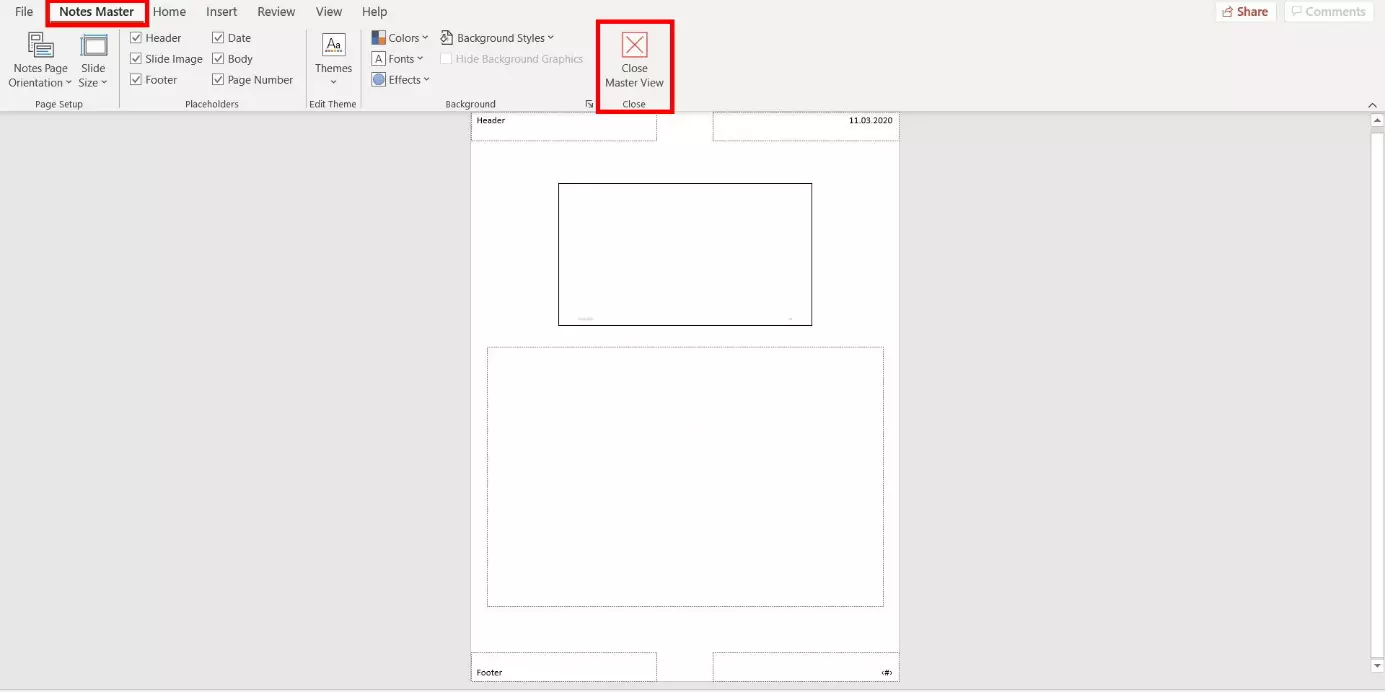
After defining all your settings, select the “Notes Master” tab from the menu bar and click “Close Master View”. PowerPoint will then automatically take those settings and apply them whenever you print your PowerPoint slides with notes (or when you only print the notes).
PowerPoint comments: creating practical notes
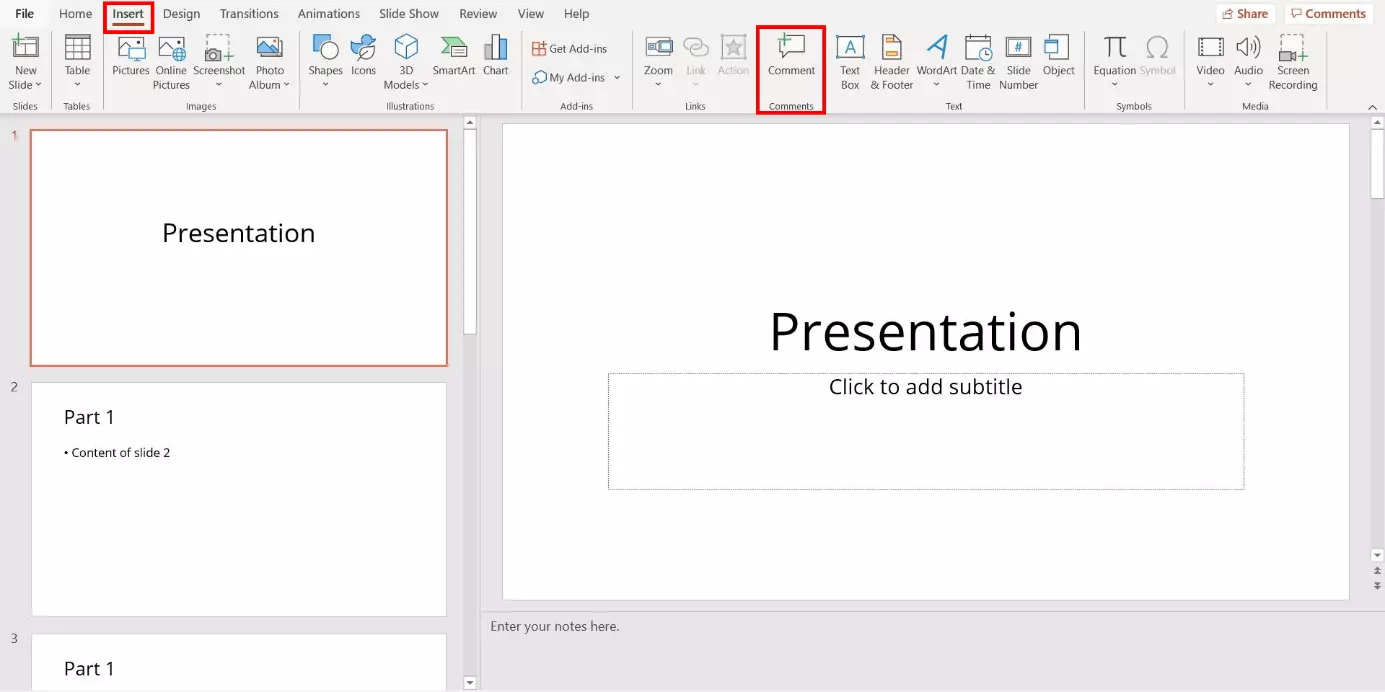
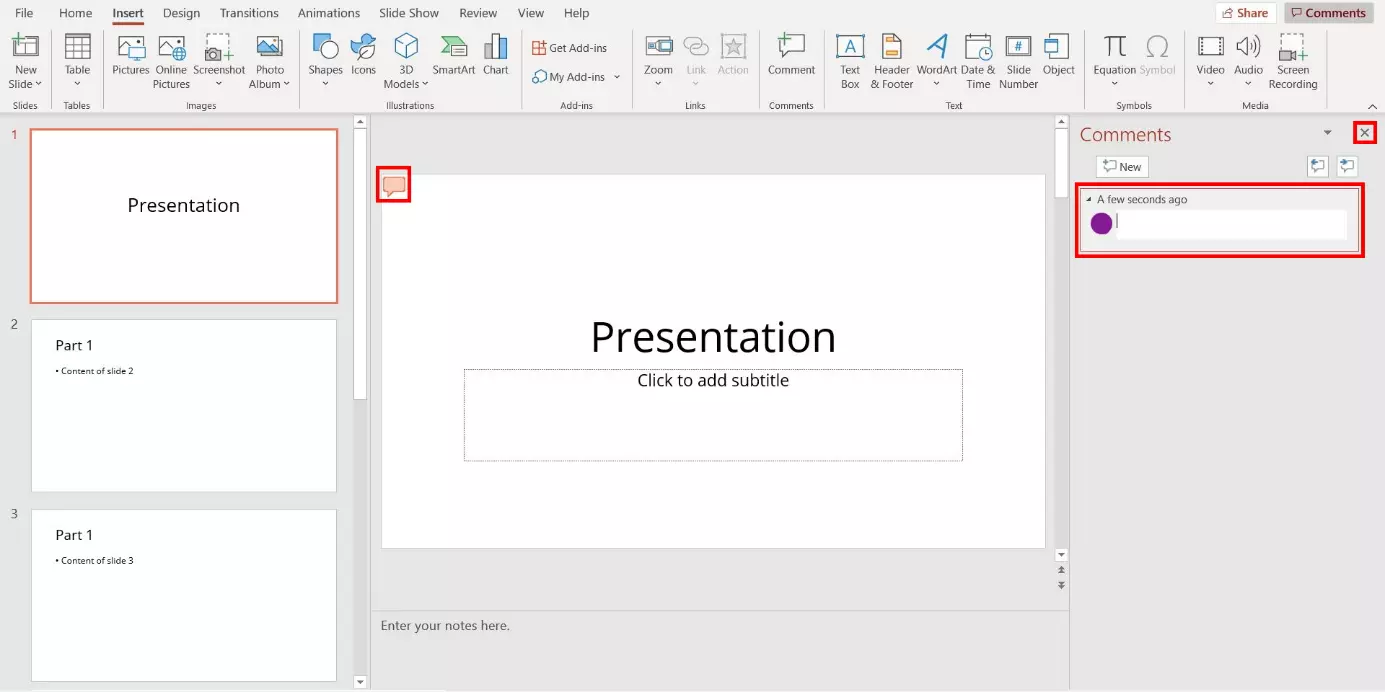
Comments are another way to add notes to your slides. The advantage these have over notes is that you can add multiple per slide. Comments are applied to individual sections and are great for inserting notes (e.g. for colleagues) during the preparation stage. Unlike notes, these are not displayed to the speaker during the presentation.
Creating comments
Printing comments
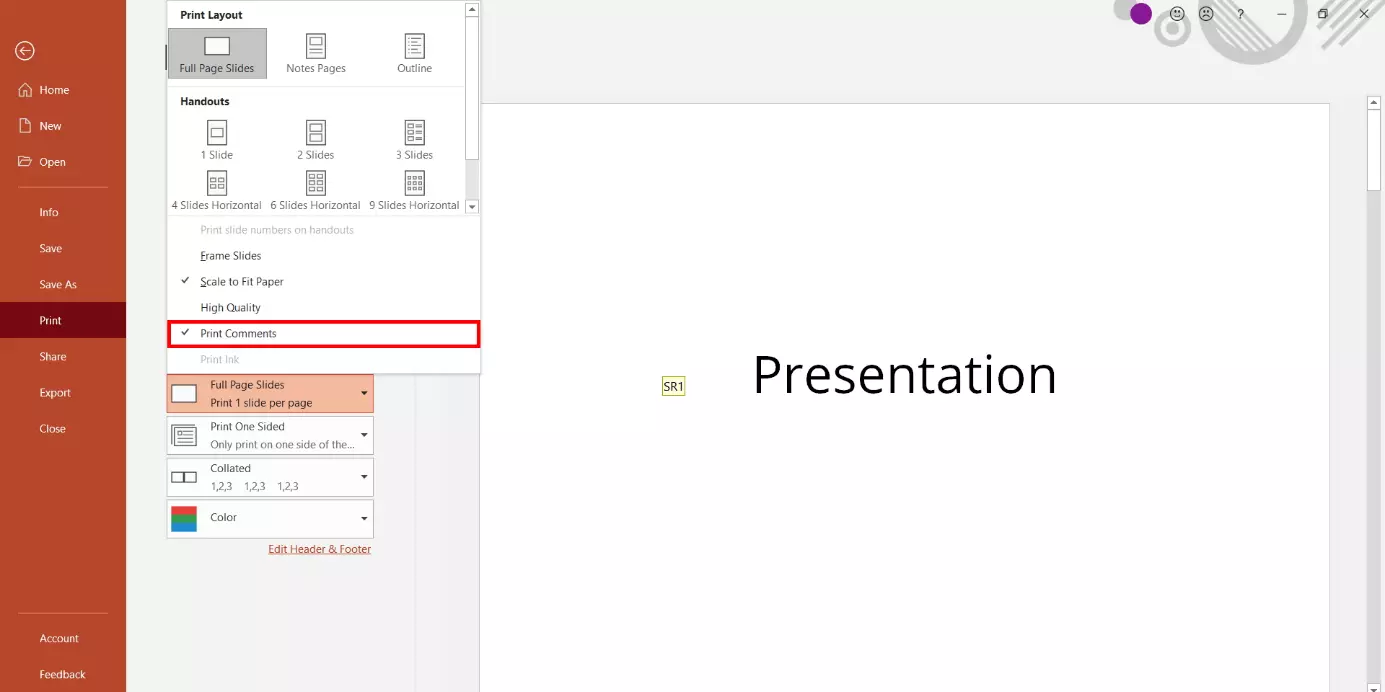
PowerPoint allows you to print comments with your presentation slides. Just like when you are printing notes, go to “Home” > “Print”. Under the heading “Settings”, click on the drop-down menu labelled “Full Page Slides”.
If you last printed PowerPoint notes, the drop-down menu will display the “Notes Pages” option.
In the printout, the slides will only display the speech bubble icons. The program will print the comments themselves on separate additional pages. You should keep in mind that this would increase the total number of pages printed.
You can save paper by printing multiple slides on a single page. To do this, select the desired number of slides per page from the “Handouts” section located in the same drop-down menu.
PowerPoint notes: increasing your print options with Microsoft Word
In the PowerPoint presentation software, the editing options and print settings for notes are limited. By exporting them as handouts and sending them to Microsoft Word, you can use all the standard editing options in Word. For example, you can print multiple slides and notes on the same page. In the following, we will provide you with step-by-step instructions on how to export your presentation and use all the functions.
Step 1: Creating handouts
Step 2: Sending handouts to Microsoft Word
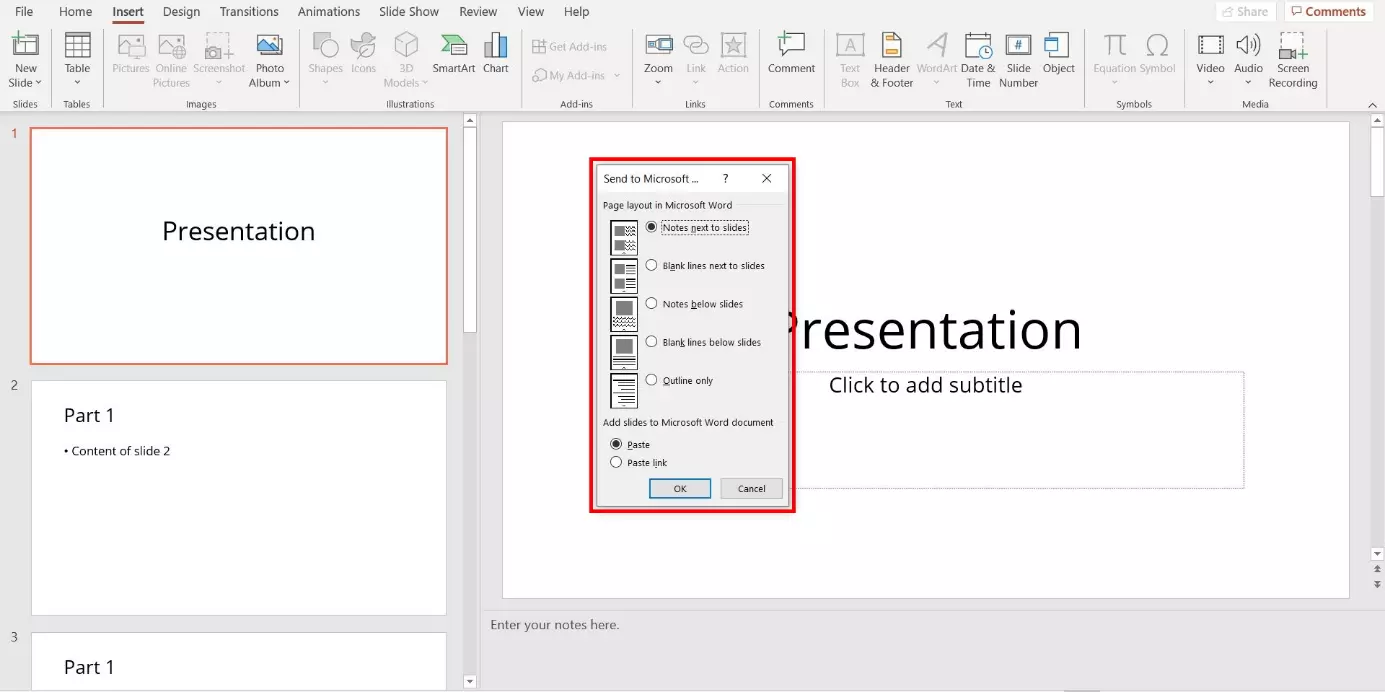
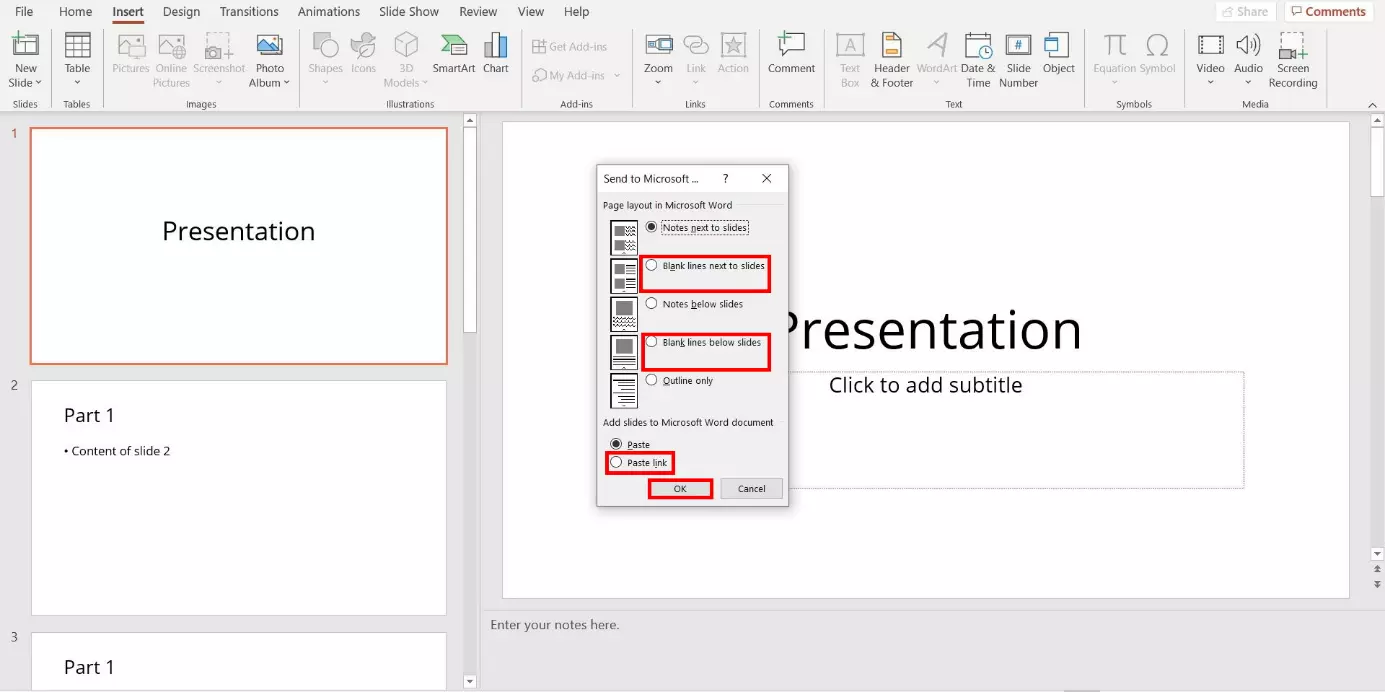
PowerPoint will then automatically switch to the Normal View and open the “Send to Microsoft Word” dialog box. In this dialog box, there will be a number of export options available. Select your desired page layout and confirm your selection by clicking “OK”. If you select the “Paste link” option, Word will automatically apply any changes made to the PowerPoint presentation.
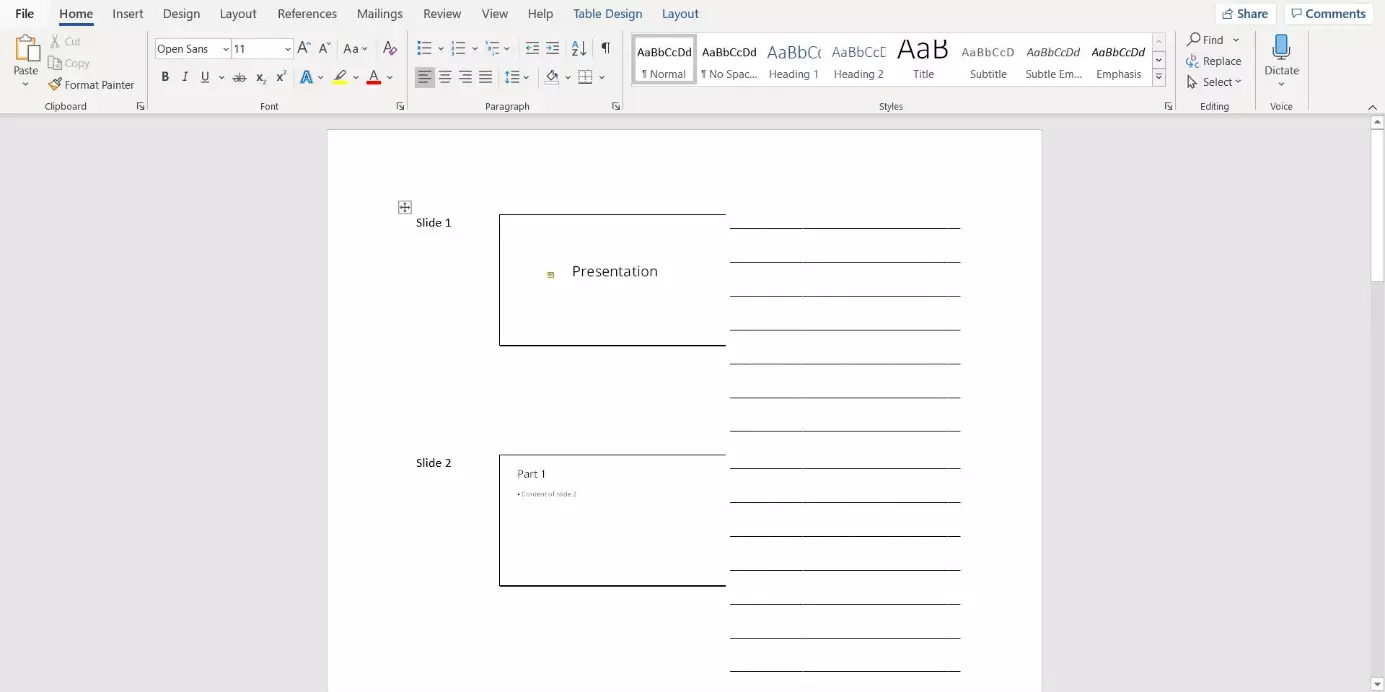
Step 3: Printing slides with blank lines (optional)
To leave space for handwritten notes on your slides later on, you can also send your presentation to Word with specially formatted lines. PowerPoint provides two options for this purpose: “Blank lines next to slides” and “Blank lines below slides” will create lines in the desired spot alongside your presentation. Select the desired checkbox and confirm your selection by clicking “OK”.
- 2 GB+ storage
- Sync across all your devices
- Spam filter and ad-free


