How to install WordPress on Ubuntu
If you want to install WordPress on Ubuntu, it is best to use the LAMP stack, a combination of the Linux distribution, the Apache web server, MySQL or MariaDB and the PHP scripting language. Installation and setup of the content management system can be done via the terminal.
Why use WordPress with Ubuntu?
If you want to run a web project with the popular CMS WordPress, you can use classic server options. But an Ubuntu server is also a good hosting system. Here are a few reasons why:
- Ubuntu is open source and free to use
- Security-relevant errors and weak points are quickly repaired
- You benefit from large administrative freedoms
- Ubuntu is less often the target of cybercrime (compared to Windows systems)
- Integrated tools for remote access are provided
When creating your WordPress site, the choice of using Ubuntu with a graphical user interface is entirely up to you. If you are already familiar with the Linux universe, it may be best to do without the GUI. This way you save valuable hardware resources.
Searching for a custom environment for complex WordPress projects? WordPress Pro from IONOS gives you access to a capable and dedicated cloud infrastructure with daily backups, malware protection and great support.
What do I need for WordPress with Ubuntu?
Similar to Ubuntu, WordPress isn’t very demanding on the hardware of the hosting environment. If you want to run a simple site, WordPress usually requires no more than 512 MB of RAM and 1 gigabyte of CPU. However, if the project grows and you also work with a variety of WordPress themes and WordPress plugins, you should plan additional power and maintenance for your CMS.
WordPress requires the following software components in order to run smoothly:
- Scripting language: PHP 7.4 or higher
- Web server: Apache; NGINX
- Database: MySQL 5.7 or higher; MariaDB 10.3 or higher (see also “MariaDB vs. MySQL”)
HTTPS support is required, which can be enabled at any time in both Apache (via module) and NGINX (via parameter).
The easiest solution to prepare the software mentioned above is to install a LAMP server.
Step-by-step guide to installing WordPress on Ubuntu
WordPress runs on a wide variety of Ubuntu versions. So, you can either go back to an older edition of the Linux distribution or use the current version. In the following tutorial, we have installed and set up WordPress on Ubuntu 22.04. Apache is used as the server and MySQL as the database.
Step 1: Install dependencies
If you have not yet set up a LAMP server or installed the necessary software components, do so before continuing with the following steps. To get the latest versions of Apache, MySQL and PHP, open the terminal and execute the following command:
sudo apt update
sudo apt install apache2 \
    ghostscript \
    libapache2-mod-php \
    mysql-server \
    php \
    php-bcmath \
    php-curl \
    php-imagick \
    php-intl \
    php-json \
    php-mbstring \
    php-mysql \
    php-xml \
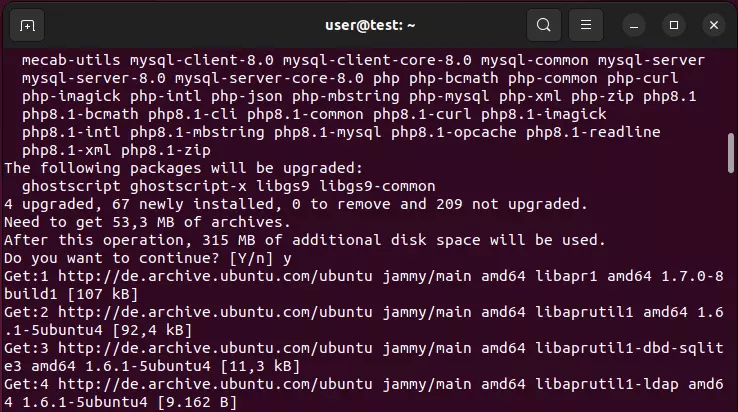
php-zipAfter a short check has been completed, you will get an overview of the packages that need to be reinstalled or updated. Confirm the download (and the space required for installation) by typing “Y” and pressing Enter.
Step 2: Download WordPress files
Once the basic framework is in place, you can start installing WordPress on your Ubuntu server. Ubuntu provides package files for this by default. These can be installed using the package manager. However, we recommend getting the installation files directly from the official WordPress website wordpress.org. This way, you can be sure you are working with the latest WordPress version as well as get assistance from WordPress support if you run into any problems.
Using the commands below, create a suitable installation directory. Once you have created the installation directory, give access rights to the user profile “www-data” (default user for web server operations). After access rights have been granted, the current WordPress installation files will be downloaded:
sudo mkdir -p /srv/www
sudo chown www-data: /srv/www
curl https://wordpress.org/latest.tar.gz | sudo -u www-data tar zx -C /srv/wwwWant to save time installing and setting up WordPress projects? IONOS hosting plans make installing WordPress easier than ever. Start the installation by going to the customer portal and entering the title of the website and your login details. The rest you can do with our setup assistant.
Step 3: Configure Apache for WordPress
The next step is to configure the Apache web server so you can run WordPress on Ubuntu. Start by creating a configuration file named wordpress.conf in the Apache directory:
sudo touch /etc/apache2/sites-available/wordpress.confThen open the file with the following command:
sudo gedit /etc/apache2/sites-available/wordpress.confNow copy the following lines into the file and then hit save:
<VirtualHost *:80>
    DocumentRoot /srv/www/wordpress
    <Directory /srv/www/wordpress>
        Options FollowSymLinks
      AllowOverride Limit Options FileInfo
      DirectoryIndex index.php
      Require all granted
    </Directory>
    <Directory /srv/www/wordpress/wp-content>
        Options FollowSymLinks
        Require all granted
    </Directory>
</VirtualHost>Now enable the page and URL rewrite and disable the default “It works!” page from WordPress. To do this, execute the following three commands in succession:
sudo a2ensite wordpress
sudo a2enmod rewrite
sudo a2dissite 000-default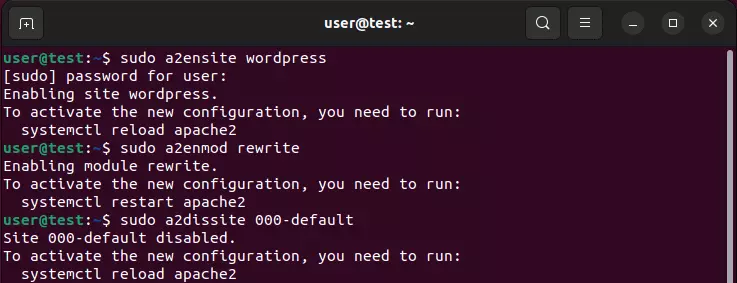
Now restart the Apache web server:
sudo service apache2 reloadYou need to register your own domain if you want your WordPress project to have a personalized web address. With IONOS, you can register your own domain today and secure the address you want.
Step 4: Create MySQL database
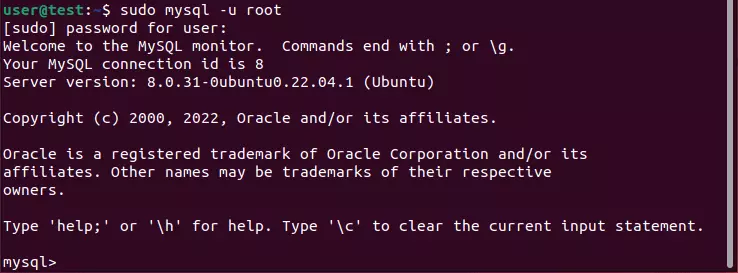
You also need to create an initial database for the project to install WordPress on Ubuntu. In order to do this, log in to the MySQL server with the root account:
sudo mysql -u rootAfter successfully logging in, you will see the MySQL input line “mysql>”.
In the next step, create a database named “wordpress” with the following command:
CREATE DATABASE wordpress;You also need to create a user profile for the database. Instead of “YourPassword”, define your own password with the following command:
CREATE USER wordpress@localhost IDENTIFIED BY '<YourPassword>';Then grant the user profile you created the rights to access the database:
GRANT SELECT,INSERT,UPDATE,DELETE,CREATE,DROP,ALTER
    -> ON wordpress.*
-> TO wordpress@localhost;The changes to the database can be applied without restarting MySQL service as follows:
FLUSH PRIVILEGES;Finally, log out of the MySQL server:
quitStep 5: Link WordPress with the created database
Now, it’s time to link the new database with WordPress. In order to do this, you need to create suitable entries in the configuration file wp-config.php. Since the configuration has not been created yet, simply use the sample config. You can do this by copying the command below into wp-config.php:
sudo -u www-data cp /srv/www/wordpress/wp-config-sample.php /srv/www/wordpress/wp-config.phpAfter that, transfer the name of the database (wordpress), the created user (wordpress) and the chosen password (which was defined in step 4) to the configuration file:
sudo -u www-data sed -i 's/database_name_here/wordpress/' /srv/www/wordpress/wp-config.php
sudo -u www-data sed -i 's/username_here/wordpress/' /srv/www/wordpress/wp-config.php
sudo -u www-data sed -i 's/password_here/<IhrPasswort>/' /srv/www/wordpress/wp-config.phpAfterwards, open the configuration file with the command:
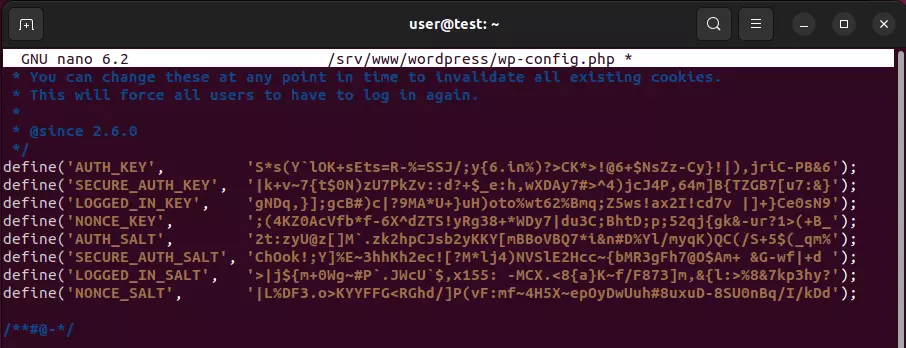
sudo -u www-data nano /srv/www/wordpress/wp-config.phpVerify that the information in the created database has been transferred as intended, and then delete the following lines from the file:
define( 'AUTH_KEY',         'put your unique phrase here' );
define( 'SECURE_AUTH_KEY',  'put your unique phrase here' );
define( 'LOGGED_IN_KEY',    'put your unique phrase here' );
define( 'NONCE_KEY',        'put your unique phrase here' );
define( 'AUTH_SALT',        'put your unique phrase here' );
define( 'SECURE_AUTH_SALT', 'put your unique phrase here' );
define( 'LOGGED_IN_SALT',   'put your unique phrase here' );
define( 'NONCE_SALT', 'put your unique phrase here' );Go to this page on wordpress.org and copy the presented entries with randomly generated keys to the place where the deleted lines previously were. Save the changes to the configuration file.
Step 6: Install and set up WordPress on Ubuntu
Open your browser and type “localhost”. The WordPress setup assistant will appear automatically. First, select the desired language and type in the title of the project. Then, enter your username, password and a valid email address to complete the setup.
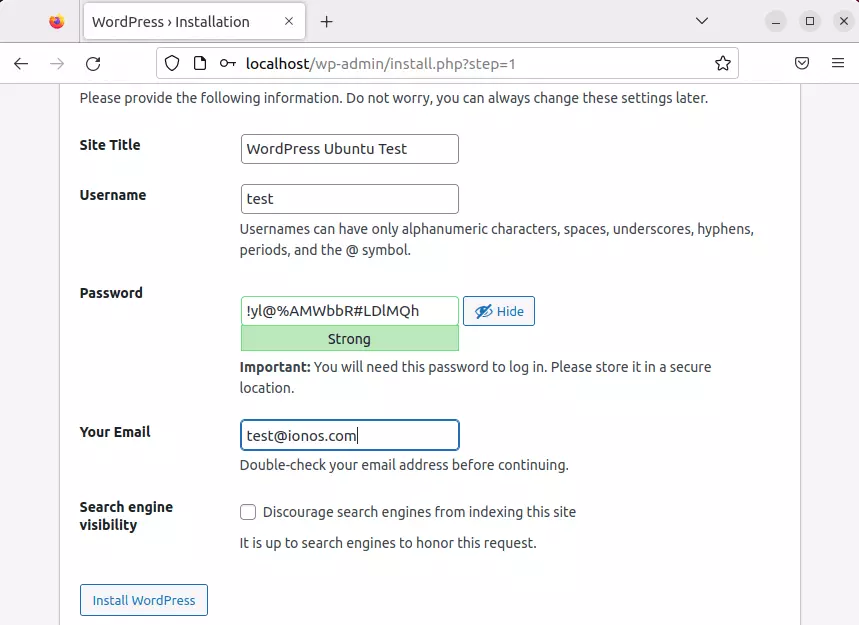
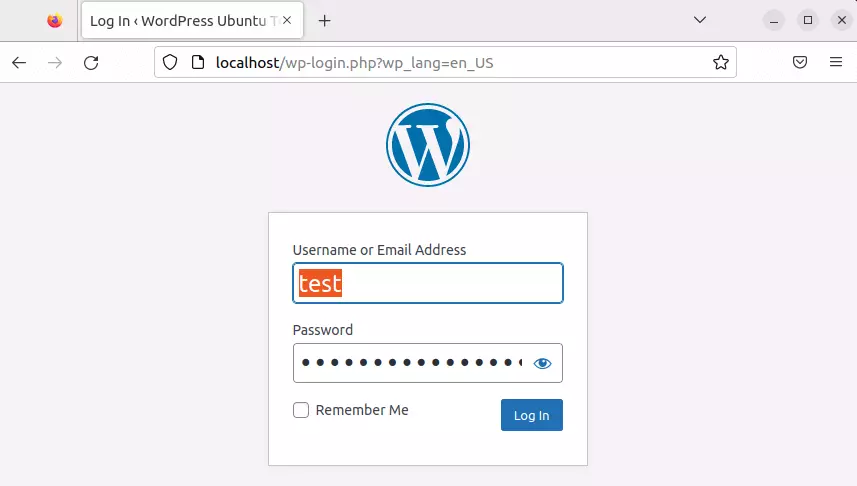
When you have filled in all the information, complete the setup and installation of WordPress on Ubuntu by clicking on “Install WordPress”. You will receive a success message and can now access the login screen for the backend at any time. All you need to do is go to the address localhost/wp-login.php, and enter your username and password.
Conclusion: Creating web projects with WordPress and Ubuntu
Installing WordPress on Ubuntu only takes a few steps and is a task that can quickly be mastered by newcomers. As long as the hardware is there, anyone can install the software components. At first, the setup of the web server and database might seem unfamiliar, but with the instructions above, you will be able to easily add your WordPress project to your Ubuntu server in no time.
Installed WordPress on Ubuntu and now want to get into the content management system properly? Take a look at the following articles in the Digital Guide:

