How to edit a WordPress header
WordPress is the world’s most popular Content Management System (CMS). Because it’s an open source platform, you can easily make your own edits to your installation of WordPress. This level of flexibility is one of the main benefits of the CMS. But nearly every WordPress site requires some tweaking to be successful. Say you want to integrate Google Analytics or a comparable tracking script, for example. Then you’ll need to add snippets of code to your theme’s framework. These kinds of administrative tasks often involve editing the WordPress header. We’ll show you the best ways to do this in our step-by-step guide.
What is a WordPress header and what are its elements?
The term “WordPress header” can be confusing. In connection with a website, the header usually describes the visible area at the top of a page. That’s usually where you find the site logo and the main page menu. Almost every website has a header. On the other hand, a HTML document, colloquially referred to as a “page”, comprises two components: the HTML head (<head>) and the HTML body (<body>). Visible elements are only contained in the HTML body, while invisible elements appear only in the HTML head.
- Create & customize your site with AI tools made for everyone
- 3x faster: SSD, caching & more
- Daily security scans, DDoS protection & 99.98% uptime
Publish your own WordPress site with IONOS. Get professional WordPress Hosting now.
In WordPress, the header includes both the HTML head and the header of the page. So, when we talk about changing the WordPress header, we are refering to two types of elements:
- Invisible elements in the HTML head
- Visible elements in the page header
We’ll explain both elements in the following sections.
Invisible elements in the HTML head
Elements in the HTML head are not visible to page visitors. Instead, they’re evaluated by a browser and search engines. The most common elements found in an HTML head include:
- Links to stylesheets
- Links to script files
- Links to fonts
- Links to favicons
- Various types of meta tags
Script tags placed in the HTML head may hamper performance, e.g., slow down page loading. Depending on the application, the problem can be remedied by adding the “async” and “defer” attributes. It’s advisable to include such script tags in the WordPress footer.
Visible elements in the page header
The page header contains visible elements at the top of the page. As of HTML5, it’s been customary to implement the page header with a <header> element. However, this is not mandatory. In principle, a <div> element can be used as well. The following elements are often found in a page header:
- Logo
- Menu
- Header image
- Search bar
How to edit a header in WordPress?
As briefly mentioned, when editing a header in WordPress we need to distinguish between adding additional code to the HTML head or changing the visual appearance of the site. In the following, we focus on the integration of additional non-visual elements in the HTML head.
Visual changes to the page header are much more complex. How exactly you do this depends on the theme you used. Furthermore, these changes usually require some design and coding skills.
Some added script tags may require user consent before they can be loaded. That’s the case if, for example, cookies are used or personal data is collected. You will then need to consider how each additional script is integrated into an existing cookie-consent solution.
Here are three methods to place additional code in the HTML head of the WordPress header:
- Use a plugin
- Modify the theme code
- Use the Google Tag Manager
The advantages and disadvantages of each method are summarized below:
| Method | Advantage | Disadvantage |
|---|---|---|
| Use a plugin | Simple application | Code snippets are stored in the database; difficult to integrate with cookie consent; lack of control; can cause performance problems |
| Modify the theme code | Code snippets become part of the codebase; visual changes possible; full control over complex applications | Requires editing of theme code and coding skills |
| Use the Google Tag Manager | Simple application; code snippets are managed centrally outside of the website; integrates well with cookie consent; In principle, it is also possible to implement complex applications | Requires one-time set-up |
Use a plugin to edit WordPress header
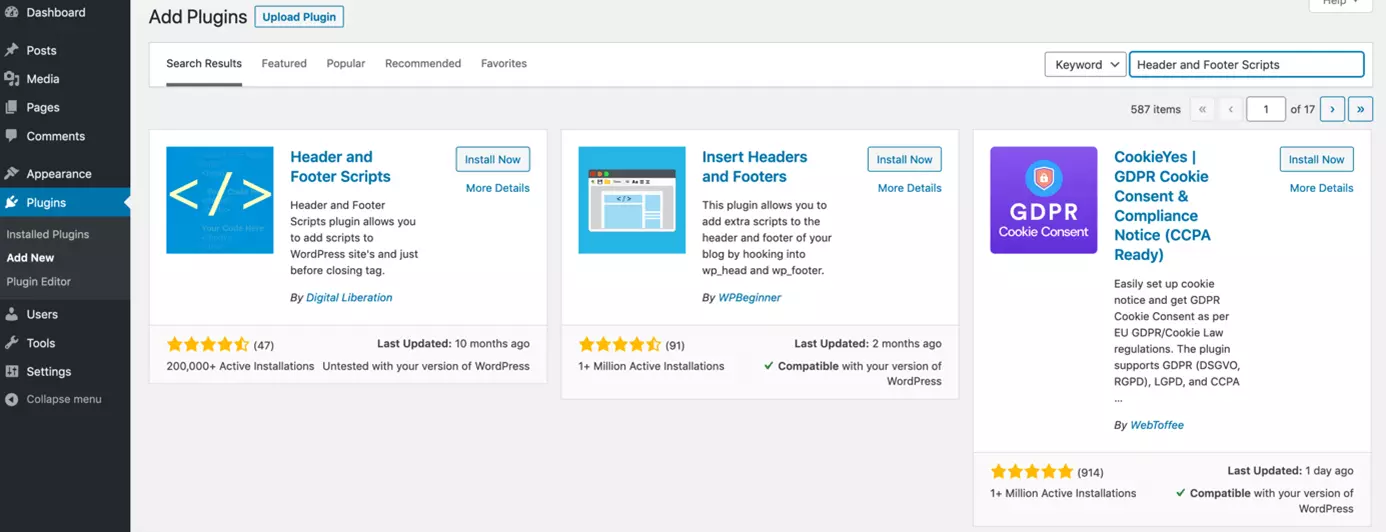
You can access various plugins to help insert code in the HTML head from the WordPress Plugin Directory. These plugins are primarily suitable to add meta tags, stylesheets, or scripts to a page. Adding visible elements to the page header is usually not possible. The plugins are easy to use and most can be added without prior coding skills. Depending on the plugin, control over the inserted code is limited. Here is an overview of widely used header code plugins:
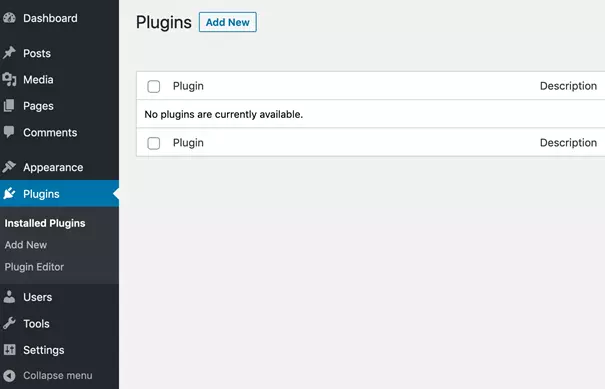
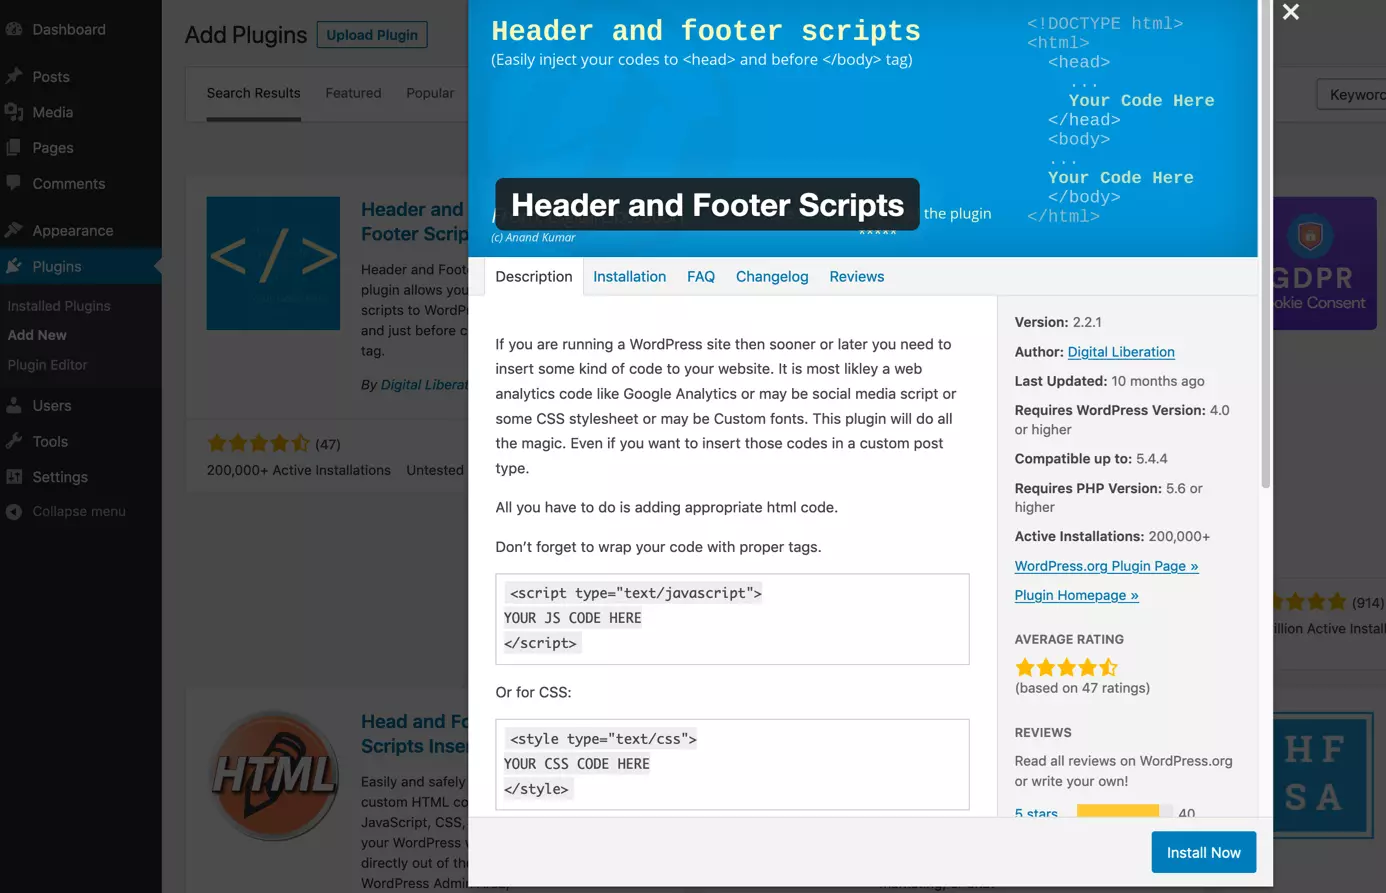
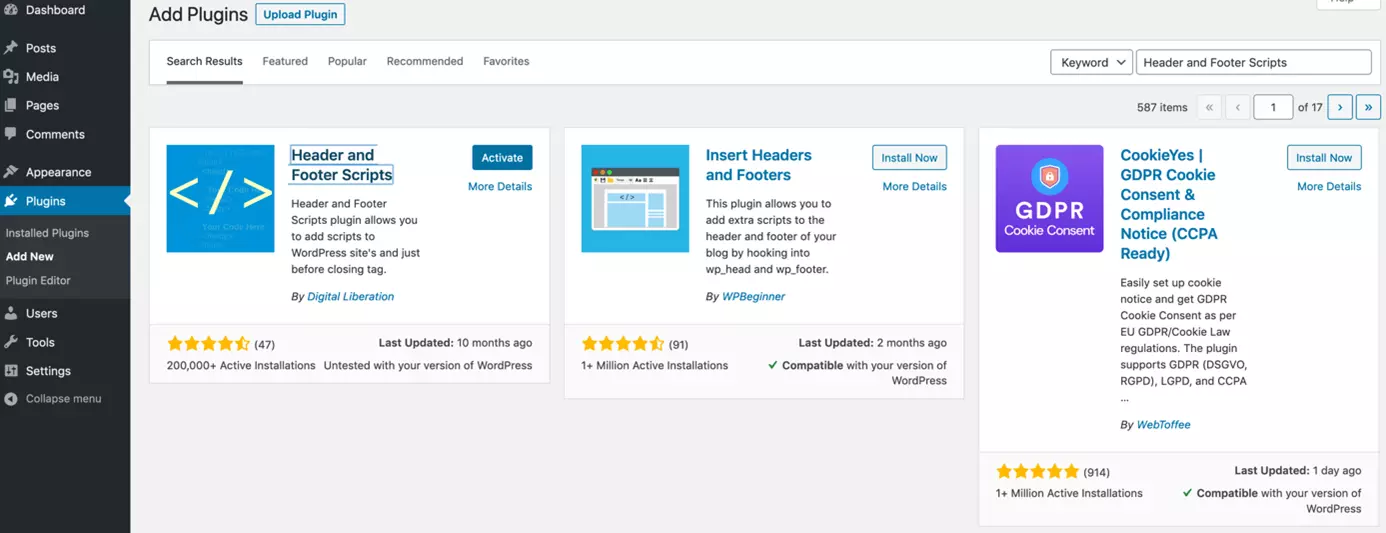
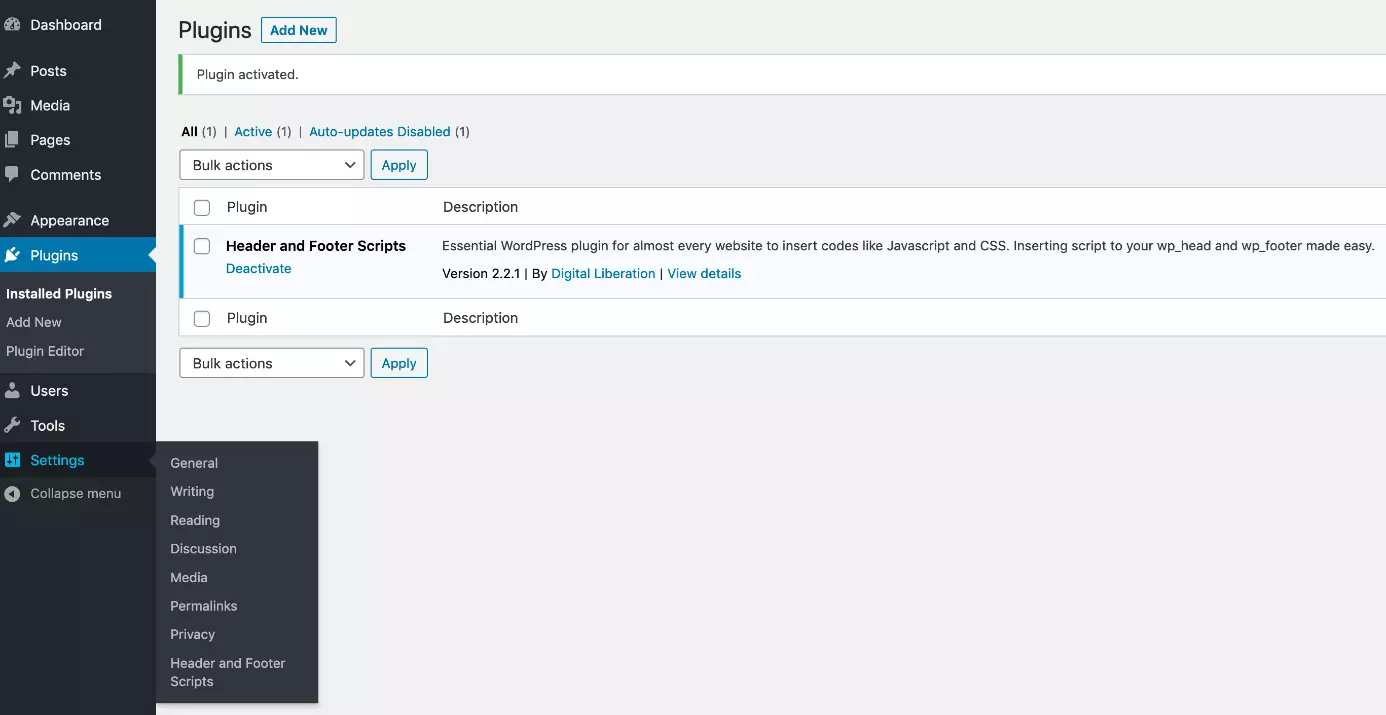
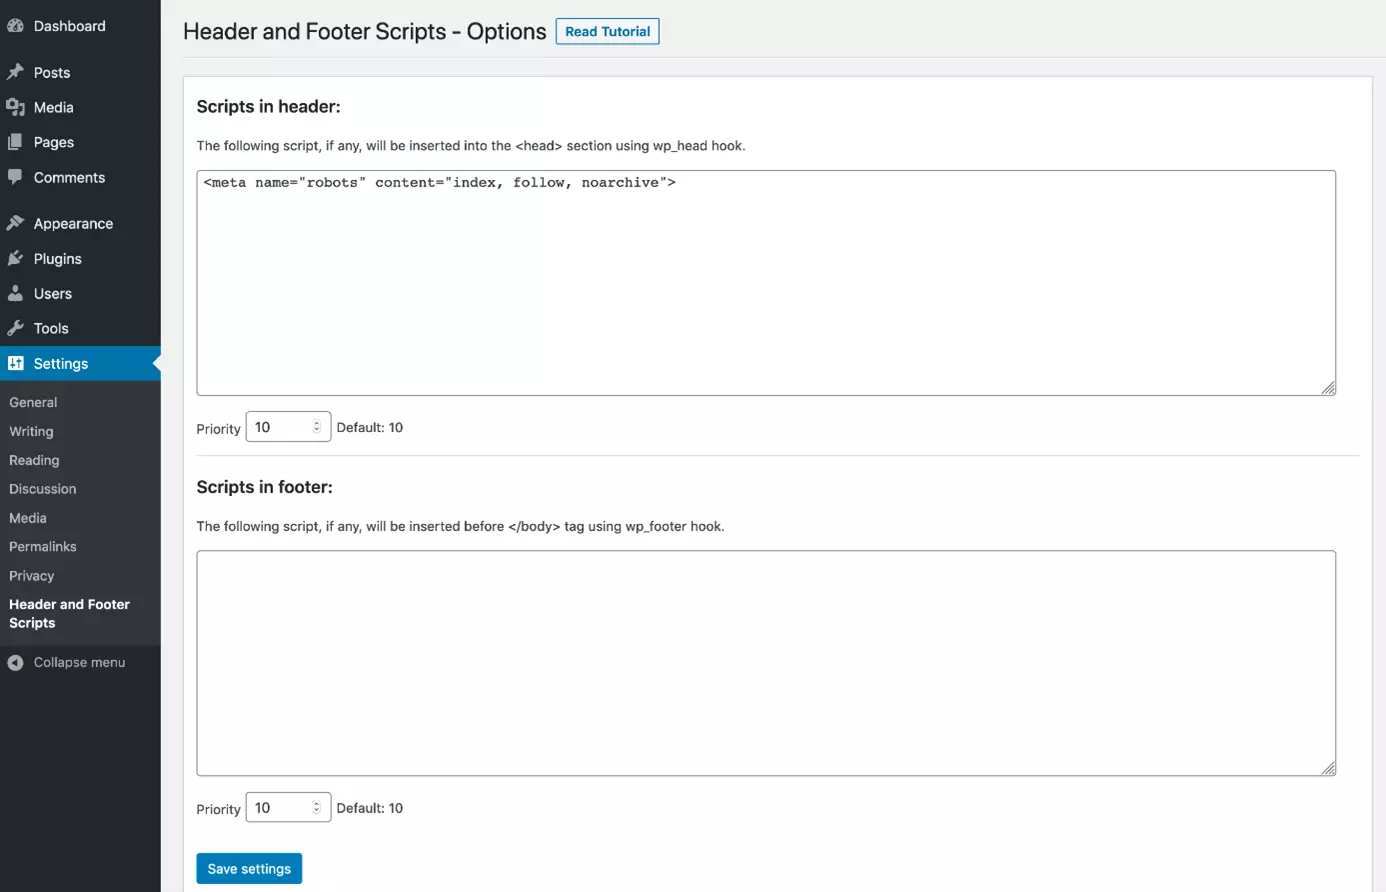
Below, we’ll show you how to use the “Header and Footer Scripts” plugin to place additional code in the HTML head of the WordPress header step-by-step.
Modify the theme code to edit the WordPress header
By modifying the theme code, you retain full control over the content of your WordPress header. Any changes made become part of the theme codebase and are therefore subject to version control. This is the preferred option for experienced users and admins. You have several options to modify the theme code:
- Add code to the template file header.php
- Add additional functions in the functions.php file
- Create a child theme and add changes
| Method | Advantages | Disadvantages |
|---|---|---|
| Add code to header.php | conceptually simple to grasp; precise control of the order of code injections; also works for visible changes | hardcoded changes; with repeated changes there is a greater risk of them becoming confusing |
| Create functions in functions.php | clear separation between presentation and functionality; the order in which the code is injected can be specified | greater complexity; can be confusing for beginners |
| Create child theme | changes are update-safe and can be easily undone if necessary | slightly higher effort; requires a one-off modification to the theme |
Add code in the header.php file
The most straightforward way to add code to the WordPress header is to edit the “header.php” file. This WordPress file is a universal template that is used across nearly every theme. Let's exemplify this by looking at the official “TwentyTwenty” theme to see how a typical header.php file is structured:
<head>
    <meta charset="<?php bloginfo( 'charset' ); ?>">
    <meta name="viewport" content="width=device-width, initial-scale=1.0" >
    <link rel="profile" href="https://gmpg.org/xfn/11">
    <?php wp_head(); ?>
</head>
<body <?php body_class(); ?>>
    <?php
    wp_body_open();
    ?>
    <header id="site-header" class="header-footer-group" role="banner">
The code above shows the WordPress header. The HTML head sits between the opening <head> and closing </head> tag. In addition to a few meta tags, the HTML head contains a call to the WordPress function wp_head – a so-called WordPress hook. Programmatically, this is linked so that other elements can be placed in the HTML head. These elements are added before the closing </head> tag. The wp_head hook is therefore only suitable for adding non-visible elements.
To add more elements to the HTML head, simply place your code before or after the wp_head () call. Please note that the order of the elements is important, especially when it comes to stylesheets and scripts. With meta tags the order usually doesn’t matter. Stylesheet and script tags should not be manually placed in the WordPress header. You can find out more about this in the following section.
The HTML head is followed by the HTML body whereby the opening <body> tag is followed by a header element
. This page header contains the visible elements such as the header image, logo, and menu. Any HTML or PHP code that we insert at this point will be displayed in the browser.
In principle, we can add more visible elements to the page header. However, be cautious. If you insert bad code, your site may no longer load or display errors. Since the header.php file is a global template, every single page is affected by changes made to it.
Create functions in functions.php
Much like the header.php file, the functions.php is found in most WordPress themes. However, it’s not a PHP template that is translated directly into HTML. Rather, the code in functions.php is used to configure the theme and the site. It is possible to define functions and link them to the WordPress hooks. As a simple example, let’s add a robots meta tag in the HTML head:
function robots_meta() {
    echo '<meta name="robots" content="index, follow, noarchive">';
}
add_action( 'wp_head', 'robots_meta' );
First, we define a new function in functions.php, which outputs the HTML code of the meta tag. We call this robots_meta (). You can choose any name, but it’s best to select one that reflects what the function does. The WordPress function add_action () is named after the function definition. We name this WordPress hook “wp_head”, which we’ll use to link to our function called “robots_meta”. A call to wp_head () then leads to a call to robots_meta (); the HTML code contained in robots_meta () is output in the HTML head.
Let’s modify our example. We want to enable the inclusion of the “is_front_page ()” into the Google cache by omitting “noarchive” on the WordPress homepage. And we want to exclude pages where WordPress comments are activated (“is_single () && comments_open ()”) from being indexed by adding “noindex”:
function robots_meta() {
    if ( is_front_page() ) {
        echo '<meta name="robots" content="index, follow">';
    }
    else if ( is_single() && comments_open() ) {
        echo '<meta name="robots" content="noindex, follow, nocache">';
    }
    else {
        echo '<meta name="robots" content="index, follow, nocache">';
    }
}
add_action( 'wp_head', 'robots_meta' );
Adding additional scripts and stylesheets in WordPress — here’s how to do it
Sometimes you need to add external software such as a tracking script or a cookie consent solution to a WordPress site. Often, it’s recommended to paste a code snippet directly into the WordPress header to load additional scripts or stylesheets. In practice, this requires a certain amount of caution, because the order in which scripts or stylesheets are added is critical!
Newly defined style properties complement or overwrite previously defined properties. If the order of the style definitions is reversed, it can lead to serious display errors. The same goes for scripts. If a script accesses variables or functions that have been defined in another script, there is a dependency. The dependent script must be loaded last.
WordPress has special functions and hooks to integrate additional scripts and stylesheets. The scripts and stylesheets are queued up ("enqueue") and that’s reflected in their names e.g., “wp_enqueue”. The following code is an example of how stylesheets and scripts are loaded within functions.php:
function add_theme_scripts() {
  wp_enqueue_style( 'main-style', get_stylesheet_uri() );

  wp_enqueue_script( 'main-script', get_template_directory_uri() . '/js/main.js', array( 'jquery' ));
}
add_action( 'wp_enqueue_scripts', 'add_theme_scripts' );
Create a child theme
When you’re adapting code of a WordPress theme, it’s advisable to create a child theme. The child theme “inherits” the code of the “parent theme”, selectively adding and overwriting components. Using a child theme ensures that changes are separated from the original theme code. It also means that updates can be made without overwriting the original parent theme. The two methods previously discussed can be used to create a child theme.
- Free Wildcard SSL for safer data transfers
- Free private registration for more privacy
- Free 2 GB email account
Using the Google Tag Manager to edit a WordPress header
Aside from plugins or modifying the theme code to place code in a WordPress header, there’s one more option: using the Google Tag Manager. You’ll only need to add it once to your site, either by adding the theme code or using a plugin. From a separate interface in your Google account, you can then track code and meta tags and integrate them into your WordPress site. This is often the preferred method for marketing managers because it enables them to anchor specific code in the HTML head without requiring the help of professional coders.
If you’re managing extensive changes to header code on a commercial WordPress site, it’s best to use the Google Tag Manager. If you’re a developer or you partner with coders, you can create a child theme. Plugins are only recommended for making simple changes to the WordPress header.


