How to verify your domain on Facebook
In this article, you’ll learn how to connect your domain with Facebook and verify it so your data can’t be misused. In addition to being able to customize how link previews for your website appear on Facebook, verifying your domain also lets you enjoy greater flexibility when managing your profile in the Meta Business Manager.
How to register a domain for your Facebook profile
Before you can verify a domain for your Facebook account, you first need to register a domain and connect it with your profile. You can register a domain with a domain registrar. Registrars act as intermediaries between the general public and domains registries, which manage and provide top-level domains (TLDs) like .com, .net and .org. It only takes a few minutes to register a domain. We’ll show you how below.
- Free Wildcard SSL for safer data transfers
- Free private registration for more privacy
- Free 2 GB email account
One way to register a domain is with IONOS. You can do so by following these steps:
- Go to the IONOS homepage.
- At the top of the page, click on the Domains & SLL tab. Under Domains, click on Domain Names.
- Now, use the Domain Checker to see if the domain name you want is available.
- Once you’ve selected a domain, add it to the shopping cart and complete your purchase.
Domains are typically registered and ready to use a few minutes after they are purchased. You’ll receive the login details for your customer account via email, where you can manage all the necessary settings for your domain, including connecting your domain to your Facebook account.
Step-by step instructions for Facebook domain verification
If you’re managing a professional business profile on Facebook, it’s a good idea to verify your domain through the Meta Business Manager. Verifying that you own the domain helps prevent misuse and unlocks features such as the ability to edit link previews in your Facebook posts.
In order to verify your domain on Facebook, you’ll first need to create a business portfolio account in Meta Business Manager.
Facebook offers three different ways to verify a Facebook domain:
- Adding a meta tag to your website’s HTML source code
- Uploading an HTML file to your website’s root directory
- Adding a DNS TXT record to your domain’s DNS settings
Each method has its own set of benefits and drawbacks, which are influenced by the level of access you have to your hosting environment as well as your level of technical expertise. It’s best to choose the option that’s easiest for you to implement. Regardless of which method you choose, you’ll need to do these steps first:
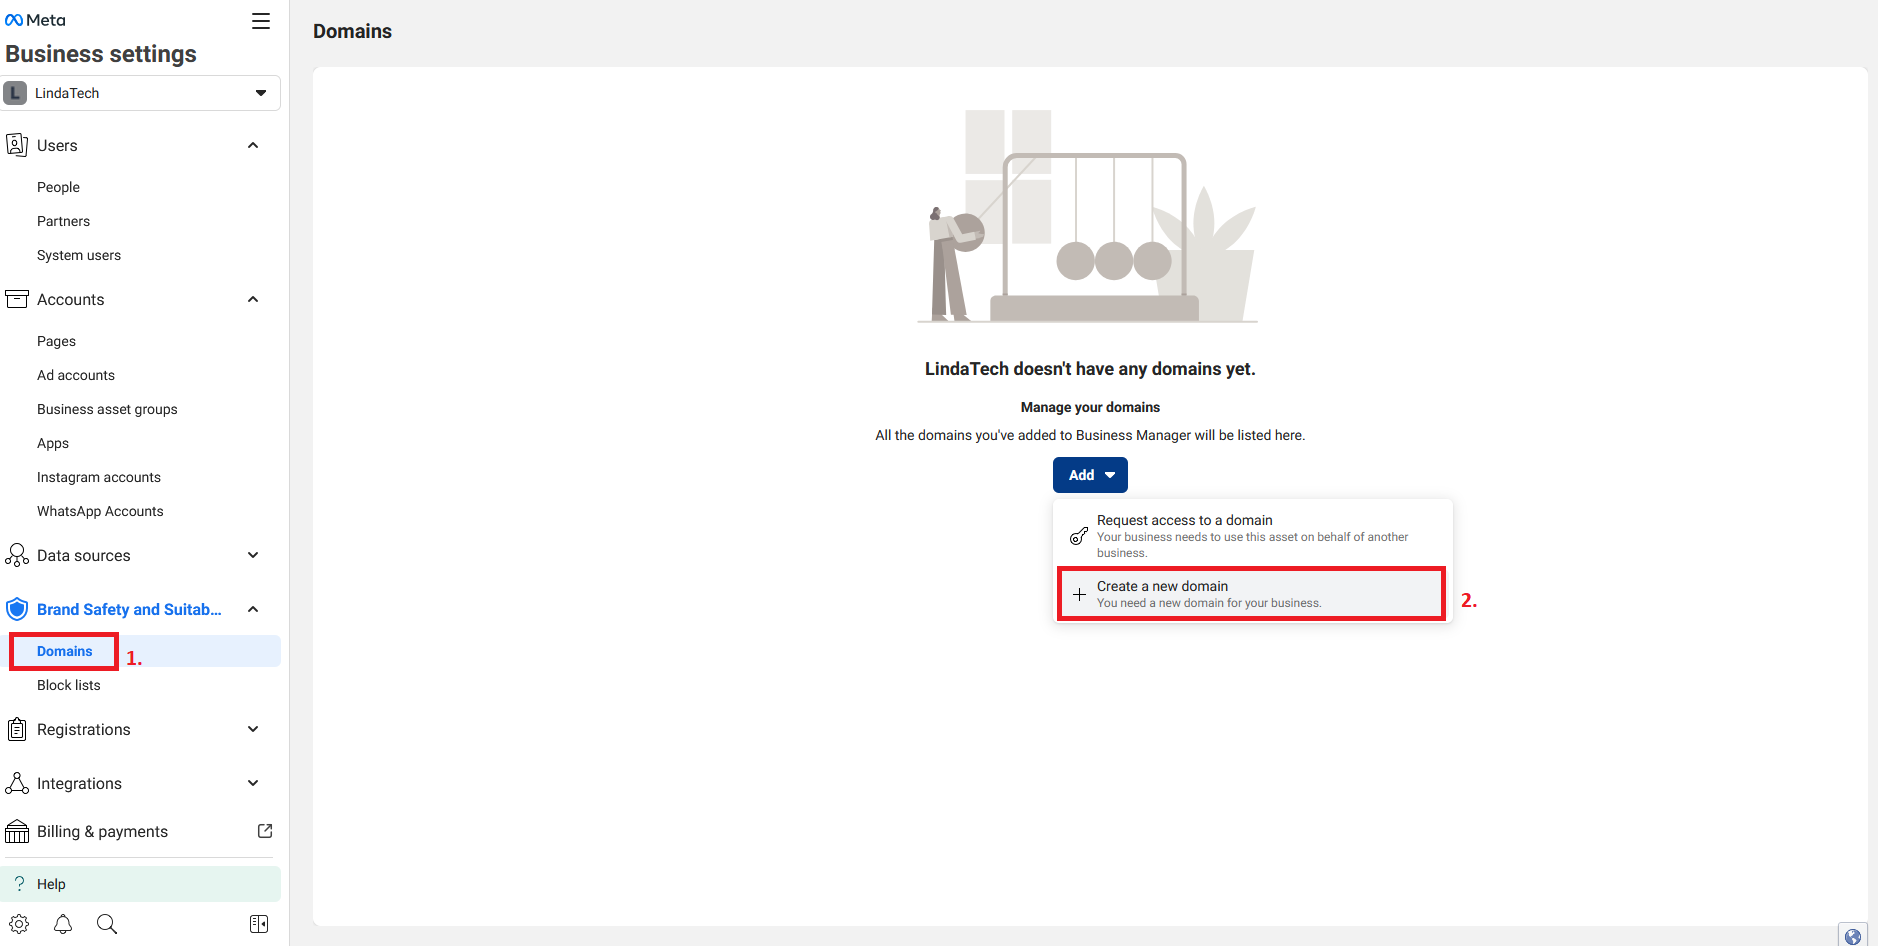
- In Meta Business Manager, go to Business settings > Brand Safety and Suitability > Domains.
- Click on Create a new domain to add a new domain.

- Enter the root domain of your site (for example,
websitexyz.com) and click Add. - Choose one of the domain verification methods to verify your Facebook domain. Below, you’ll find instructions for all three methods. Follow the instructions that correspond to the method you want to use.
Method 1: Add a meta tag to your HTML code
- Copy the meta tag that appears in your business settings.
- Open the HTML source code of your website’s homepage. This is usually the index.html file or the main page of your content management system.
- Paste the meta tag inside the
<head>section of your HTML code and publish the page. - Visit your website’s root domain and check the HTML source code to make sure the meta tag has been added correctly.
You can check the HTML source code by accessing your website in a browser and right-clicking on the page. A context menu will appear with the option View Page Source. Click on this option to check the HTML source code.
Method 2: Upload an HTML file to the root directory
- In your Business settings, you’ll find a link for the HTML verification file. Use the link to download the file, and don’t make any changes to the file once it has been downloaded.
- Use your hosting account or FTP program to access your website files.
- Upload the HTML file to your domain’s root directory. The root directory is the main folder where files like index-html are stored.
- Once you’ve uploaded the file, go to your Business settings in Meta Business Manager and click on the link in step 3 to confirm that the verification code is visible on your website.
Method 3: Update your DNS TXT record with your domain registrar
The exact process for updating your DNS TXT record my vary depending on your domain registrar, but the basic steps for doing so are similar among most registrars. Here, we’ll show you how to do this with a IONOS account:
- Log in to your IONOS account.
- Go to Domains & SSL and select the domain you want to verify. Click on the DNS tab.
- Go to your Business settings in Meta Business Manager and copy the TXT record provided by IONOS for domain verification.
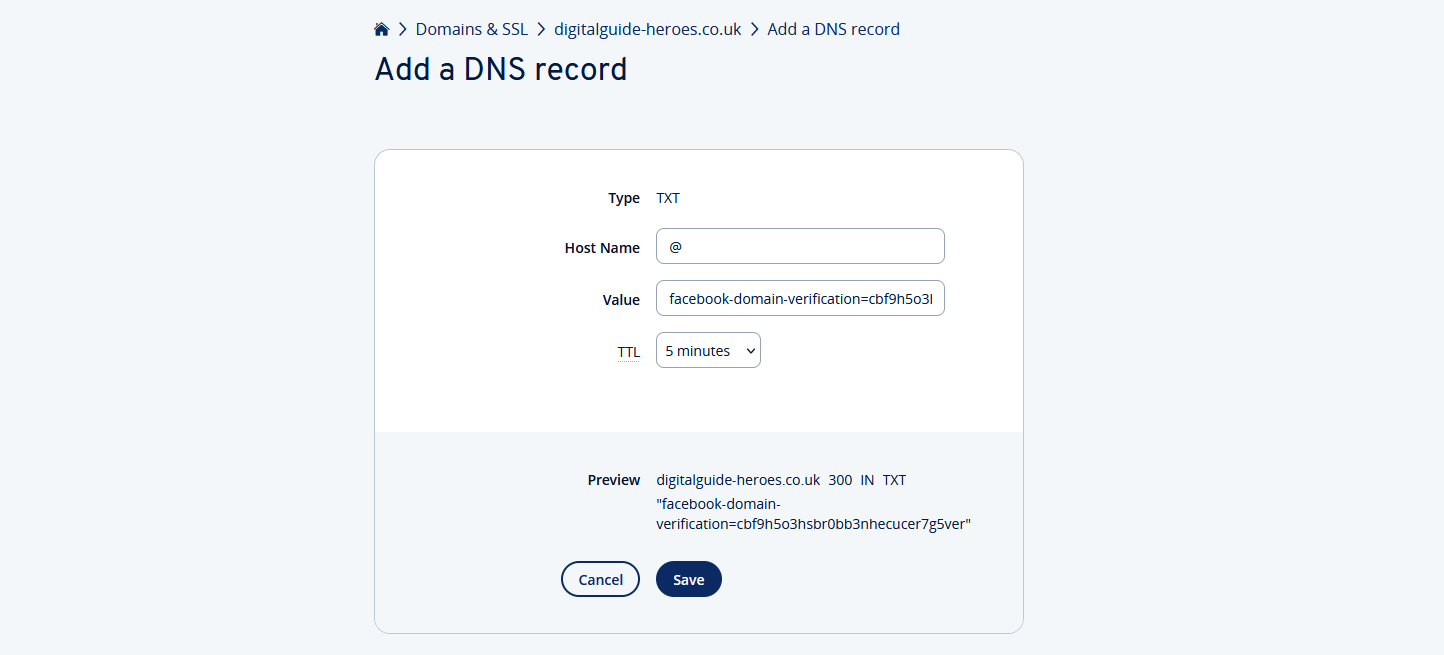
- Click Add Record and choose TXT for the entry type.
- Enter “@” as the hostname for the root domain and paste the copied TXT record in the Value field. If you want, you can change the TTL value (for example, to 5 minutes). Then click Save to save your entry.

Once you’ve completed one of the three methods listed above, go back to your Business settings in Meta Business Manager and click Verify Domain. If a problem occurs with the verification, you’ll receive an error message. Should this happen, try a different verification method.
If you were able to successfully verify your Facebook domain, you can remove the meta tag, DNS TXT record or HTML file without it affecting your verified status.
How to forward your domain to your Facebook profile
Once you’ve registered your domain, you can connect it to your Facebook profile by setting up a domain redirect. Doing so will allow people to access your Facebook page directly through your domain, which is helpful if you aren’t done creating a separate website yet and want to use your Facebook page as your primary online presence.
Connecting your domain to your Facebook account can significantly boost your online visibility. You can also connect your domain to an Outlook account to create a consistent brand presence across different platforms.
If you’re an IONOS customer, you can use the IONOS setup assistant to connect your domain with Facebook. The setup assistant makes the process significantly easier, providing you with step-by-step instructions for configuring your settings.

