Email Authentication with DKIM
This article contains information about what DKIM is and how to use it at IONOS.
What is DKIM?
DKIM (DomainKeys Identified Mail) is an important process for email authentication. It is used to check the authenticity of emails and ensure that they originate from the specified domain and have not been changed during transmission.
In this process, the sender's email server adds a digital signature to the email, which is checked by the recipient's email server. To confirm the authenticity of the message, the recipient's email server retrieves the sender's public key via the DNS and uses it to check the digital signature. The public key is published as a TXT record in the DNS zone of the domain used by the sender of the email.
Together with SPF and DMARC, DKIM reduces the likelihood of your emails being marked as spam and makes an important contribution to curbing mail spoofing and spam.
DKIM is activated by default
If you use the IONOS name servers for your domains, which is the default setting, you do not need to do anything else: Because then we have automatically set up the DNS records required for DKIM signing for your domains.
If DKIM is no longer activated for you for any reason, we recommend that you reactivate DKIM - otherwise your emails may not be delivered correctly. You can find out how to do this in the next section.
(Re-)activate DKIM for domains
For example, if you have deleted the DKIM entries for an existing domain in your IONOS account, you can reactivate DKIM at any time. To do this, add the following IONOS account add the following 3 CNAME entries for your domain:
| Hostname | points to | TTL |
|---|---|---|
| s1-ionos._domainkey | s1.dkim.ionos.com | 1 hour |
| s2-ionos._domainkey | s2.dkim.ionos.com | 1 hour |
| s42582890._domainkey | s42582890.dkim.ionos.com | 1 hour |
Note
To use DKIM with IONOS mailboxes whose DNS zone is managed by another provider, you must set up the 3 CNAME records shown above with your DNS provider.
- Open the DNS settings for your domain.
- Select Add record > CNAME.
- Create the first CNAME record by taking the values for Hostname and Points to from the first line of the table above and entering them in the corresponding fields of the input mask.
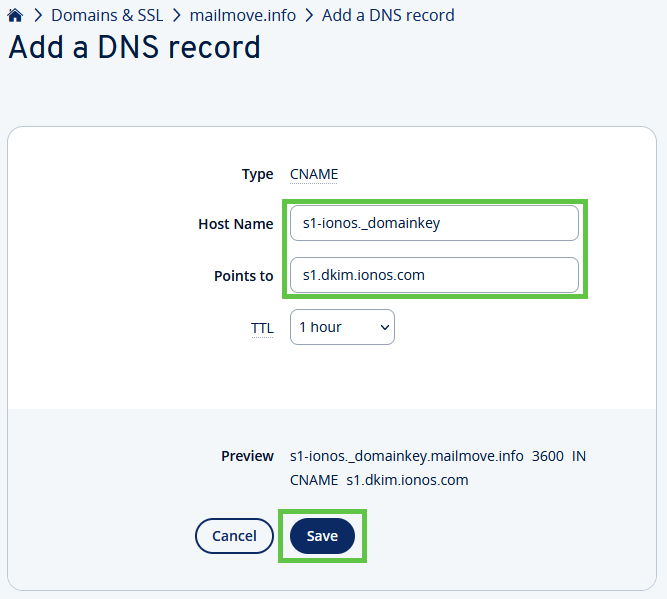
- The TTL is already correctly preset to 1 hour. You do not need to change anything here.
- Click on Save to create the first CNAME entry.
- Repeat the process with the corresponding values for the other two CNAME entries.
Activate DKIM for subdomains
To set up the DKIM entries for an existing subdomain, add the following 3 CNAME entries to your IONOS account and replace the placeholder NAME_DER_SUBDOMAIN:
| HOSTNAME | SHOWS | TTL |
|---|---|---|
| s1-ionos._domainkey.NAME_DER_SUBDOMAIN | s1.dkim.ionos.com | 1 hour |
| s2-ionos._domainkey.NAME_DER_SUBDOMAIN | s2.dkim.ionos.com | 1 hour |
| s42582890._domainkey.NAME_DER_SUBDOMAIN | s42582890.dkim.ionos.com | 1 hour |
- Open the DNS settings for your domain.
- Select Add record > CNAME.
- Create the first CNAME record by taking the values for Hostname and Points to from the first line of the table above and entering them in the corresponding fields of the input mask.
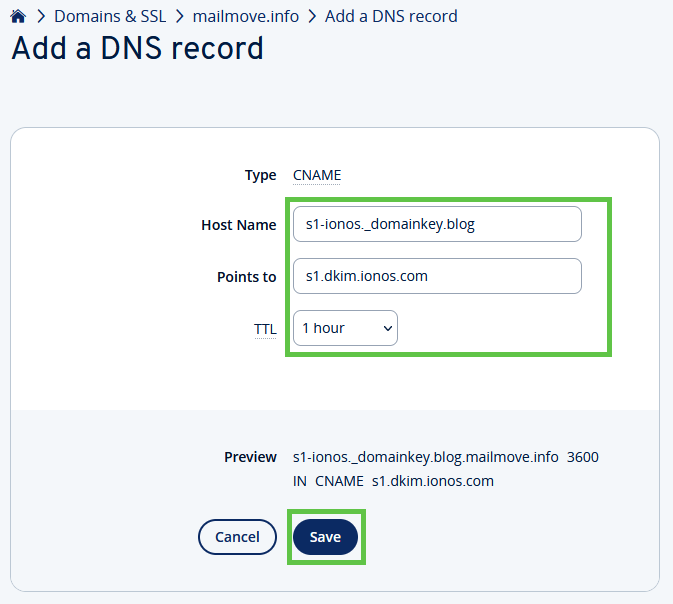
- The TTL is already correctly preset to 1 hour. You do not need to change anything here.
- Click on Save to create the first CNAME entry.
- Repeat the process with the corresponding values for the other two CNAME entries.